mBlock 5 vs Python editor for mBot 2


#1

Hello,

I am new to the field of the microcontroller programming and this is merely a project for my son but I am very compfortable with programming and building software itself.

So I just bought a mbot2 and started playing around with mBlock and the block building programming interface.
While that is a very nice start, after getting used to the features I definitely want to switch to python and use that as the primary development interface (my son is going there with his school activities anyways, so I want to figure it out before he needs it).

As a starting point I used the movement demo and accidently found a button (which I am now searching again) that generated python code based on the blocks. That’s gread to get started! Using that code in the editor was disappointing.
The editor is just a text editor. No autocompletion just syntax highlighting and a bit of easier retyping of already used words.

I was just happy to find out that there’s a dedicated python editor. But now I was the more surprised to not beeing able to use the same code as before due to issues with the event library. There are already some topics about the event library and I read them:


which both are pointing to this topic:

The solution pointed out in the post above does not help either, because the code:

import cyberpi
import time
import mbot2

from cyberpi import event

@event.start
def on_start():
    # Moving function display
    # Upload mode and Live mode are supported.
    cyberpi.console.clear()
    # cyberpi.console.set_font(12) <-- this api is not available with python 3
    cyberpi.console.println("Welcome to mBot2")

will never start. It’s just a different API that does not work on the cyperpi that is shipped with mBot2.

A bit of research just showed that not beeing able to install the event library is due to this beeing a python2 library but the python editor is using python 3.6.5 and there’s no option to change the interpreter for the editor.

Then I found out that if I upload the code without hitting the red Run button, I just works (with the python 2 library and syntax). This is still not good, as we don’t have any autocompletion for not installed python libraries or some libraries will not allow us certain APIs (like the cyberpi.console.set_font ).
My guess would be that the python code is uploaded directly to the CyberPi (maybe the websocket the console just mentions ws://localhost:20101/) and will be interpreted there without any issues.

There are many good python editors available so I would not mind using one of those and setting this up. Found the makeblock article about that:
https://education.makeblock.com/help/program-cyberpi-with-a-third-party-python-editor/

but after reading it (besides that it also suggests installing python 3.6.8) I just did not understand how the program will then be uploaded to the CyberPi/mBot2.

I hope I’m not the only one trying to solve that issue and not just going with the block programming model. From what I’ve seen is possible this can be a fun experience for a long time, but only if I can figure out a convenient setup.

thank you so much for reading and I hope you have some great ideas.


#2

@sheeper Am I correct in assuming that you are using the editor shown below?

Or the one shown here:

I need to know if you are using #1 or #2. Thanks!


#3

At the very beginning I was using #2 “mBlock v5.4.3” (that’s the name of the program in my taskbar), but as this is just a basic text editor with no support during development I turned my attention to #1 the “python editor”.


#4

Ah, I see. So you have the python libraries for cyberpi installed in mBlock Python IDE? Also, try this code (just for a test):

import cyberpi
import time
import mbot2

from cyberpi import event

@event.start
def on_start():
    # Moving function display
    # Upload mode and Live mode are supported.
    cyberpi.console.clear()
    cyberpi.console.println("Welcome to mBot2")

Thanks! @sheeper

If you are asking about how to code cyberpi with a 3rd party editor, that’s not easy. CyberPi is micro-python based, so it isn’t very easy to do things like that. Also, since I have to go (I’ll be back in about one hour, hopefully), you can talk to my rather dumb but OK AI for mBlock here:

https://mblock.zapier.app/


#5

Thank you for the quick reply. Yes I did install the cyberpi library.

I did try it and was surprised that I must have messed up the consolidation of my first test.

Your snipped did indeed work, both with the Run (this is refered to as “Live” mode right?) and Upload.
The console was cleared and it shows the welcome message.

So I tried getting more of the APIs to be used.
With “Live” mode it’s not possible to use the cyberpi.console.set_font(12) line:

AttributeError: 'console_c' object has no attribute 'set_font'

the print from the start hook is therefor not visible.

Then I was adding more of those basic example events:

import cyberpi
import time
import mbot2

from cyberpi import event

@event.start
def on_start():
    # Moving function display
    # Upload mode and Live mode are supported.
    cyberpi.console.clear()
    cyberpi.console.println("Welcome to mBot2")
    

@event.is_press('up')
def is_joy_press():
    time.sleep(2)
    cyberpi.audio.play('hi')
    cyberpi.console.println("move forward 10cm")
    cyberpi.led.on(0, 255, 43, "all")
    mbot2.straight(10)

Works if I just “Upload” but on “Live” mode the movement command is not working. mBot2 is saying “hi” the console output is visible but the bot is not moving. The editors console also directly shows:

AttributeError: module 'mbot2' has no attribute 'straight'

Seeing those difficulties even if one manages to get this example to work it’s not useable as a educational device, right?


#6

@sheeper You can use CyberPi educationally quite well if you wish. You just can’t go outside what the micro-python supports. See the python API docs here:

https://education.makeblock.com/help/mblock-python-editor-python-api-documentation-for-cyberpi/
(Main folders here: https://education.makeblock.com/help/category/mblock-python-editor-python-api-documentation-for-cyberpi/).

Yes, this is typically called Live Mode.


Generally, a console is not for formatted text (e.g., think of a browser console), so there is not much need to change the size or anything. To do things like this, you can use labels.

cyberpi.display.show_label(message, size, x, y)

Displays a text in the specified position of CyberPi’s screen

Parameter:

message: str, text to be displayed, such as hello
size: int, font size of the text to be displayed; setting range: 16, 24, and 32
x: str or int, position where the text is to be displayed
When x is str, the options are as follows:

top_mid: in the upper center

top_left: in the upper left

top_right: in the upper right

center: in the center

mid_left: in the middle left

mid_right: in the middle right

bottom_mid: in the lower center

bottom_left: in the lower left

bottom_right: in the lower right

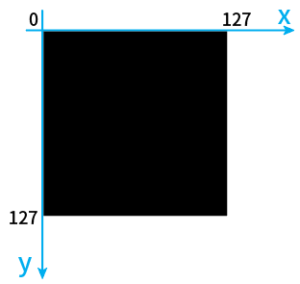
When x is int, the value ranges from 0 to 128, indicating the x-coordinate of the upper left corner of the text.

y: int, y-coordinate of the upper left corner of the text; setting range: 0–128
The following figure shows the x- and y-coordinates defined for CyberPi’s screen.

image

Example program

import cyberpi
cyberpi.display.show_label('cyberpi', 16, 'center')

Or:

import cyberpi
cyberpi.display.show_label('cyberpi', 16, x = 64, y = 64)

Good luck!


#7

I don’t mind using the micro python subset for programming.
If the IDE is working it can be mBlock, even though one got to admit - writing IDEs is difficult, so why have your own if one can profit by just providing the tools to use any IDE there is.

But having no autocompletion at all or having a randomly broken completion are both bad choices. Not to talk about navigation between functions, refactoring of linter support.

I know some are advanced topics, but others are realy basic to not loose the fun quickly.

When asking your bot, it stated that one might be able to use the Arduino IDE, is that realy possible?

Best_codes makeblock Forum AI Bot

If you prefer to use a different editor or IDE to write code for your mBot2, you can still do so by leveraging the Arduino IDE and the Makeblock library. Here’s how you can set it up:

  1. Install the Arduino IDE: Download and install the Arduino IDE from the official Arduino website (https://www.arduino.cc/en/software). Choose the appropriate version for your operating system and follow the installation instructions.

  2. Install the Makeblock library: Open the Arduino IDE and go to “Sketch” > “Include Library” > “Manage Libraries”. In the Library Manager, search for “Makeblock” and click on the “Install” button to install the Makeblock library.

  3. Connect the mBot2: Connect your mBot2 to your computer using a USB cable or via Bluetooth. Ensure that the mBot2 is powered on.

  4. Select the mBot2 board: In the Arduino IDE, go to “Tools” > “Board” and select the appropriate board for your mBot2. It is typically “Arduino Nano”.

  5. Select the correct port: In the Arduino IDE, go to “Tools” > “Port” and select the port that corresponds to your mBot2.

  6. Write your code: In the Arduino IDE, you can now write your code using the Makeblock library. Refer to the Makeblock documentation for the available functions and syntax.

  7. Upload and run the code: Once you have written your code, click on the “Upload” button in the Arduino IDE to upload the code to the mBot2. After the code is uploaded, it will start running on the mBot2.

Cause I was stuck at step 4 and did not want to mess up anything by just trying.


#8

@sheeper Explain to the bot that mBot 2 uses Python :roll_eyes:. It isn’t that smart, although you could maybe do it? If you want to write your codes in something else, I would use VS Code and then upload it with mBlock. VS Code is free and really nice.