Robot Tank Enhanced


#1

Hi,

I thought I could share some impressions of my modified Robot Tank, built mainly from the parts of an Ultimate Robot Kit. The original design of the robot tank tended to throw tracks when in outdoor use, e.g when used on grass. So I wanted some smaller guidance wheels between the two main wheels. For this I needed to enhance the length, so the carriage consists now of two connected beams and have a length of 208 mm (13 raster units). This design is pretty agile on turns and climbs well over steps. An earlier model, based on two 160mm beams tended to topple when driven over obstacles. It does not throw tracks any more and drives best on “speeds” between 40 and 80 (speed settings in the program). Extra parts needed: 4 Timing Pulleys 62T, Shaft collars, Threaded Shafts and Flange Bearings.

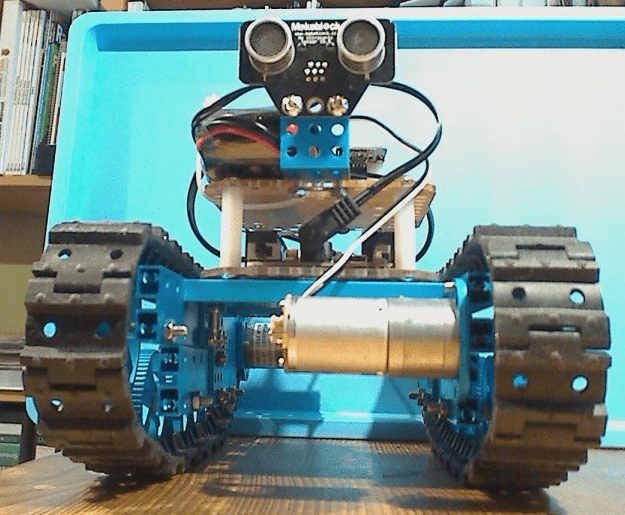
The extended length also allows for the battery unit, in my case a rechargeable 11.1V (12.6V peak) Lithium-Polymer accupack (3400 mAh) to be placed underneath the casing, between the undercarriage beams. This should lower the CoG and improve the driving characteristics even more (The images show the power pack still on top of the casing).

So far the robot is equipped with Bluetooth and Ultrasonic modules. The next project will be to include a gyro, in order to allow feedback of the position and use the robot as autonomuous reconnaissance tank, as well as predictive turns (e.g. 90 deg). If somebody here already has experience with MeGyro module, please let me know. I found some really good tutorials about how to use gyros but nothing replaces experience.

Cheers, Stefan


#2

Cool design! I’d like to get a battery like you have there. Can you please provide a link to where I could get one? Thanks!


#3

Trapsis,

Beford applying such accupack to makeblock electronics, be aware that you risk your warranty. The specs usually exceed the specs for makeblock, so you may well fry your electronics.

Batteries are not sent via airfreight (hazarduous), thus you can not import them from a foreign shop. Just google for the specs and find a retailer or shop in your country. These accupacks are normally used in RC cars and other models. I live in Norway, so I visited a local modellers shop in Oslo and talked with the guys. In Germany, CONRAD would be first choice. Other countries I don’t know. I you are living in the US, search the makeblock forum, I remember an amazon link posted here, some time ago.


#4

Hi

Nice looking robot!

Can you tell a little more detail on what parts I need to order to add the extra “wheels” and rails to use? Adding the 3 on each side really adds to the look.

TIA

Jim


#5

Hi Jim,

just read the first article in this thread again, it is all listed there :wink: .

Cheers,
Stefan


#6

Hi

I did…but I think the issue is I have the starter kit and you have the ultimate kit (which is a very nice kit, but I couldn’t afford it). I bought rails that I thought was correct, but they are not. Can you please give me part numbers you’re using for the rails that holds the larger “gears” and the smaller “gears”. I think I have everything else.

TIA -

Jim


#7

Ah ok, I see…
The Makeblock system is based on a raster of 16 mm. The second part of the part names equals the part’s length in mm, in steps of 16 mm.

As you own a starter kit, you have the rails for the smaller gears (0824-144), with 9 holes.

You will also need:

  • 2 x 0824-128 (8-holes) --> these form the upper beam, for the large gears.
  • 2 x 0824-080 (5 holes)–’
  • 2 x 0824-096 (6 holes) -->you need a second beam to hold the electronics.
  • 2 x Plate 3 x 6 (to connect the upper and lower beams).

All these come in sets of four, so you will have some spare parts in the end. However, just add them to your collection and use them for your own ideas/solutions. You can never have enough spare parts with these systems :smile:

Have fun with your enhanced tank! One more tip: Keep the Center of Gravity (CoG) as low as possible, otherwise your tank will probably run a bit unstable when large velocity changes occur. It may be a good idea to mount the battery pack below the cross-beams, which hold the “payload”.

Cheers, Stefan


#8

Thank you!

Jim


#9

great design, love it! will try to replicate a bit later (my son and i are still playing around with the starter kit tank bot). i’ll also think on how to get those smaller wheels on springs to better follow terrain. or maybe to rethink the suspension entirely.


#10

OK, in the meantime I have partly redesigned this robot, although the general design has not changed. See here the images of “Version 2” enhanced robot :slight_smile:

Probably the most important change: The battery (a 11.1V (12.6V peak!) LiPo-accu went to the undercarriage, which allowed for a generally lower design and enhanced the movement characteristics, as the CoG went far down, reducing the danger of toppling.

The robot is now equipped with a gyro sensor (the one in the middle, on two stents), which allows it to keep it’s course straight. I also added a short micro-USB to USB cable, which makes it easier to connect to the IDE.


For the next step I plan to make the robot a bit longer, to allow the mounting of some serious payload. This would then also mean to have 4 or 5 pulleys either side, instead of the three, I have now. Then I want to integrate a damper system, but did not yet find a good way to do so. Ideas are appreciated here :-).

At this moment, the robot is driven by a self-made Bluetooth control sketch, which connects to a BT app on Android. This is described in a separate thread. Thus, the sensors are not used at the moment, but my next step on the software side will be to add a “auto-drive” mode to the sketch and allow easy toggling between both modes “on-the-fly”.

Have fun!


#11

So impressed with your idea that I started building a modified tank for the base of my robot . I’m running four motors, each driving a set of tracks and a Raspberry pi to power and control the base.


#12