How to upload code into the mBot


#1

Hi there,
I’ve got the mBot for my kid days ago. We are learning how to use scartch to do programming but now we are stuck in uploading the code into mBot.

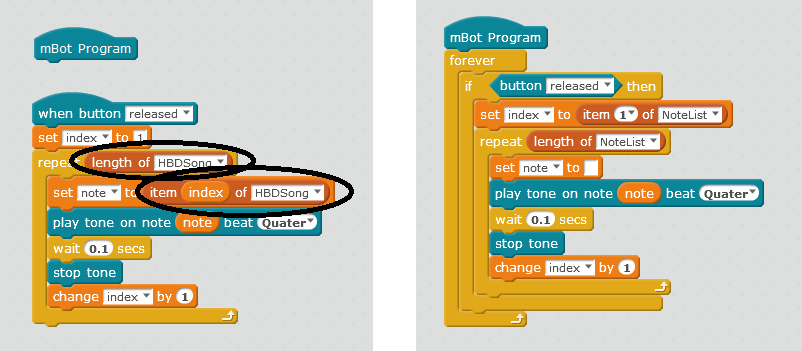
I have the USB connected to the mBot. I create a code to play some notes when the on-board button is pressed. It works pretty well if I have the mBot connected with the mblock (windows 10) by USB (COM3) or bluetooth. With USB cable still plugged on, I try menu->connect->upgrade firmware. I am not sure but I think that will upload my code into the mBot. But after I unplug the USB, the code doesn’t work. The will flush out the default program which was working with remote control before.

Also, I try to reset the default program, this is upload the original kernel into mBot but then my program will be flushed out. So how do I upload the code, make it work without USB or bluetooth connected?

Also, if I want to keep the default program but extend it with my code, how do I do that?


Getting started
#2

uploading/updating firmware can only be done via USB.
When you have a mBlock program ready to compile and upload to mBot, then you right click on the mBot program Event block and it should offer an ‘upload to arduino’ option and then a new panel will appear on the right. click on the upload button and it should show the compiling and upload progress.
Here is another thread on this topic: http://forum.makeblock.cc/t/mbot-factory-settings/1151


#3

Extending the default program is discussed here: http://forum.makeblock.cc/t/source-code-for-the-default-program/1526/3
I have the A part done and working on B right now.


#4

Thanks danjger. In my code, I put the “when button release” event (from Robots tab) to trigger some code to play notes. It works well when the mBot connected to the computer via USB or bluetooth. However, if I want to upload that to arduino in the way you mentioned, I didn’t see the option ‘upload to arduino’ by right clicking on the “when button” block. It seems that it only work if the code contains the “mBot Program” block. I tried that, right clicking on the “mBot Program” and click on ‘upload to arduino’, it shows me an arduino panel but with default function defined only. It didn’t put the code for “when button” there. Do I miss anything?

I look at your code for extending the default program. It seems that I need to create a forever module to keep the mBot Program to run forever. But I still have a question on the customize list. I create a list to hold all notes being played. I test it in mblock, working good. But when I put them under the mBot Program block and rename the list to something else. It doesn’t work. It said unsupport block. I wonder if the list is not supported by mBot program?


#5

Yea, apparently the list blocks are not yet compatible. We discussed this in this other thread as well and I hope the moderators realize this is broken


#6

Got it. I appreciate all those information. It helps.


#7

I try to upload code like you described, with my USB plugged into the serial port. I get an error message that my serial port is not connected. What am I doing wrong?


#8

be sure to power on the mBot first, wait a second then select the correct serial port from the connect -> serial port menu. Wait a few seconds (an LED on the mBot shoudl blink a bit and then the text at the top of the mblock window should say Serial Port ??? Connected


#9

Sorry, but I still need clarification. Are we talking about the serial ports on the mbot or on my PC? The mbot has only one slot for the USB cable, and that port is not named.


#10

I figured it out by trial and error - it’s COM8 in the mbot. I wish there were more documentation to take the guess-work out of it.


#11

I appreciate your help. When I update the firmware, the LEDs work, but then the remote stops working. When I restore the default program, the remote works, but the LEDs stop working. Is there a way to make a real fix, or this is the best it is going to get?


#12

Updating firmware will clear the memory and allow you to load your own programs.
restore default program will wipe out anything you have loaded and only have the “A”, “B”, “C” remote program.
What about the LEDs is not working?


#13

If you do want to upload the programs to the mBot via the Arduino you will probaly have to reset the mBot afterwards because the remote control & app will not be able to control Mbot anymore
to Factory reset the mBot do this:

A. Plug in the USB Cable to your computer 
B. Click on "Connect" --> SerialPort
C. Wait a while until you see your USB cable COM Show Up in the Serial Port (For me my USB cable is COM 4)
D.Then Click on "Connect" again then you should see the "Reset to Default Program" show up click it
E. Wait until it's complete and your mBot will be reset! (so you can use the App  & Remote control again!)

#14

In another thread, some users were reporting that only LED2 works when programmed (LED1 did not), and that programming red gives you green, programming green gives you blue, and programming blue gives you nothing. I had the same problem, and solved it by upgrading the firmware. The problem was that updating the firmware made the remote stop working.


#16