How to run multiple tasks?


#1

Hi,

I am very new to Scratch/Arduino programming so please forgive me if this is very simple to do. How can I program the mBot to listen/process multiple tasks at the same time?

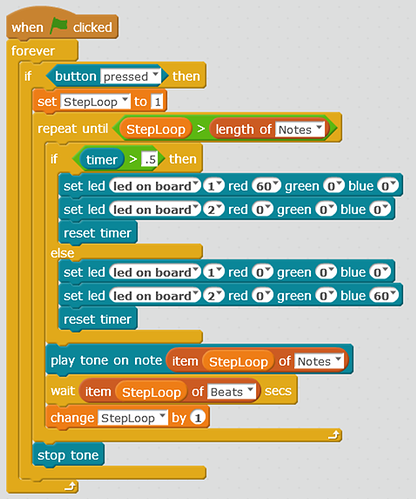
I have attached a screenshot of my code below. I am flashing the on-board LEDs and if the user push a button, it would play a song.

Two problems I am having. 1st) When the song is playing, the LEDs are no longer flashing. I would like the LEDs to continue to flash while the song is playing. 2nd) If the user pressed and released the button before #2 starts, it would not play the song. I would like the mBot to play the song once a user pushed the button and not have to wait until after the 2nd LED to flash.


I am trying to put together some training lessons for a group of kids (ages 6-9). Starting with LEDs and then move on to the sound, input from button, etcā€¦ If you have some codes that you can share with me, please let me know.

Thank you!
Hin


#2

Please contact via email support@makeblock.cc to get help, we are on national vocation now. Sorry for your troubles here.
Una


#3

The only way I know of is to use a timer and an interrupt handler. The C runtime does not have support for threading.


#4

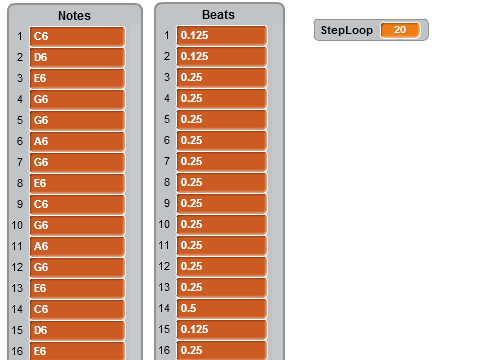
I have a possible solution, but I donā€™t have an mBot to test with. It is not so much multitasking, as it is concurrent (nested?) running. I got part of the idea from chuckmcknight on this link Changing notes on the speaker

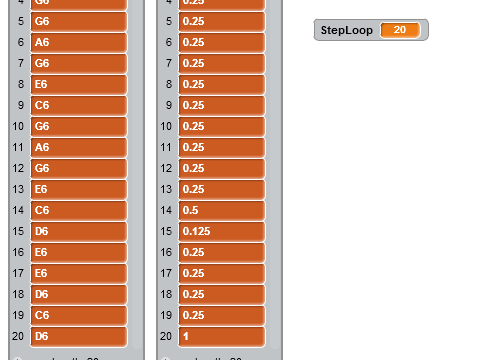
and the rest of the notes

If someone in the community could help test this and let me know how it works, I would appreciate it.

Mike


#5

Looks great! Why not buy a mBot to test on your own? I can offer some discount for you.


#6

upload the .sb2 file and I can test.
The first thing I would do is change the ā€œwhen (flag) clickedā€ to ā€œmBot programā€.
Since your beats are fractions of the led flip-flop it should work. It will have better timing when uploaded to arduino versus running from scratch but I can test both ways.


#7

The arduino UNO doesnā€™t have any hardware threading or multitasking capability unless you write one in software but that isnā€™t the same thing. You really donā€™t get that luxury in this type of hardware. You can move to Raspberry Pi for that kind of work but there are other trade offs.
Interrupt handling might work but all other processes block during the execution of the interrupt
https://www.arduino.cc/en/Reference/Interrupts
you would have to limit how long the interrupt handler executes to simulate a multi-threaded system.


#8

danjger,

Here is the file Concurrent.sb2 (75.7 KB). let me know how it works.

Mike


#9

mddickey,

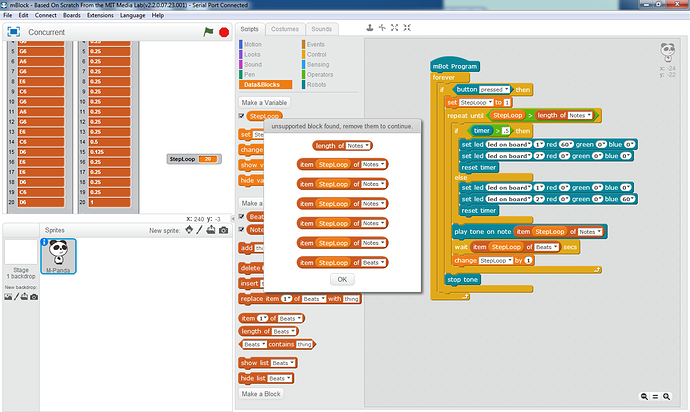
Thanks for providing the sample file. I tried uploading the code on my mbot but was unable to. I got the following error message: unsupported block found.


#10

I got the same thing using mBot, but not when I used ā€œwhen flag checkedā€. When I tested it without the button, ConcurrentWithoutButton.sb2 (75.7 KB), you can see it looping through both lists. I also want to note that Data&Blocks Lists do not seem to work under any Robot Extensions (could this be a bug?) Here is another test I did ConcurrentWithoutButtonOrLists.sb2 (75.7 KB). Again, this seems to work, but other then flashing the LEDs, not much.

Mike


#11

I canā€™t use the list operations on mBot.
It is just the list operations that donā€™t seem to be supported with the current version. Letā€™s see if @peterlee or @una or @Pioneer or any other Makeblock staff knows the status of that support.
We need to get the arduino upload to support the list operations.


How to upload code into the mBot
#12

The second program you uploaded just sits on the right led blue forever.
Iā€™ll have to look at it more closely tomorrow.


#13

ok I changed the note from 10 to C4 so I could hear it beeping. The leds donā€™t change because the timer never gets over .35
I edited the code slightly to see the value. Iā€™m not too familiar with how the timer works so more experiments to come.
.


#14

Once you replace the When Clicked block, it no longer likes lists. No code generation for it.

The timer starts at zero when the mBot is started and increments in milliseconds. The reset timer starts it back at zero. :slight_smile:


#15

This is a possible solution to you problem.

Run two mBot Program blocks and both will run at the same time.

The LEDā€™s will flash constantly no matter what the button state is.

When the button is pressed the LEDs will continue to flash and the tune will then play.
Note: the tune code could exist in the program on the left instead of running it as a Function. Itā€™s just easier to break things up into sub-programs and solve them in isolation.

Hope this helps


How do I make my mBot follow a line and avoid an obstacle?
#16

Thank you Tards57! I tested your code and I was able to run the two parts some what simultaneously. There is a slight pause between each tone and the flashing led but it will work. I cannot believe it was this simple. LOL!

Thank you again.


#17

Hi @Hinlee,

the reason for the short pause between the tone and the flashing LED is you are using the delay() command.
delay() blocks the arduino completely during itā€™s runtime, not allowing anything else to be performed while waitng.

The Arduino Uno does not allow real multitasking, as explained above, but there is a replacement for delay(), which does not block the Arduino: --> millis().
The ā€œMultitasking the Arduinoā€ Tutorial on the The Adafruit ā€œLearn Arduinoā€ Site describes how to perform software multitasking on an Arduino Uno, using the millis() command. Basically you write your own time management. The tutorial is written for the Arduino IDE, but with some imagination you can easily adopt it to your project. Not sure how the millis() command is implemented into mBot, but may be Timer would be the appropriate block?

Please see also This thread here in the forum, which also discusses multitasking.

Hope this helps,

Stefan


#18

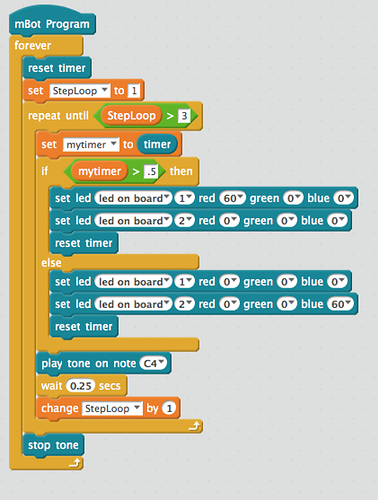
I did a bit of minor multitasking using the timer. Iā€™m still new to this, but it does seem to work.


#19

I am doing the same thing with kids in the same age group. I found that just letting them play with it and introducing some programing concepts along with a simple ā€œchallengeā€ has worked well.

1 make your robot dance
2 make your robot roll in a strait line after the button is pressed for an apx distance then spin stop and beep repeat 5 times.

Weā€™ve only done the 2 so far as we only got them a little while ago, but itā€™s been fun so far. Iā€™m going to try to make a guide with the challenges in it along with one way to do the code in mblock.

If anybody has any additional challenge ideas Iā€™d love to hear them.


#20

I was curious about what happens when you use the reset timer / timer objects in mBlock so I set up the following sequence:

mBot Program
reset timer
set Timer to (timer)

where ā€˜Timerā€™ is a variable I declared.

I saw the following code generated in the Arduino environment:

#include <Arduino.h>
#include <Wire.h>
#include <Servo.h>
#include <SoftwareSerial.h>

#include <MeMCore.h>

double angle_rad = PI/180.0;
double angle_deg = 180.0/PI;
double Timer;
double currentTime = 0;
double lastTime = 0;
double getLastTime(){
    	return currentTime = millis()/1000.0 - lastTime;
}

void setup(){
    lastTime = millis()/1000.0;
    Timer = getLastTime();

}

void loop(){
}

so it appears that the getLastTime function is using the millis() function so that will be non-blocking.