Trying to understand the Extension Builder's coding concepts


#41

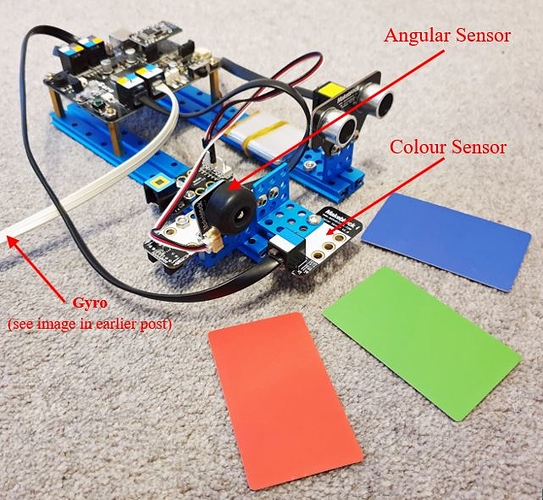
I though you might like to see the simple test rig that I am using for my extension block experiments:

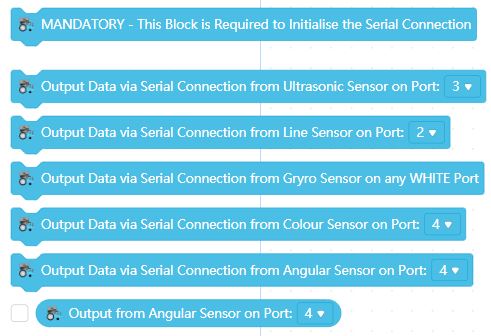
… and I now have created the following blocks:
Extension%20Blocks

Strange that Makeblock never got around to creating a library for their useful Me Angular Sensor? - but the Gas Sensor library can be used for this purpose:

This sensor returns values from 0 to 1024 which in 360º = 2.84 units per degree of movement - so I created the following transcode to return output values in both degrees & raw numbers:

Sadly, I’m still no further on with getting the correct RGB values output from the Me Color Sensor.


#42

Wow! That looks pretty crazy!


#43

A final analysis…

…After three months of hard work, I think that it is time to bring this rambling post to an end. I do think that I have pushed my exploration of the Extension Builder as far as I possibly can; and in reality I have achieved much since I can now make and publish block extensions of my own.

What I have found (and I have carefully studied all of the Extension Builder help files and programming examples) is that I didn’t gain a great deal from any of them. I also trawled my way through every post on this Forum referring to Extensions and whist they were not always clear, I gained the odd bit of guidance from some of them.

Sadly, whilst some Forum members ‘liked’ what I was attempting, no one actually contributed any insights into their own attempts at extension creation. In reality, I gained the most from just experimenting over-and-over-and-over again with the software until things began to work. My usual method (as documented earlier in this post) was to create a sequence of coding blocks to do something that I wanted to happen in mBlock 5 (in Upload mode) and then take the resultant Arduino C sequence transcoded from those blocks and paste it into mBlock’s Arduino Editor. Here (as I had done when teaching myself the rudiments of Arduino C) I could edit and play with the code and then upload it into whichever robotic mainboard I was using to test if the sequence ran OK.

From then onwards, I could then take that code and paste it into the Extension Builder to try to encapsulate that code into a single block. Simple, but not without not knowing which of the transcoding editor windows (include, lib, declare, setup, code or _loop) should be used for which bit of code - and more importantly, why! There was much trial-and-error testing here. Since I couldn’t find any real guidance anywhere, I still know nothing about the many other programming options available in the Extension Builder software: uploading middleware, extension event handlers, widgets, snippets etc. etc. I know nothing either about adding API commands and it is now clear to me that Extensions can only be written for use in Upload mode and not in Live mode and sadly not at all for manipulating Sprite graphics - if only that were possible!

There seems, rather encouragingly, to have been many readers of this post so I do hope that my recorded journey into the land of Mext has been of value to others.

#44

Sorry, for not really helping, @CommandeR. I like your posts to show my support for you, but I have so many things to do and only about 30 minutes a day to do them. I genuinely try to help; I just can’t sometimes. Please forgive me.


#45

Thanks - I’ve moved on…


#46

It is not true that it is not possible to create extensions that function not only in Upload mode, but also in Live mode. The extension “Advanced Arduino” I created works in both modes (blocks of the “Advanced Pins” category). Moreover, you can add the device “Common UNO Device” and make sure that it also works in both modes. But it’s not scary that creating such extensions is difficult (since the developers tried to complicate the solution of this task as much as possible). A really valuable tool that works well and allows you to control sprites is the extension “Upload Mode Broadcast”.


#47

Hi a1egr0

Thanks for your considered response - I’ve received very few on this topic. Your “Advanced Arduino” extension looks good and you are essentially correct, some things are possible in both modes, but nowhere as much as I would like to achieve.

Did you not notice my image of my Lab-Pack ‘Stage’ screen earlier in this post communicating with Devices?
I am therefore totally au fait with the concepts of the extension “Upload Mode Broadcast”.

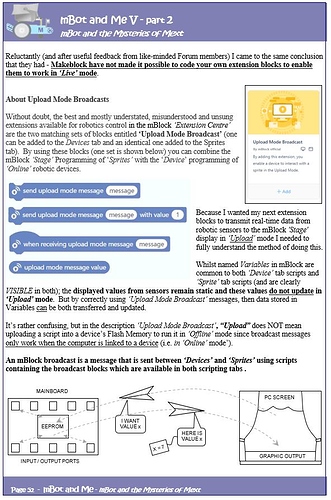
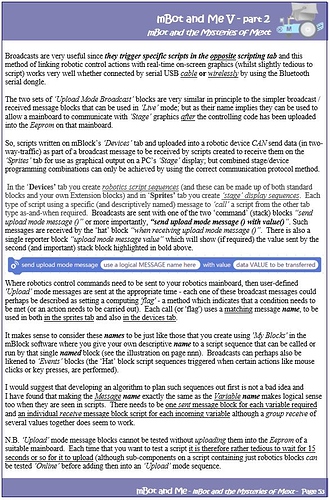
For the benefit of others on the Forum who might want to know more, see my musings on “Upload Mode Broadcasts” below:


#48

Hi, CommandeR,
I’m sorry, I didn’t look through this whole thread. I agree that the “Live” mode in the mBlock 5 environment works very badly (unlike the MindPlus environment, for example). By the way, you can use the extension “Serial Broadcast” with the application “Serial Broadcast PC” instead of “Upload Mode Broadcast” (or the combination “Serial Broadcast” plus “UART Broadcast”). In this case, there is no need to click on the “Upload” button every time after opening the project.


#49

Hi

At last, someone working on something similar & giving something back to the Forum. Thanks for the info. I’ve just had a quick look at "Serial Broadcast PC” and have downloaded the two mext files to study later. Had a very quick look at your “Uart Broadcast” extension too.

Much appreciated

Lindsay


#50

Thanks, I’m glad I was helpful. Do not forget that in order to use the “Serial Broadcast” extension, you also need to download and install the application from the developers’ website.


“UART Broadcast” uses hardware serial instead of software serial.
I hope you enjoy my extension “Advanced Arduino” as you get to know it better. I have posted a number of examples on how to use this extension.
https://goo.su/AAE_mBlock


#51

Hi @a1egr0

Sadly, my system tells me that the goo.su/ website has a Trojan …


#52

This website only allows you to create short links that are easy to use. Perhaps someone is linking to Trojan sites. You can use the direct link to the extension description:
https://drive.google.com/drive/folders/1wW9ycuSCNfIi6vabLJtssYoy8NoDFZ4a


#53

Thanks - This link works fine.


#54

Hi @a1egr0

I really am in awe at the scope of what your comprehensive extension “Advanced Arduino” can achieve. I haven’t really used it yet since I don’t often programme Arduino boards other than Makeblock’s own, but I DO recommend this to all Forum followers - do take a look everyone!

Lindsay


#55

I am very grateful to you for the appreciation of my work. The extension “Advanced Arduino” was created for my own needs, including so that schoolchildren could effectively participate in robotics competitions. I started development back in 2018, in the mBlock3 environment, so this is a project that has been verified by time and practice. By the way, many extension options are also in demand when programming Makeblock controllers, for example, using arrays, typed variables and functions, etc.


#56

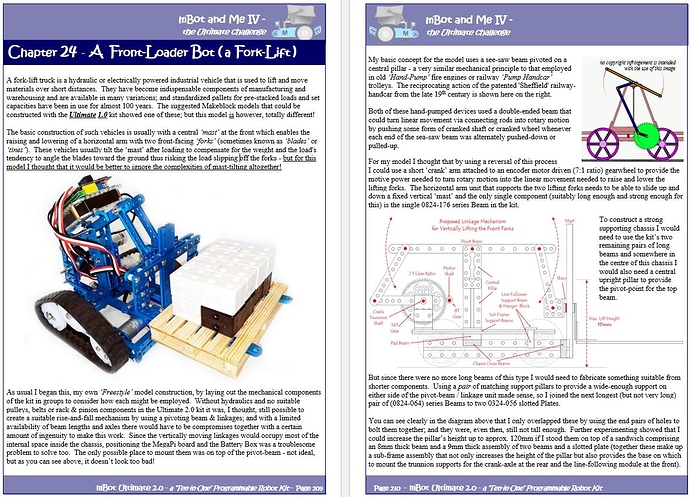
Refreshing my post especially for @Mack13 @AngieGrams and others to check out…

… thought you might like to see these book pages too.


#57

Nice! I’ve included the Robotic Arm Add-on Pack for mBot and mBot Ranger in my order. It and mBot Ranger are slow to ship; mBot neo has had a shipping label created. Wonder which will arrive first. . . .

In any case, the interchangeability that started my posting on this forum is what I’m hoping will be a possibility so the three grands can work with each other’s models in a creative way.


#58

Seasons Greetings Makeblock Lovers
Ho%20Ho%20Ho

May all your creations work as intended.


#59

Thanks! Merry Christmas!


#60

Hi Everyone

I’ve just returned to documenting my extensions experiments after a forced break from such things; and when I reopened my test file in the Extension Builder (see Sept 22 onwards - facilitating real-time data transmission from sensors ) I just happened to noticed that the four names in the list of ‘Supported devices’ for my blocks under the ‘basic information’ tab. had changed - see below:

image

I had entered these device types to ensure that all of my new extension blocks were compatible with mCore, MegaPi, Orion & Auriga ; the ‘first-generation’ of Makeblock’s mainboards.

auriga was no longer there. charioteer had been substituted and ‘Auriga’ was no longer to be seen in the drop down list of ‘Supported devices’ .

Has anyone else come across this. I cannot find any reference anywhere on line to Makeblock changing the device name - so strange that this has not been documented!