That’s awesome!  I’m so glad for you! I’ll try it now.
Trying to understand the Extension Builder's coding concepts
CommandeR
#33
Reluctantly (and after useful feedback from like-minded Forum members) I came to the same conclusion that they had - Makeblock have not made it possible to code your own extension blocks to enable them to work in ‘Live’ mode.
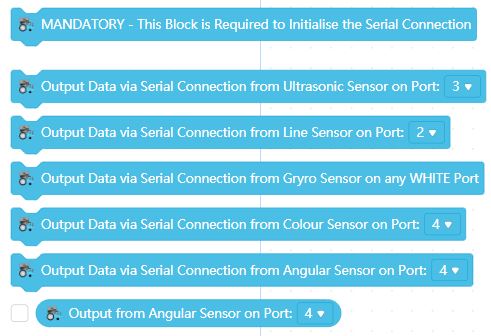
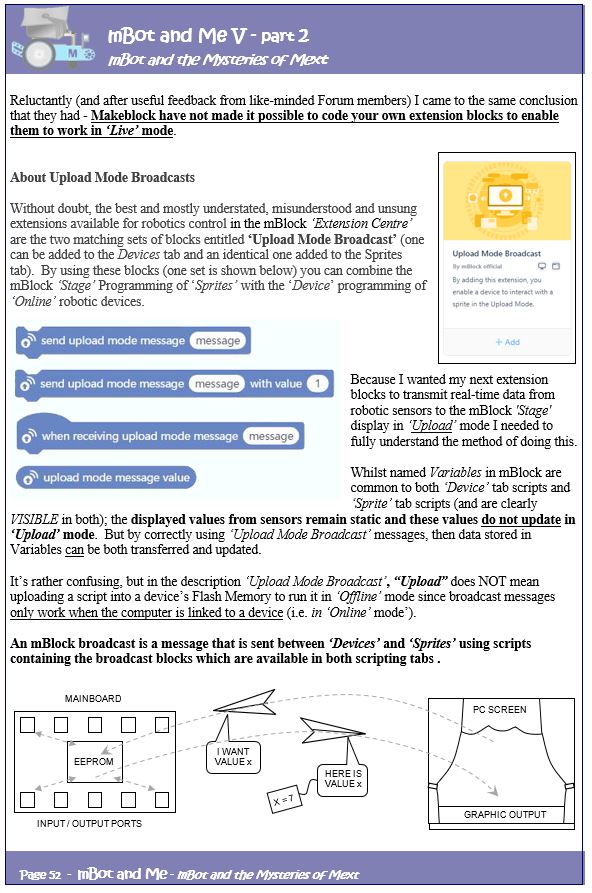
So, I have moved on from what was a dead-end line of investigation to creating a new Extension - not just for mBot but for all ‘old-style’ Makeblock mainboards (Orion, mCore, Auriga & MegaPi) and the blocks that I am creating here can transmit real-time data from commonly used Makeblock sensors to show feedback output on the mBlock ‘Stage’ display.
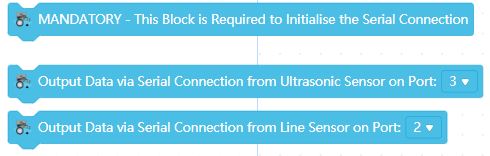
These blocks have to work in ‘Upload’ mode and therefore require the use of the ‘Upload Mode Broadcast’ extension which is commonly available for these devices in the mBlock ‘Extension Centre’. So far though, these blocks work OK (but with some limitations on what you can do with the output).
The two ‘Output Data’ blocks do all the work of getting the value of each sensor and then broadcasting the value to a receiving script on the Sprites ‘Stage’.
CommandeR
#34
I should have mentioned in the post above that the ‘Upload Mode Broadcast’ extension must also be added into the blocks palette of the Sprites tab. But this only has to be done once, since if a mBlock file is saved then the extension remains with the file and will be seen again in the Sprites blocks palette whenever the file is re-opened - has anyone any idea why adding this extension also, for some strange reason, activates the ‘Teachable Machine’ extension too? The Devices tab extension (equally strangely) does NOT however remain in the file when saved and it must be added every time to an extension like this (which requires its use to work) whenever it is opened.
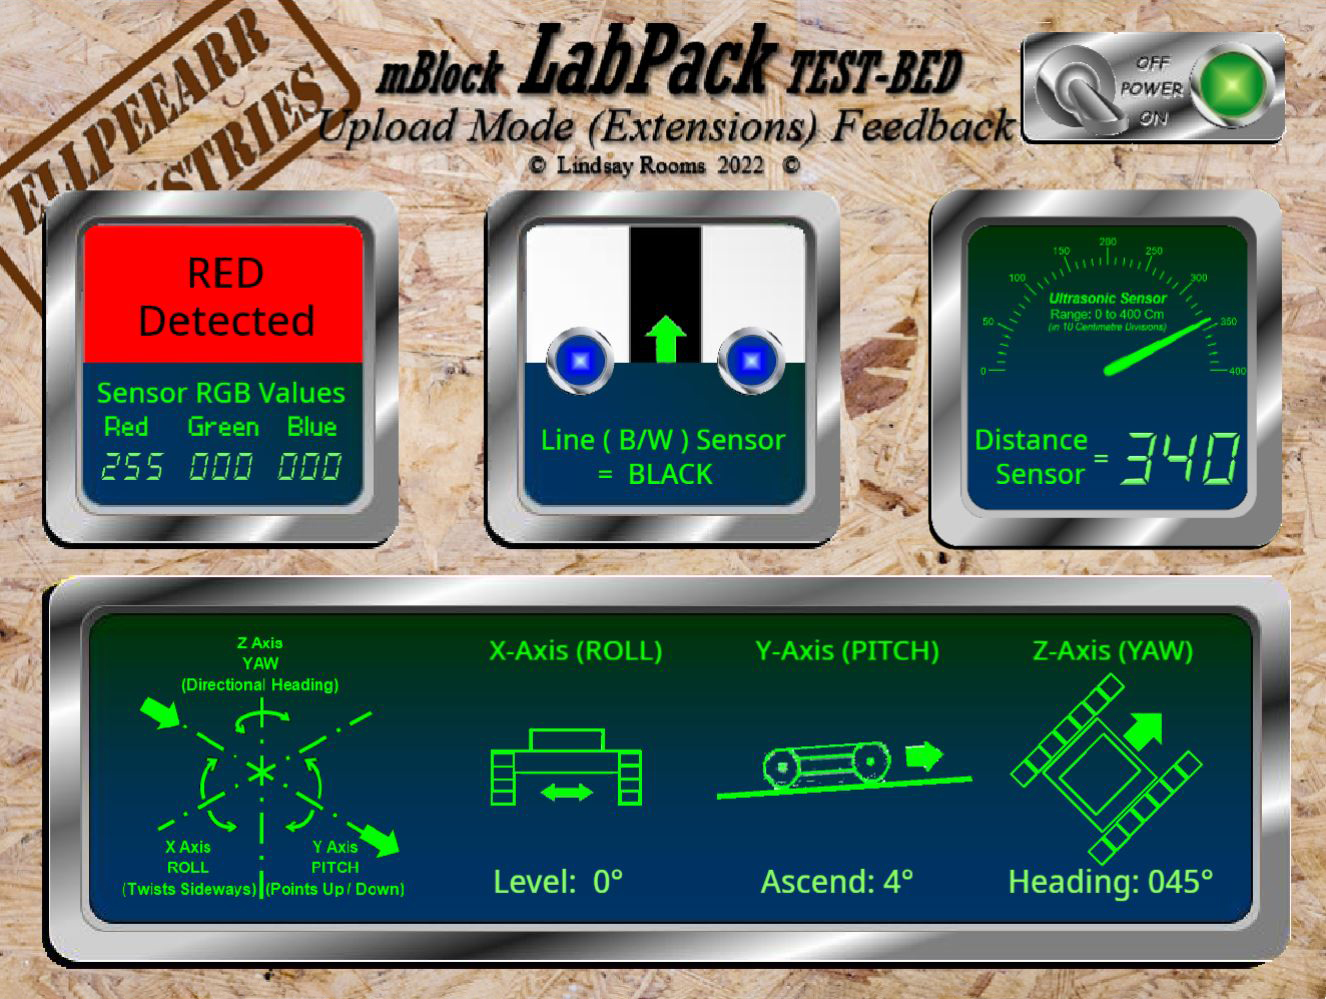
The blocks shown above do work OK and do report back output from the ‘standard issue’ ultrasonic and line sensors; but only when tethered (connected by a serial USB cable) - they do not work when connected wirelessly using theBluetooth Serial dongle. The ‘Stage’ output is returned in variable monitor read-out windows (but only if the variable is ‘ticked’ in the blocks palette) and the useful and unclutterd ’large’ (but orange) output read-out is the best one to use here. N.B. Monitor read-out windows take on the colour of the block generating the output and ‘Variables’ blocks are orange.
However, I wanted to use in ‘Upload’ mode the same methods that I had used before in ‘Live’ mode to create output screens that could display feedback values of any size or colour.
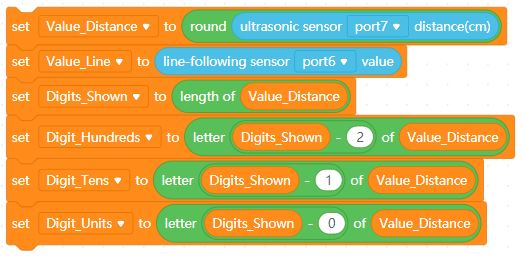
In mBlock I created blocks that could break up a returned variable containing sensor output into individual hundreds, tens and units values which could then be used to choose a matching sprite costume - so simple to do when you know how. For more guidance on this, its in my original book ‘mBot & Me vol I’ - you can download this (free) via the following link:
https://education.makeblock.com/resources/res-mbot/56549/
The blocks shown above can be transcoded and used in extension block transcode (Arduino C):

In my experiments with Broadcast messages which could send data from the ultrasonic sensor back to the stage in ‘Upload’ mode I eventually realised that the values shown for each digit returned were always in the region of 49, 55, 56 etc. and after much fiddling with the Arduino C code lines and many repeated uploads I worked out - eventually that these values were being returned in ASCII Decimal format e.g. 0 (zero) was being returned as a value of 48. Once I had established this fact then I simply used the method (sensor_value _returned - 48) to fix the problem with each line of code.
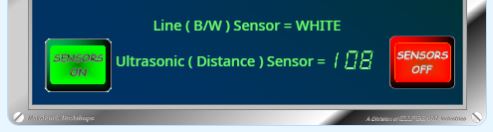
Now, the ‘Stage’ display had individual digits to use and at last I could produce real-ime graphic output such as that shown above. The work goes on with the adding of more individual sensor blocks to this extension and I will publish it eventually…
CommandeR
#36
Yes progress is being made - I’ve just been waiting for the Forum to return to normal loading speed again.
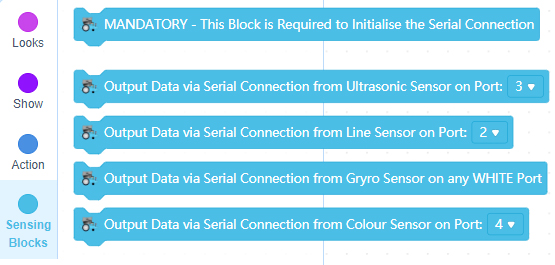
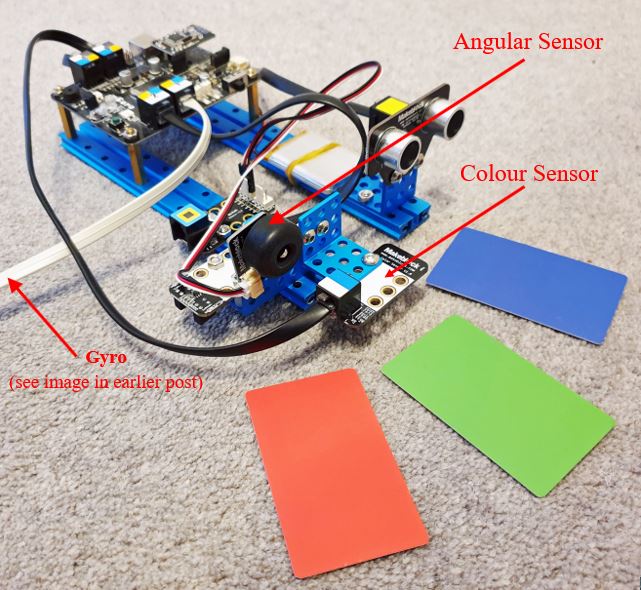
I have now added two more extension blocks to my Upload mode experiments. In addition to the Ultrasonic and Line Following sensors I have now added a block for reading the Me Colour Sensor and the Me Gyro sensor. This last block works OK but not as good as the extension created by @Dr.K (Dr. “Kilo” Watt).
I have been experimenting (as you can see in the image below) by extracting data from these extension blocks and displaying graphical feedback updated in real-time on the mBlock ‘Stage’ without having to resort to the standard, and somewhat limiting mBlock ‘variable monitors‘.
If you want to know how to create output feedback screens like this, there is some guidance in my original book ‘mBot & Me vol I’ - you can download this (free) via the following link:
https://education.makeblock.com/resources/res-mbot/56549/
I have also been looking in some detail at using feedback from the Me Gyroscope module and despite guidelines to be found elsewhere …
… (see MeGyro Module: General Introduction to Gyros) …
… I have had to modify what is commonly described (and frequently repeated) as the correct mounting procedure. To test my gyro module I built a simple ‘wind-vane’ construction with the module attached to the top of it and mounted it on a small tripod with a swivel/ tilt unit (see the image below):
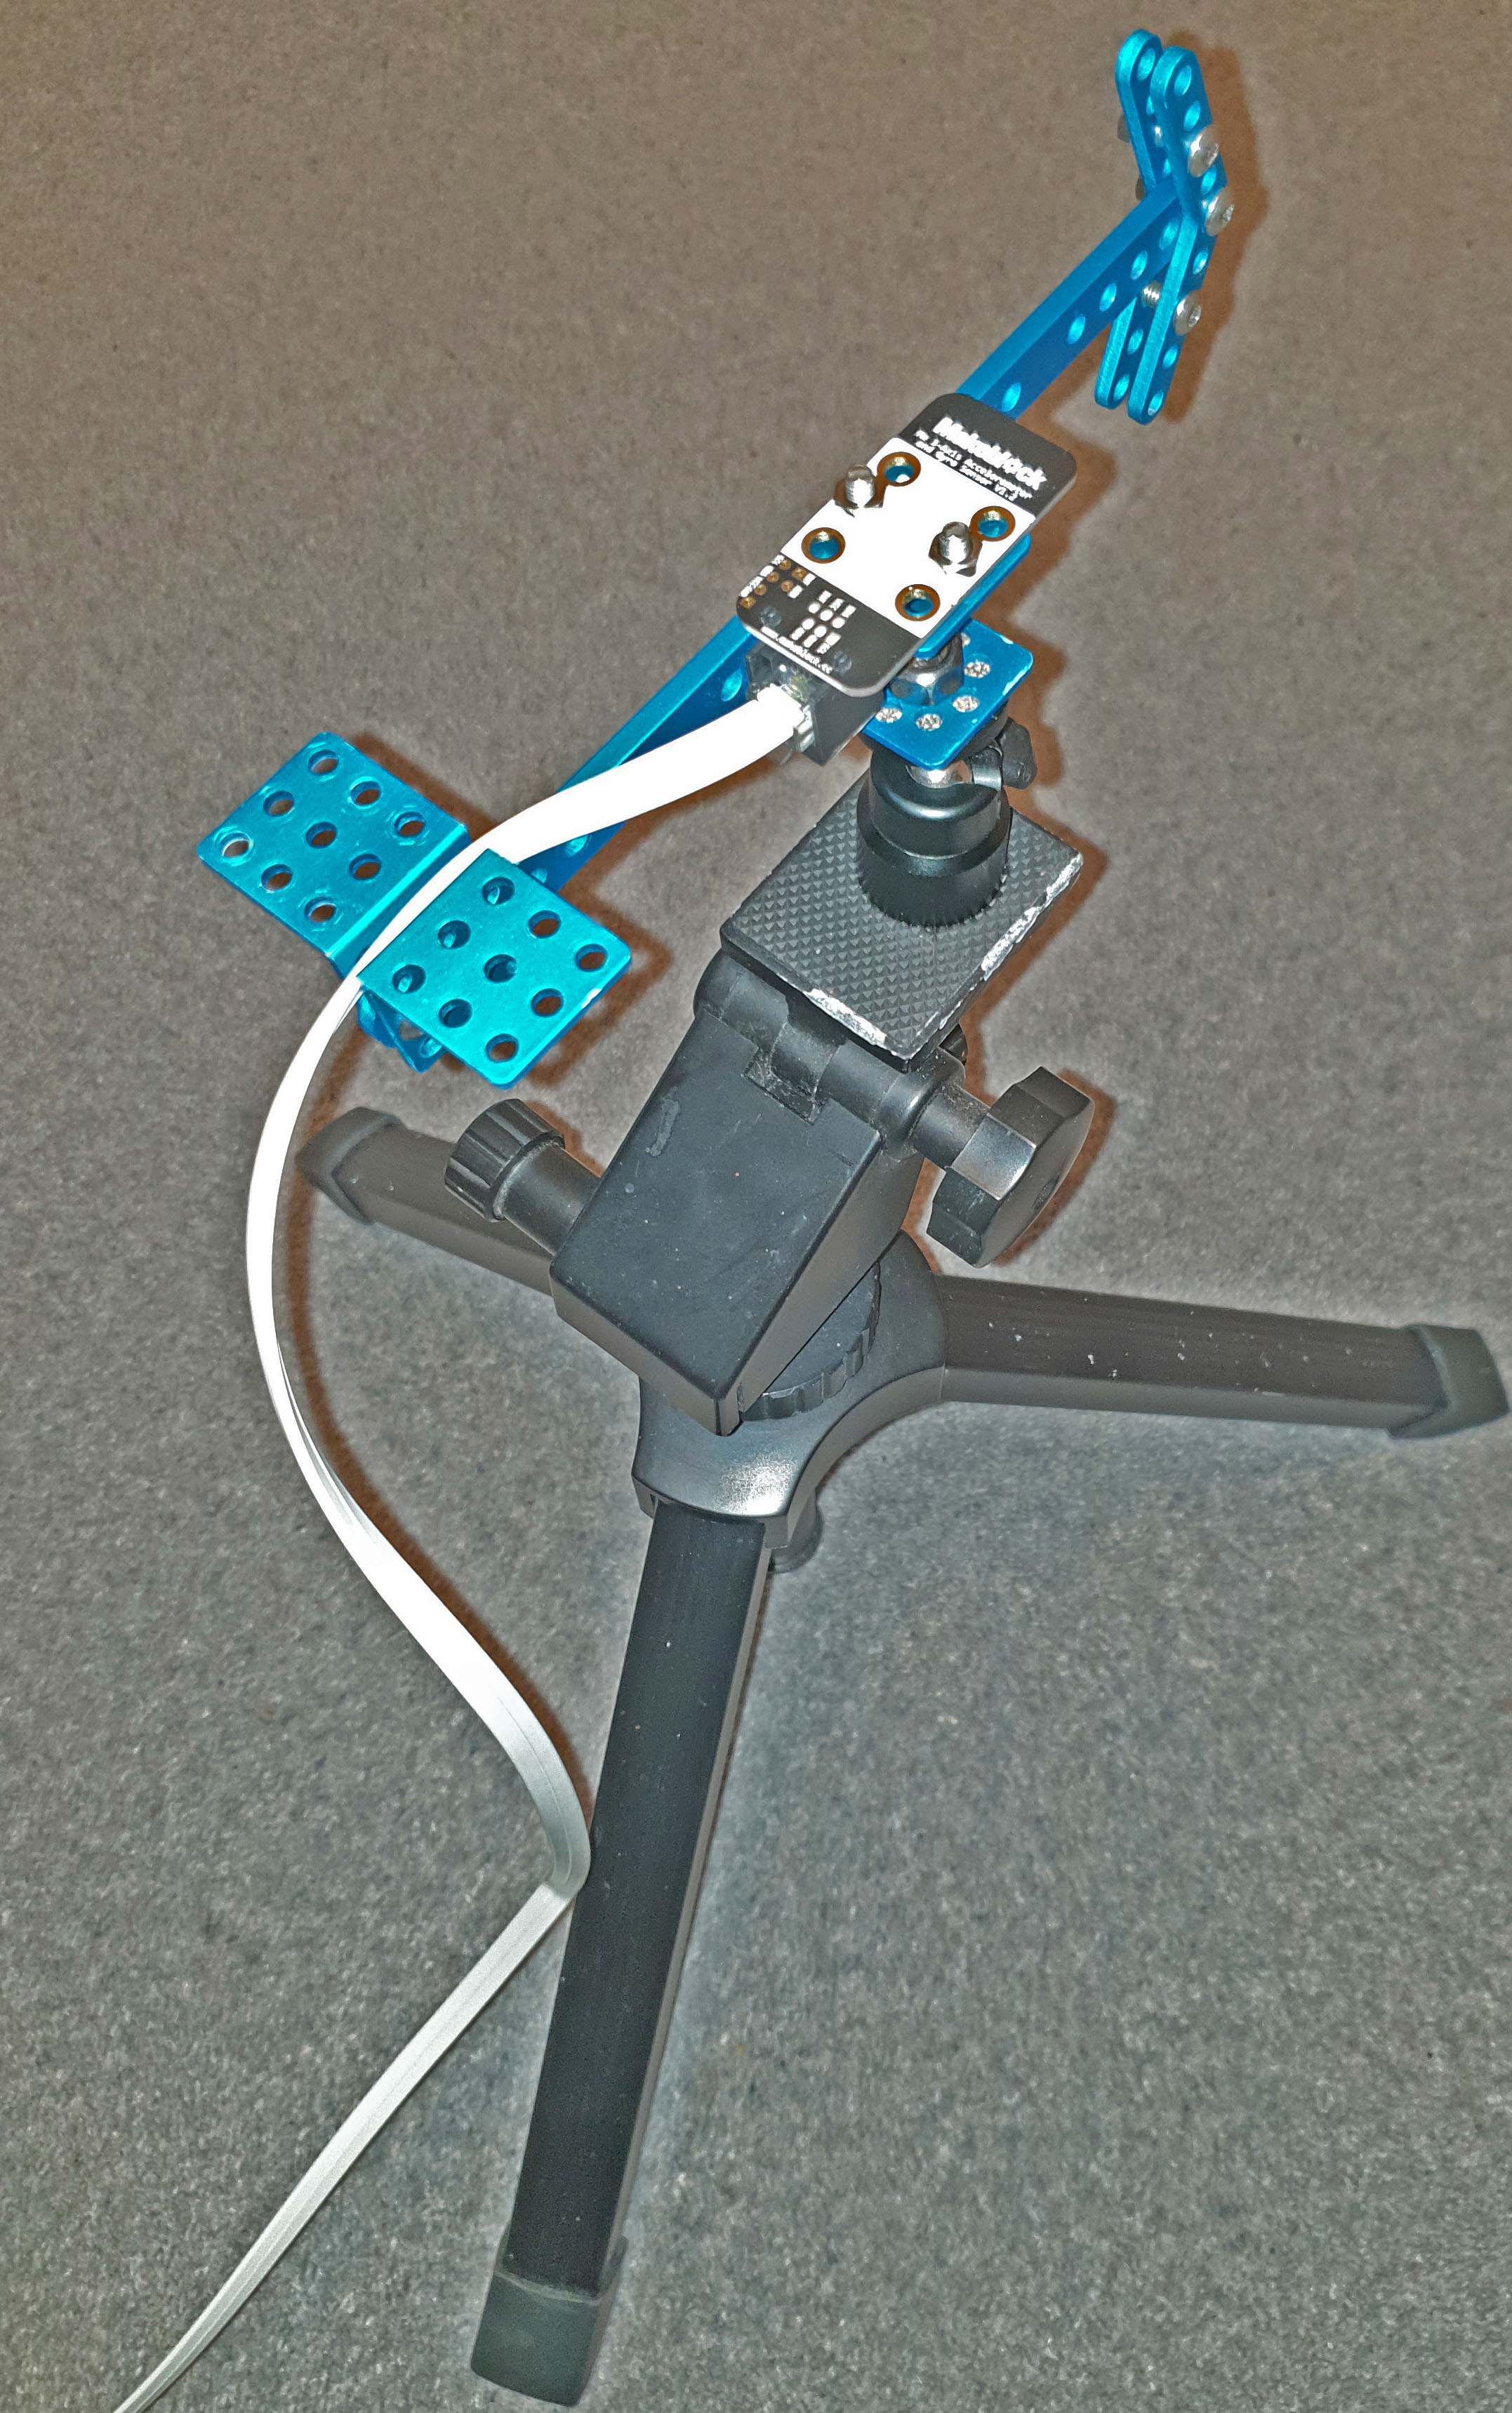
Using this simple rig clearly demonstrated that the X axis arrow printed on the module needs to point across the width of a robotic device and not forwards along the length to enable feedback to correctly indicate the sideways ROLL attitude as X values. The Y axis arrow on the module therefore needs to point along the length (the longitudinal axis) and towards the front of any robotic device to correctly indicate the up/down inclination PITCH attitude as Y values. This leaves the Z-axis pointing vertically through (up or down) and returns the DIRECTIONAL HEADING of the module (the YAW attitude) as Z values. The Gyro module, as you can see above (and contrary to expectations) should be mounted upside down with the Z-axis pointing downwards which will then output POSITIVE values for the first 180° of CLOCKWISE rotation of the robotic device.
N.B. For the remaining 180˚ of the Z axis rotation minus (negative) values are returned; and a calculation is required to make sure that only positive values are interpreted from the sensor readings:
If Gyro_Z>0 and <180
 	Then Gyro_Z Modified = Gyro_Z
Else
If Gyro_Z <0
 	Then Gyro_Z Modified = (Abs (Gyro_Z-180) +180)
So, onwards and upwards …
CommandeR
#37
Have any of you ever seen mBlock 5’s ‘white screen of death’? Crashing this usually very stable piece of software is almost unheard of but can be caused it seems by having too many project assets.
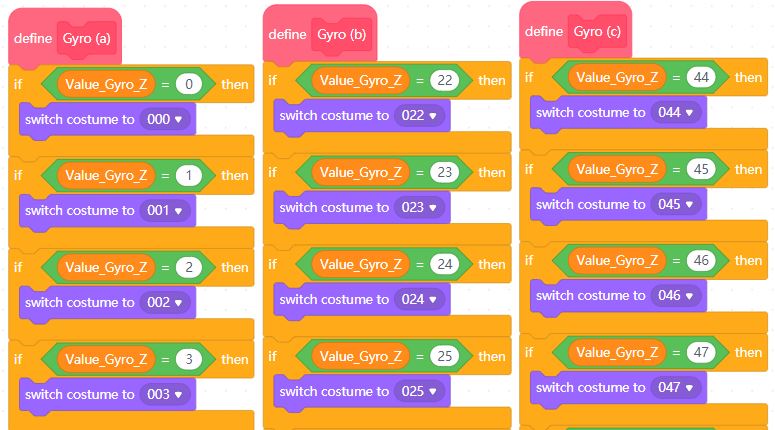
In the creation of the ‘stage’ feedback screen (which you can see in my previous post), I needed to make costumes for the Z axis (the directional heading) of the Gyro; 360 of them in fact and that is a lot of costumes to duplicate and edit - so many (and such a tedious a task) that I had to do them in batches over quite a few days.

Once I had duplicated 200-or-so entries, the Costume Editor became noticeably sluggish. By the time that I passed 350 costumes, my first software crash happened; and whilst I could restart and run mBlock with my project functioning normally, as soon as I entered the Costume Editor screen it crashed again. Whilst trying to find my way around this problem, as a test I found that I could make a new sprite in the same project and duplicate costumes quite happily; but the many costumed Gyro sprite always crashed on opening it in the Editor!
I removed (by exporting it) my ‘Gyro_Z ‘ sprite from my project and reloaded the resultant .sprite3 file (270Kb in size) into a new project with no other assets present and then the resultant .mblock file became approx. 430Kb in size. It should be mentioned here that my sprite also contained the matching decision-making (if/then) block scripts needed to interpret module feedback into costume output. Sadly, this new project file also crashed mBlock as soon as I opened the Costume Editor - so what was I to do? …
… As a last resort, I tried opening this new single sprite project in the online mBlock Web version of the software (I always use the Desktop PC version). Amazingly the Costume Editor ran much more smoothly and it was now possible to create more costumes, and these were quicker to implement by copying rather than duplicating) and I could now complete my total of 360 costumes with ease; including their accompanying block scripts - which for ease of visibility (and duplication) I broke into vertical runs of 22 if/then decisions under 16 ‘My Blocks’ headings (see part of the first three of these below).
I loaded (imported) my newly completed ‘Gyro_Z ‘ sprite back into my original project where it worked perfectly giving me 0º to 360º Headings for the Gyro feedback screen. All that I had to do now was not to open this sprite in the Costume Editor.
Color sensor isn't working
Best_codes
#38
I like making my mBlock prjects that don’t use devicees on turbwarp.org. It normally doesn’t crash.
CommandeR
#39
Has anyone got the Me Color Sensor module to return accurate RGB Values?
The predefined colour values returning (2 for RED etc.) work well but the method shown below for returning individual RGB colours.using colorSensor.ColorDataRead(); does not work nor do similar colorSensor library calls: ReturnColorCode(); ReturnColorData(); or ReturnRedData(); etc.
Red should return 255,0,0 in RGB but the sensor using ColorDataRead(); returns 55,7,4
Green should return 0.255,0 in RGB but the sensor using ColorDataRead(); returns 12,27,7
Blue should return 0,0,255 in RGB but the sensor using ColorDataRead(); returns 62,66,58
Any ideas?
COLOUR is the name (replacing ‘colorSensor’) that I have given to my Colour Sensor Object and the Upload transcode that I am using in my Colour Sensor extension block is shown below: -
uint8_t detectedColor(MeColorSensor COLOUR, uint8_t colorType){
if(colorType == COLOUR.Returnresult()){
return 1;}
return 0;
}
uint16_t getSingleColorValue(MeColorSensor COLOUR, uint8_t colorType){
long rgbcode = 0;
COLOUR.ColorDataRead();
if(colorType < 3){
rgbcode = COLOUR.ReturnColorCode();
Value_Colour = COLOUR.ReturnColorCode();
switch(colorType){
case 0: return (uint8_t)(rgbcode>>16);
case 1: return (uint8_t)(rgbcode>>8);
case 2: return (uint8_t)rgbcode;
default: return 0;}
}else if(colorType == 3){
return COLOUR.ReturnGrayscale();
Value_Colour = COLOUR.ReturnGrayscale();
}else{
return 0;}
}
void Control_Light(MeColorSensor COLOUR, uint8_t lightState){
if(lightState == 0){
COLOUR_/{RJ25_Port}/.TurnOffLight();
}else{
COLOUR_/{RJ25_Port}/.TurnOnLight();
}
}
void Colour_Sensor_On(){
COLOUR_/{RJ25_Port}/.SensorInit();
Control_Light(COLOUR_/{RJ25_Port}/, 1);
}
void Colour_Sensor_Off(){
Control_Light(COLOUR_/{RJ25_Port}/, 0);
}
void Get_Colour_Value(){ // PROBLEM WITH RETURNED RGB VALUES HERE
Colour_Sensor_On();
while(1) {
**Value_Red = getSingleColorValue(COLOUR/{RJ25_Port}/, 0); _
_ Send_Colour();_
_ Value_Green = getSingleColorValue(COLOUR_/{RJ25_Port}/, 1);_
_ Send_Colour();_
_ Value_Blue = getSingleColorValue(COLOUR_/{RJ25_Port}/, 2);**_
Send_Colour();
if(detectedColor(COLOUR_/{RJ25_Port}/, 0)){
Value_Colour = 0; // Pre-Defined White
Send_Colour();}
if(detectedColor(COLOUR_/{RJ25_Port}/, 2)){
Value_Colour = 2; // Pre-Defined Red
Send_Colour();}
if(detectedColor(COLOUR_/{RJ25_Port}/, 4)){
Value_Colour = 4; // Pre-Defined Yellow
Send_Colour();}
if(detectedColor(COLOUR_/{RJ25_Port}/, 5)){
Value_Colour = 5; // Pre-Defined Green
Send_Colour();}
if(detectedColor(COLOUR_/{RJ25_Port}/, 7)){
Value_Colour = 7; // Pre-Defined Blue
Send_Colour();}
if(detectedColor(COLOUR_/{RJ25_Port}/, 9)){
Value_Colour = 9; // Pre-Defined Black
Send_Colour();}
}
}
void Poll_Colour(){
broadcaster.on(String(“Poll_Colour”),Get_Colour_Value); // on receipt of message get sensor value
}
void Send_Colour(){
broadcaster.broadcast(String(“Colour_Value”),String(Value_Colour));
broadcaster.broadcast(String(“Red_Value”),String(Value_Red));
broadcaster.broadcast(String(“Green_Value”),String(Value_Green));
broadcaster.broadcast(String(“Blue_Value”),String(Value_Blue));
broadcaster.broadcast(String(“Update_Colour”)); //return sensor values via these individual messages
broadcaster.callOK();
}

CommandeR
#41
I though you might like to see the simple test rig that I am using for my extension block experiments:
… and I now have created the following blocks:
Strange that Makeblock never got around to creating a library for their useful Me Angular Sensor? - but the Gas Sensor library can be used for this purpose:
This sensor returns values from 0 to 1024 which in 360º = 2.84 units per degree of movement - so I created the following transcode to return output values in both degrees & raw numbers:

Sadly, I’m still no further on with getting the correct RGB values output from the Me Color Sensor.
CommandeR
#43
A final analysis…
…After three months of hard work, I think that it is time to bring this rambling post to an end. I do think that I have pushed my exploration of the Extension Builder as far as I possibly can; and in reality I have achieved much since I can now make and publish block extensions of my own.
What I have found (and I have carefully studied all of the Extension Builder help files and programming examples) is that I didn’t gain a great deal from any of them. I also trawled my way through every post on this Forum referring to Extensions and whist they were not always clear, I gained the odd bit of guidance from some of them.
Sadly, whilst some Forum members ‘liked’ what I was attempting, no one actually contributed any insights into their own attempts at extension creation. In reality, I gained the most from just experimenting over-and-over-and-over again with the software until things began to work. My usual method (as documented earlier in this post) was to create a sequence of coding blocks to do something that I wanted to happen in mBlock 5 (in Upload mode) and then take the resultant Arduino C sequence transcoded from those blocks and paste it into mBlock’s Arduino Editor. Here (as I had done when teaching myself the rudiments of Arduino C) I could edit and play with the code and then upload it into whichever robotic mainboard I was using to test if the sequence ran OK.
From then onwards, I could then take that code and paste it into the Extension Builder to try to encapsulate that code into a single block. Simple, but not without not knowing which of the transcoding editor windows (include, lib, declare, setup, code or _loop) should be used for which bit of code - and more importantly, why! There was much trial-and-error testing here. Since I couldn’t find any real guidance anywhere, I still know nothing about the many other programming options available in the Extension Builder software: uploading middleware, extension event handlers, widgets, snippets etc. etc. I know nothing either about adding API commands and it is now clear to me that Extensions can only be written for use in Upload mode and not in Live mode and sadly not at all for manipulating Sprite graphics - if only that were possible!
There seems, rather encouragingly, to have been many readers of this post so I do hope that my recorded journey into the land of Mext has been of value to others.
Best_codes
#44
Sorry, for not really helping, @CommandeR. I like your posts to show my support for you, but I have so many things to do and only about 30 minutes a day to do them. I genuinely try to help; I just can’t sometimes. Please forgive me.
a1egr0
#46
It is not true that it is not possible to create extensions that function not only in Upload mode, but also in Live mode. The extension “Advanced Arduino” I created works in both modes (blocks of the “Advanced Pins” category). Moreover, you can add the device “Common UNO Device” and make sure that it also works in both modes. But it’s not scary that creating such extensions is difficult (since the developers tried to complicate the solution of this task as much as possible). A really valuable tool that works well and allows you to control sprites is the extension “Upload Mode Broadcast”.
CommandeR
#47
Hi a1egr0
Thanks for your considered response - I’ve received very few on this topic. Your “Advanced Arduino” extension looks good and you are essentially correct, some things are possible in both modes, but nowhere as much as I would like to achieve.
Did you not notice my image of my Lab-Pack ‘Stage’ screen earlier in this post communicating with Devices?
I am therefore totally au fait with the concepts of the extension “Upload Mode Broadcast”.
For the benefit of others on the Forum who might want to know more, see my musings on “Upload Mode Broadcasts” below:
a1egr0
#48
Hi, CommandeR,
I’m sorry, I didn’t look through this whole thread. I agree that the “Live” mode in the mBlock 5 environment works very badly (unlike the MindPlus environment, for example). By the way, you can use the extension “Serial Broadcast” with the application “Serial Broadcast PC” instead of “Upload Mode Broadcast” (or the combination “Serial Broadcast” plus “UART Broadcast”). In this case, there is no need to click on the “Upload” button every time after opening the project.
CommandeR
#49
Hi
At last, someone working on something similar & giving something back to the Forum. Thanks for the info. I’ve just had a quick look at "Serial Broadcast PC” and have downloaded the two mext files to study later. Had a very quick look at your “Uart Broadcast” extension too.
Much appreciated
Lindsay
a1egr0
#50
Thanks, I’m glad I was helpful. Do not forget that in order to use the “Serial Broadcast” extension, you also need to download and install the application from the developers’ website.
“UART Broadcast” uses hardware serial instead of software serial.
I hope you enjoy my extension “Advanced Arduino” as you get to know it better. I have posted a number of examples on how to use this extension.
https://goo.su/AAE_mBlock