Programming Ranger to use sensors


#1

I am a new mBot Ranger owner and user. I can program the robot to move, blink lights, etc. in mBlock. I do not know how to program the processor to use the eight or so sensors that I got in the extra kit. I also have a Mini Gripper that I would like to use, but don’t know how to program it.

I have seen, on YouTube videos, the Mini Gripper, being operated from an iPad, and it could be operated while the robot was moving. The operation was not downloaded to the Ranger, but was part of the iPad App like the movement joystick is under Play, and Drive in the App I have. The current version of the Makeblock App doesn’t have the ability to control the Gripper. It doesn’t seem like the sensors are meaningful if you can’t operate them from the App.

Am I missing something? How do I program the extra sensors that I have, not just the onboard ones.

Appreciate any help.


#2

Welcome to the platform :slight_smile:

A little info. There is 2 methods of operating the ranger: 1. Live mode and 2. Upload mode.

Live mode runs on your device and has a lag between the device and robot.
Upload compiles the program into machine instructions then uploads it to the robot and runs much faster. If you upload a program it writes it over the top of the live firmware so if you want to use Live mode after upload mode you need to update the firmware back onto the robot. Upload mode is only available from PC.

The sensors return a value they don’t carry out commands so they are round blocks that fit into a block that requires an input of a number.

Here is a program running in live mode that makes the robot drive forward until the ultrasonic sensor sees something closer than 30cm then stops
Capture


#3

The shapes of the blocks tell you what type Capture
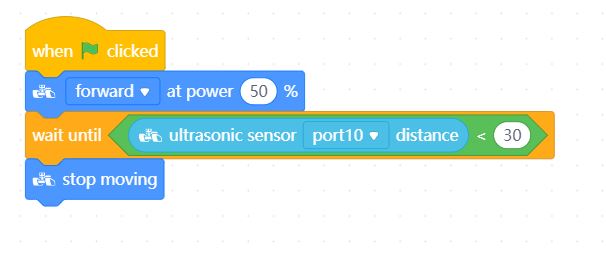
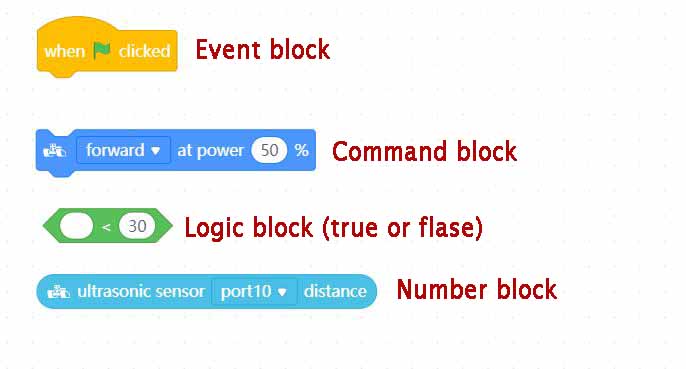
of block they are and how the work


#4

Thanks for your replies.

Can anyone tell me how to program the sensors that come with the Electronic Add-on Pack like the:
LIght Sensor
Temperature sensor
Motion sensor
Segment Display

Also I purchased (and probably shouldn’t have because I can’t program them) the

Mini Gripper
Servo Pack

I can use mBlock and have programmed the Ranger to do things with its track and lights, and sounds. I have also returned the processor to the factory firmware. No problem.

I just want to get a hint about programming the device to use the sensors that I bought.

Any help appreciated.


#5

Hi Fixman,
http://learn.makeblock.com/en/10scenes-1/
You will get all the needed resoureces from here.
http://learn.makeblock.com/en/me-light-sensor/
http://learn.makeblock.com/en/temperature-sensor-waterproofds18b20/
http://learn.makeblock.com/en/me-pir-motion-sensor/
http://learn.makeblock.com/en/me-7-segment-display/
Thanks.


#6

Thank you so much tech_support. I now have some clues about getting the sensors programmed.

It is really too bad that the Makeblock IDE is not set up for the mBot Ranger. It would make it so much easier. I did find that if I select the Orion device, some of the sensors are available, and usable.

I would like to use my Arduino IDE rather than the one offered in Makeblocks. I was able in include MakeBlockDrive into the library, but was not able to find a board in the Boards manager section. Can you provide one? Also any libraries that I might need.

Many thanks for your help.


#7

Hi Fixman

Here’s my document which might help you with the arduino IDE:

The board you need is Arduino Mega 2560 as it shows you here: http://learn.makeblock.com/en/learning-arduino-programming-ranger/

All the libraries you need should be in the github repository https://github.com/Makeblock-official/Makeblock-Libraries although it will take some digging and some reading as the makeblock documentation on the libraries is almost non existent, thankfully some of the products listing have some C++ source examples on their website

Good luck


#8

Thank you so much Murray. I am familiar with GitHub, and have done some programming with the Arduino IDE (Uno, and the CircuitMess Ringo phone), but don’t have enough experience to find out what you have just given me. Now at least I can start with some simple programming.

Thank you again.


#9

@MurrayElliot I just looked over your doc quickly and did notice your pin definitions for the H-bridge that controls Ranger motors is in correct in this part of your doc “It’s possible to program the pins directly using PWM:” The correct pins can be found in MeAuriga.h found here https://github.com/Makeblock-official/Makeblock-Libraries/blob/master/src/MeAuriga.h whick also line up with the schematics found here http://download.makeblock.com/Me%20Auriga%20电路图V1.1%20-%2020160221.pdf

If your interested not only being able to control the motors but also read the encoder position and current speed then I have some simple code here to do this https://github.com/OutOfTheBots/Makeblock_extenstions/tree/master/Encoder


#10

Hi Shane

Thanks , you mean I have DIR A1 and DIR A2 round the wrong way or is there something else I’ve missed?

Regards
Murray


#11

OK I have now looked closely and your doc seems to be correct. I must have been looking at it sideways last time :frowning:


#12

THanks For this links I really need it


People don't reply here
#13

Thanks for looking over it, appreciate having your knowledgeable eyes across it, it’s always going to be a work in progress…


#14

I have tried to get this simple program working both in the Arduino IDE, and in the Arduino IDE part of Makeblock. The program compiles, and uploads with the Ranger device selected, but no action from the Display. I am using Port 6, and I can get the Display to run a simple program using the Orion device selection, and the Makeblock (Blocks) IDE, so I know that the display works, and and stuff like the port selection are all OK. The Arduino code won’t work with either the Orion or Ranger device selected. I am just not holding my mouth right.

Any ideas?

#include “MeOrion.h”

Me7SegmentDisplay disp(PORT_6);

int i = 0;
void setup()
{
}

void loop()
{
if(i > 100)
{
i = 0;
}
disp.display(i++);
delay(100);
}


#15

Hi Fixman. If you’re running this on the ranger, you need to change the include statement to “MeAuriga.h” the hardware on the Auriga (the board on the Ranger) and the Orion is different.


#16

I don’t know the unit, but you might want to have some setup code for the display too to make sure the module is properly initialised

void setup()
{
disp.reset(PORT_6);
}


#17

Fantastic Murray — it works!! This was an example that came from the MakeBlockDrive library using the 2560 Board. I assumed too much about the hardware.

You know, I don’t think it should be this hard ---- Am I right?

Once again thank you so much. I would be dead in the water without your help.


#18

Hi Fixman. Glad you got it sorted. I’ve been coding for nearly 40 years (gulp! I started writing Fortran on punched cards!!!).

I too found it difficult and frustrating that there was so little information for the coder. It took me some time to figure it all out and decided to write it all down for others as best I could.

To be fair, the Mbots are designed for use with Mblock, and Arduino is just a side effect of that, so I guess that’s why there’s so little of the kind of documentation I’d expect to see for coders (i.e. proper API documentation), the effort goes into the simpler interface, but even that isn’t easy when adding add-ons to the base robot. Again step-by-step simple instructions would be great and a set of plugins and extensions for every additional module for each robot kit would be helpful, but doesn’t exist. It’s pretty simple if you stick to one standard robot and mblock, go away from that and it all gets a bit “experimental”

In term of C++/Arduino, the examples are a bit of a mix - they assume some knowledge, i.e. that the main boards are all different in terms of how they’re wired up, so an Orion isn’t compatible with an Auriga etc etc, they are all written for a specific board (and that not all examples will work on the board they specify out of the box), and in order to figure it out you need some ability to read schematics and translate that into information into code.

A good example of this is motors - with Ranger, you get two motors, but the firmware includes the following libraries:
#include “MeDCMotor.h”
#include “MeStepper.h”
#include “MeEncoderMotor.h”
#include “MeEncoderNew.h”
and there’s no official documentation that I could find to say which you need for the base model.

Some of my information came from an instructables article I linked to in the document (https://www.instructables.com/id/Advanced-Makeblock-Sensors-DIY/) which really kick started me in the right direction. Without that, I might still be struggling :slight_smile:

Enjoy the journey, you’ll get there!


#19

Thanks Murray. I also remember IBM punch cards and trying to get something done in Fortran and COBAL. It was over 50 years ago for me, and it was just a one semester course. That was the last programming I did until now. I got interested with the Arduino UNO, and then built the CircuitMess MAKERphone (Ringo) which can also be programmed with Arduino C. Unfortunately, there is no API for that product either, but I was saved by a kindly, retired, senior programmer on the CircuitMess Forum. I was able to learn a little more and had fun. What else is an 81 year old stuck in the house to do.

I thought I would move on with the mBot Ranger. From the research I did, I thought I could learn to get the robot to do this https://www.youtube.com/watch?v=bxtf0LdS028 They obviously control the Ranger/gripper from a smart device in real time.

The MakeBlock IDE is not anywhere near complete for the Ranger (Auriga) and can only be used for the onboard sensors. Really not much good, and a long way from using a gripper in real time. The Orion device selection did allow me to do a little more, but pretty much an accident I guess (different processor).

You are right, the journey will be fun. Thanks to another senior programmer, I will be able to study all of the great references you gave me, and I know I will be able to program all the sensors I have. Will I be able to run the Ranger with a gripper attached in real time from a smart device ------ I DON’T THINK SO.


#20

It may not be a smart device - it could be controlled using a dumb bluetooth controller. (https://www.makeblock.com/accessories/bluetooth-controller) and some custom extensions to mblock (or just Arduino code as you’ve been doing) - you can get there!