I have purchased a Starter robot IR version with the Orion board and having NOTHING but trouble finding examples for MBlock code for THIS board. It seems to be prohibited to post anything but MBot code. The Orion has the least amount of drag & drop functions than ANY of the other boards made by MakeBlock, so I am asking for SOMEONE to let me know where to find info for the Orion board only. Almost none of the tutorials work when applied to the Orion and I just go around in circles trying to do ANYTHING except “Blink” and then re-load the original program. This is neither fun nor instructive.
Orion board programming help
Hi!
The Orion board is one of the older boards. Are you using mBlock, the Makeblock App, or the Arduino environment for coding?
Regards,
Chuck
Hi
Since mBot is much more popular, haha~ Maybe you can tell us what specific info you need for Orion board. Your desired application?
Hi Chuck,
I rather gathered that the Orion had run it’s time out from the lack of examples (Written in MBlock, PLENTY in the Arduino IDE). And, yes, I am TRYING to use MBlock. It seems to be the only program/app that has the commands for the Orion. It was the board that came with the IR Starter robot kit I bought. I think that if I can find somewhere to see some examples in the MBlock format, maybe then I could figure this thing out
Thanks for the reply,
Gregg
Hi Gloria,
Is it really popular? On second thought, maybe it is. After all, it seems to be the only robot they have that has good(?), clear(?) instructions. I bought 2 kits before I ran into the programming issue, so I have LOTS of extra parts to play with. The Starter kit and the Ultimate 2.0. I have 2 things I have tried and failed horribly. I tried to use a few variables for the 2 motors and 2 more for the 2 sonar sensors I mounted on the front. The original program would look at whatever was in front of it, jink to the right, and the run over whatever it was with the left track. I tried to use the sonar distance as the motor speed for the 2 motors. It works for the first couple of objects, then zeros in on anything and crashes. The other thing would be to duplicate the program that came installed as to the number buttons. They were programmed to set the motor speed at several different speeds and lock THAT speed in until you pushed another number button. This was handy when the robot was running the obstacle avoidance program. I have been able to set the buttons on the remote to different speeds, but they keep resetting back to the starting value. I can find some of the code I need, but it is always in the Adurino format. That I REALLY don’t understand!
Thanks for replying,
Gregg
I don’t know that it’s run it’s time, but it is a much more basic board in some respects. It seems to be more geared towards Arduino programming although there is some minimal support in mBlock for it.
@tech_support, is the Starter Kit due to be discontinued?
Technical specifications
- Output voltage: 5V DC
- Input voltage: 6V-12V DC
- Maximum input current: 3A
- Communication mode: UART, I²C,digital I/O, analog input
- Control chip: Atmega 328P
- Dimension: 80 x 60 x 18 mm (L x W x H)
Functional characteristics
- Easy to connect with a variety of sensors, electronic modules, and drive modules
- Support the DC motor, stepper motor, servo driver, and encoder motor driver
- Drive two motors directly
- Supply 5V voltage and 2A current
- Onboard buzzer
- Over-current and over-voltage protection
- Fully compatible with Arduino
- Easy to use RJ25 cable
- Provide specific Arduino library functions in Makeblock to simplify programming
- Support mBlock (upgrade of Scratch 2.0) and applicable to users of all ages
Also, can you post what you’ve tried?
Chuck,
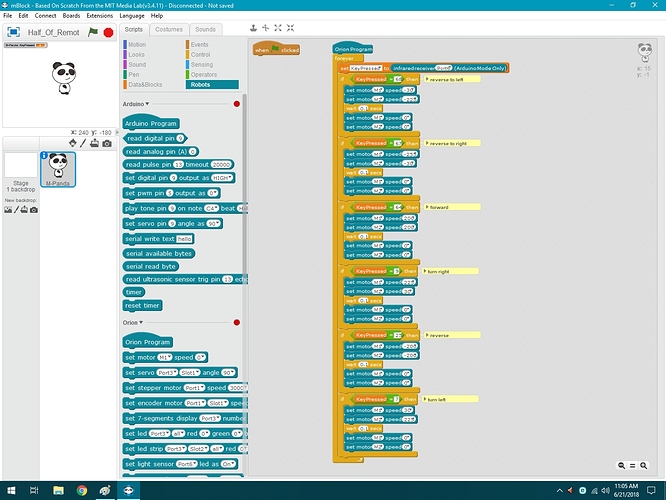
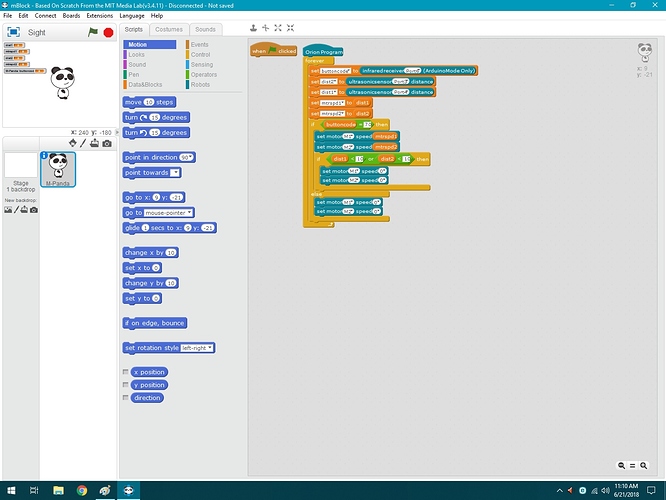
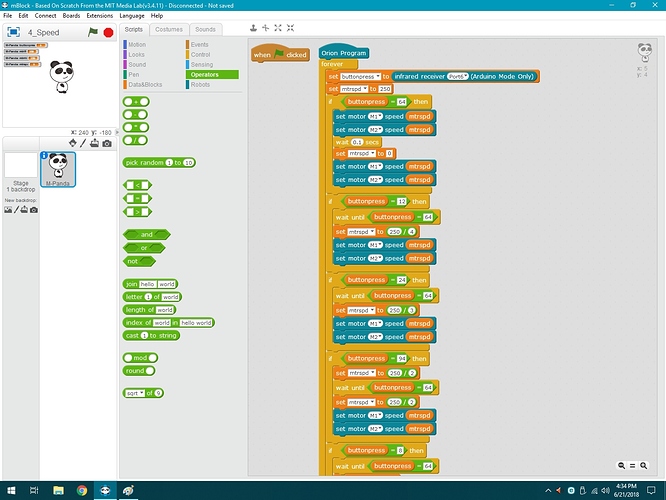
Again THANKS! Not so much that I hadn’t read a lot of the info you guided me to, but it is nice to bounce things off of someone. Clears out the tunnel vision sometimes, most of the time. At 65, most of my friends are either dead or have moved out of California. Rather hard to bounce ideas off them anymore. Attached are 3 “Sketches” in MBlock and the modified Starter robot I made with parts from the Ultimate 2.0 and the original Starter kit. 1st, the Half Remote file works ultra fine and DOES NOT kick the treads off on turns, the original just reversed one of the motor directions and popped one tread or the other, if not BOTH, ALMOST every time you turned. 2nd is the VERY NON-WORKING thing called 4_Speed that is the result of weeks of; get up at 7:00 AM, turn on computer, fire up MBlock, tear up what I tried to do the day before. Re-arrange, manipulate, change from IF/THEN to IF/THEN/ELSE and back again. Inside out, up and down. I flat out CAN’T figure this out and have NO idea at ALL what I am doing wrong. Again, NO examples. This one is the one making me bald from ripping what is left of my hair out every time I try to work on it. The last is my attempt to get stereo vision using the two sonar sensors I mounted on the front of the bot. I tried to use the left “eye” to set the right motor speed(rhtmtrspd), the right “eye” to set the left motor speed (lftmtrspd). The idea was: if the sonar “sees” 400 Cm ahead, set a variable dist1 and dist2, use 400/2 (=200, a good motor speed to start and easy to math out), minus the distance (dist1 or dist2). This kind of works for about 2 or 3 different moves around things set up as a test course (Coffee cans). Then it ZEROS in on the obstacle next in line and rams it full speed. The whole thing is me TRYING to SORTA re-do the original remote control programming that came with it, MY WAY. Failing HORRIBLY,
Thanks, Gregg
Hi Gregg,
As far as I know, motors are installed oppositely, if we set speed both positive or both negative, starter will roll instead of moving forward or backword since wheels rotate in opposite direction. We can set M1 speed A and M2 speed -A, starter will move forward or backward. In your testing, you’ll know how can we let it move forward.
Gloria,
Originally I bought the Starter robot, within days I went back and bought another kit. I bought the Ultimate 2.0 also, so I use parts from it to lengthen the track base and widen it enough to fit both motors up front to counterbalance the battery pack which I mounted to the rear. This way I could access the board easier to plug it in the computer. I also wired the right motor in reverse so that when trying to learn the programming, I didn’t have to work with negative values ALL the time. I have posted some of the MBlock programs I have been working on, and getting worked over pretty good in return. The best(?) one is the Half_of_Remote. It works the way I want for now, I was planning to use a variable for each motor speed and try to combine the programs together after proving them out one at a time. The one named Sight is my attempt to get the robot to wander around an obstacle course of empty coffee cans, I would have to check it over to see if what I posted was the one that semi-worked. The way I had it, if the right eye “saw” something, it would slow the left track causing the bot to turn left. Did the opposite for the left eye. I am pretty sure that it fails from too much info coming back as it get too close to anything, but it fun to watch. That one I will need help some time in the future. For now, I would like some help with the 4_Speed program. It is a TOTAL MESS right now as I think I uploaded it after a knock-down, drag-out mauling after some 6 or 7 hours the other day. If you know the way the Starter bot remote came, you could control the motor speeds using the 1 through 9 buttons and have the speed passed to the (^) button and also passed it to the obstacle avoidance routine. The best I have done was to get the (^) button working to start and stop. Button 1 would run the motor(S) as long as you held it down, but stopped when released, and did not pass the speed value on. As a matter of fact, it caused the forward button to stop working. I seemed to have uploaded an extra file and left out one when replying to Chuck so I will attach a pic of my bot so it might make things a bit clearer. I will be very thankful for any help,
Gregg
OK, This is for Chuck too. Don’t either of you bother to try to help. It will be a TOTAL WASTE of TIME!! The STINKING Orion board DIED within the 1st 2 weeks, JUST LIKE THE FIRST STARTER KIT I BOUGHT!! The 1st kit didn’t last 2 weeks either! Had to return for a replacement. Now, ONCE AGAIN, I will have to bust this THING down to return to Micro Center. What a PILE of CRAP!! I really don’t give a “you know what” if these guys get torqued, their/THIS product SUCKS! I hope EVERYONE thinking of buying one of these LEFTOVER, P.O.S.(NOT Police Officer Special!), JUNK Starter robot kits reads THIS post FIRST so THEY don’t get the SAME SCREW JOB as I have been getting! Sorry Chuck, Gloria, et all, am beyond upset. Had I even the slightest idea MakeBlock did things like this, they would have been the LAST robot kit I EVER would have bought!!
Again, sorry,
Gregg
Sorry to hear that~
My own starter works ok. The DIY robot form, I am afraid that I cannot test it with the programs.
Wow, I’ve been working with several of the Makeblock robot kits, especially the mBot for STEM and the mBot Ranger and to be honest I haven’t had those issues. It sounds like your Orion boards must have been part of a bad production run. I looked over your programs and I didn’t see anything that jumped out as being wrong, per se, but like @Gloria, I didn’t duplicate your DIY build by switching the wires (my solution was to write a custom block that handled that under the covers for me when I was using mBlock and something similar when I was writing in the Arduino environment).
I’m pretty surprised that you’ve had two board failures and would suggest that you reach out to @tech_support for some sort of resolution. 
This topic was automatically closed 30 days after the last reply. New replies are no longer allowed.


