Check out the docs here:
https://education.makeblock.com/help/mbuild-quad-rgb-sensor/
and here:
https://education.makeblock.com/help/mblock-block-based-device-cyberpi-extension-quad-rgb-sensor/
What does the color detection mode mean?
The algorithm of the quad RGB sensor is performed based on the hue, saturation, value (HSV) color model. The standard mode refers to the threshold used in earlier firmware versions, and the color enhanced mode is added to the latest firmware, in which the threshold is adapted to application scenarios based on the HSV model. You can select a color detection mode as required.
See more details

Why do I need to perform calibration on the quad RGB sensor?
The performance of the quad RGB sensor may be significantly affected by the ambient light, map, color card, or the distance between sensors and the object to be detected. Therefore, performing calibration on the quad RGB sensor in the environment and conditions where it is to be used can improve the detection accuracy.
Calibration preparation
- Update the firmware to version 011, and update the Quad RGB Sensor extension to the latest version.
- Assembled mBot2, or CyberPi + mBot2 Shield + quad RGB sensor
- White paper of A6 or larger, or the white area on the mBot2 line-following map
- Find a place with common room light instead of intense light
Calibration steps
(1) Connect the quad RGB sensor to the mBuild port on mBot2 Shield or CyberPi by using an mBuild cable.
(2) Connect CyberPi to your computer by using a USB cable.
(3) Open mBlock 5 and connect CyberPi to mBlock 5.
(4) Add the Quad RBG Sensor extension.
(5) Write the following program and upload it to CyberPi. Alternatively, you can write a program in live mode.
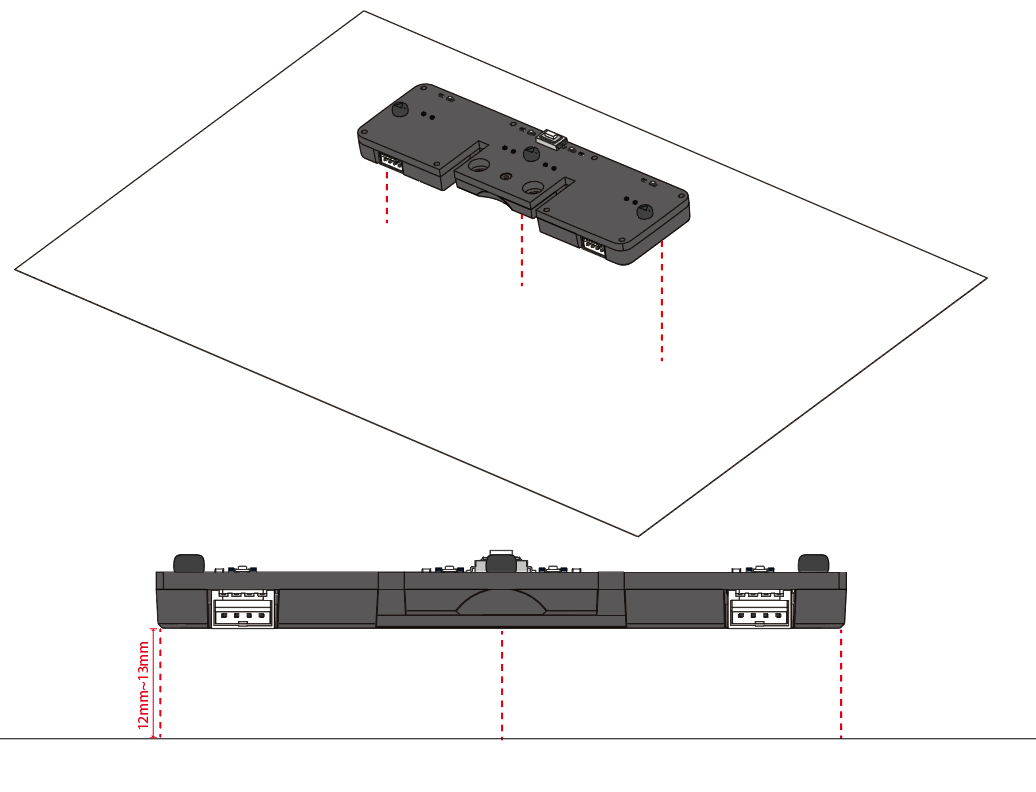
The calibration process is short. Place the quad RGB sensor (12 mm to 13 mm recommended) over the white paper before you start the calibration program.
During the calibration, the fill lights are lit up in other colors and then reset to the pre-defined color, which looks like blinking. When the calibration is complete, it says “Calibration completed” on the screen of CyberPi. You can execute the program to perform calibration on the quad RGB sensor again.
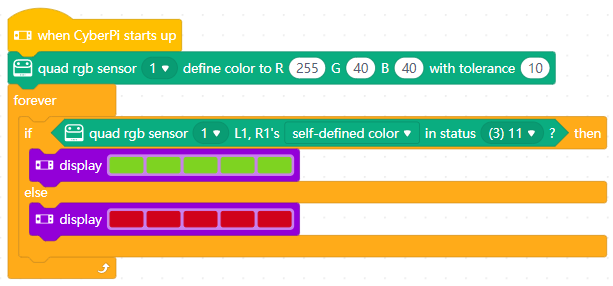
Assuming you mean tolerance:

Define a color and its tolerance
You can define a color with the following RGB ranges:
R: 0–255
G: 0–255
B: 0–255
Tolerance
For example, set the block as follows:
Initial RGB values
255
40
40
If tolerance is set to 10, then:
Upper limit of RGB values
255
50
50
Lower limit of RGB values
245
30
30
You can set the tolerance based on the ambient light and object color differences.
I hope the docs help you @BobB. They are very thorough. 
Best Regards,
Best_codes
 You can try to mount the sensor a little lower using spacers, and it sometimes helps. Not much you can do, though, as it is a hardware issue.