loveOmeter code doesn't work : no voltage


#1

Hello,
I am totally newbie with arduino, mblock, programming, english language.
I am following the kit starter book and converting with mblock.

I have some problems with the loveOmeter :

  1. The mblock code does not work but the official code does it (the electronic circuit is ok). A link to download my code. LoveOmeter
  2. How can i change the rate baud with mblock ? The default value is 115000 instead of 9600 as recommended.

My OS is xubuntu 18.04 and arduino uno.

Thanks for any advise or help.
Regards


#2

Hi Atone,

I am also a beginner but I think I can help. Sorry if my english is bad because i speak french.

  1. Is the official code made with the Arduino IDE?
  2. Do you use a temperature sensor and 3 LEDs?

Do you have the diagram to set up the project ???


#3

Bonsoir, Good evening,

English language

Is the official code made with the Arduino IDE?

Yes from file >Examples >StarterKit_BasicKit>p03_loveOmeter

Do you use a temperature sensor and 3 LEDs?

yes

The offical code from IDE get the good result with the 3 LEDs and the temperature sensor.
I even tried ardublock to check if my understanding of the code was correct and it works too but not mblock and I don’t understand why.

Thanks

En français (moi aussi)
Le montage fonctionne correctement avec le code fourni par l’ide et un téléversement.
J’ai même essayé ardublock pour vérifier si ma comprhéension du code était correcte et ça fonctionne aussi mais pas mblocx et je ne comprends pas pourquoi.

Merci


#4

Hi,

I did not do the project but your code seems logical and should work.
I touched the code a little so that there is less break.


#5

Hi,
Thanks for helping.
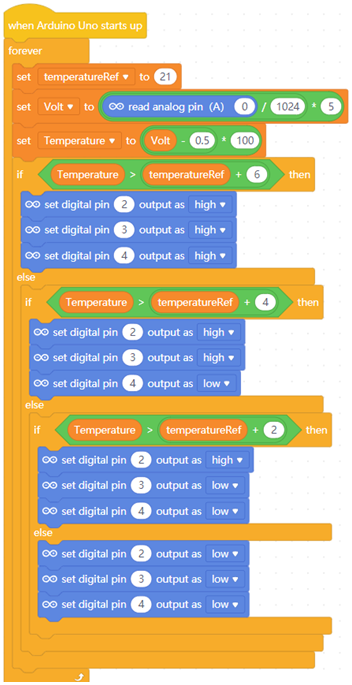
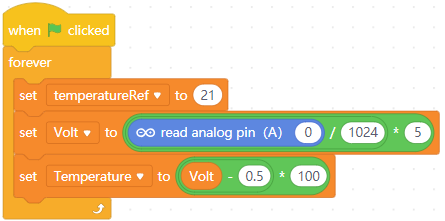
I reproduced the arduino code, added some lines
Serial.begin(9600); Serial.print(" Volts: "); Serial.print(Volt); Serial.print(", Temperature: "); Serial.println(Temperature); .
I noticed the voltage equals zero but when i upload the official code the voltage is correctly gauged.
See the video : on right the IDE with the official code, on left the IDE with your code.

Very strange.

https://www.swisstransfer.com/d/32cbdf92-ac81-4f28-a08b-11b94f655cca

float Temperature = 0;
float Volt = 0;
float temperatureRef = 0;

void _delay(float seconds) {
  long endTime = millis() + seconds * 1000;
  while(millis() < endTime) _loop();
}

void setup() {
  //added
  Serial.begin(9600);
  
  pinMode(A0+0,INPUT);
  pinMode(2,OUTPUT);
  pinMode(3,OUTPUT);
  pinMode(4,OUTPUT);
  while(1) {
      temperatureRef = 21;
      Volt = (analogRead(A0+0) / 1024) * 5;


  //added from the example
  //Send the voltage level out the Serial port
  Serial.print(" Volts: ");
  Serial.print(Volt);
      
  Temperature = ((Volt - 0.5)) * 100;
      
//added et new line
Serial.print(", Temperature: ");
  Serial.println(Temperature);
      
      if(Temperature > (temperatureRef + 6)){
          digitalWrite(2,1);
          digitalWrite(3,1);
          digitalWrite(4,1);
}else{
          if(Temperature > (temperatureRef + 4)){
              digitalWrite(2,1);
              digitalWrite(3,1);
              digitalWrite(4,0);

          }else{
              if(Temperature > (temperatureRef + 2)){
                  digitalWrite(2,1);
                  digitalWrite(3,0);
                  digitalWrite(4,0);

              }else{
                  digitalWrite(2,0);
                  digitalWrite(3,0);
                  digitalWrite(4,0);
              }
          }
}
_delay(1);

_loop();
  }
}
void _loop() {
 }
void loop() {
  _loop();
}

#6

Hi Atone,

J’ai réussi a obtenir quelques choses d’intéressant.

  1. J’ai connecté un Arduino UNO sans capteur (juste le USB)
  2. J’ai pris ton code et j’ai gardé le début.
    3
  3. Je suis passer en mode Live et remplacer le début par :When drapeau clicked.
  4. J’ai exécuté le programme et j’avais uniquement températeureRef=21 mais aucun volt, ni Température.
  5. J’ai remarqué une mise a jour Firmware. Je l’ai faite.
    35
  6. Tout est fonctionnel.
    4

P.-S Je l’ai faite avec un Arduino UNO et une copie. Les réagisses de la même façon.

I managed to get some interesting things.

  1. I connected an Arduino UNO without sensor (just the USB)
  2. I took your code and kept the start.
  3. I am going to switch to Live mode and replace the start with: When flag clicked.
  4. I executed the program and I only had temperatorRef = 21 but no volts or Temperature.
  5. I noticed a Firmware update. I did it.
  6. Everything is functional.

P.-S I made it with an Arduino UNO and a copy. Reactors in the same way.


#7

Bonsoir,
Merci pour cette astuce mais cela ne fonctionne pas (PC xubuntu 18.04 64bits et windows 10 64 bits). La mise a jour n’est pas enregistrée.
Je vais créer un nouveau post avec ce problème spécifique.

Good evening,
Thanks for this tip but it doesn’t work (PC xubuntu 18.04 64bits and windows 10 64 bits) . The update is not saved.
I will post a new post with this particular problem.

no update firmware