I want to stop all the Mbot’s codes like stop all code in scratch mode.How can I do? @tech_support @chuckmcknight
For example the robot is moving or doing something with it’s sensors.I want to put a code and make robot stop.
How to stop all codes in MBot
BirazzHirs
#1
Crackel
#2
A bit like the instruction that stops all execution of sprites: Stop All?
![]()
Me, I make a loop so it’s easy to stop. Makeblock can answer you better.
tech_support
#3
Hi BirazzHirs,
May we know your application or your program for the mBot?
mBot cannot take multiple actions at the same time, but finish one then do another. There is no need to stop all blocks. If any misunderstanding, just feel free to tell us.
BirazzHirs
#4
We use MBlock’s own programme which is based on scratch and stop all doesn’t work exactly.
Because we upload the codes to the robot and we don’t control it from our computer.It has to do it with it’s arduino codes.We tried to put stop all and it didn’t work.Our wish is pressing the button for one time or 2-3 etc. times and make robot stop and do nothing.
I hope you understand @tech_support @chuckmcknight
tech_support
#5
Hi BirazzHirs,
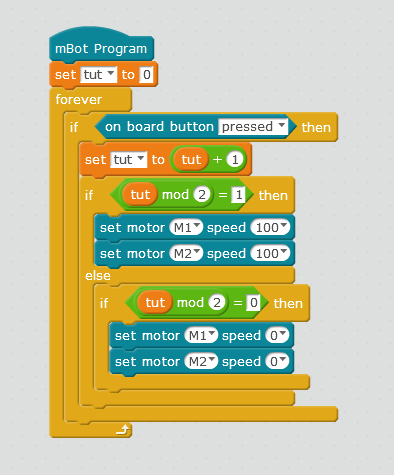
Maybe you can try similiar program like below (press one-run, press again-stop…)
Hi!
Generally speaking you’d need to have a way to control the state of the program, i.e., a “run” state and a “stop” state. This is usually accomplished by setting a state variable and testing it to see which state the program should be in, i.e.,:
currentState = 0;  // 0 - run; 1 - stop

forever
  if currentState == 0
    // do whatever the robot needs to do
  else  // assumption is that the currentState is not zero
    stop the motors
    turn off LEDs/buzzer, etc.
Motors are stopped by setting the speed to zero. For the mBot you can use the run [forward] speed 0 block to stop both motors. To turn off the LEDs set the color to 0 for red/green/blue, etc.
One of the big concepts that you need to internalize is that the program needs to be organized in a series of “states” to control what is going on. This is easier to do in Arduino (C/C++) code, but it can be accomplished in Scratch as well.
The program posted by @tech_support uses the onboard button to toggle the state variable tut which is one way of coding a solution.
One other thing I would suggest is the liberal use of custom blocks to contain chunks of code rather than putting everything inline because as the program gets longer you will begin to see mBlock start to take longer to do anything. This is a problem with the Scratch 2.0 offline editor that mBlock is based upon and really can’t be helped.
BirazzHirs
#7
Actually we are trying to use press button like if I press once it will do our first mission than we press twice in a row it will do our 2nd mission we need help abou this we need stopping for this thanks for help  @tech_support @chuckmcknight
Crackel
#9
Hi BirazzHirs
I checked in mBlock 5 and it is not possible with the instructions in graph. Maybe in Python, but I have not explored next to the application.
It is gray so goodbye send message to send broadcast.
The instruction that stops all may not be the best way to go. Moreover, it does not seem possible to run several lines of code in parallel with mBot and mBlock. Do you want to share your program, we could look a little cleaner. I have a mBot so I can see if I can help.
chuckmcknight
#10
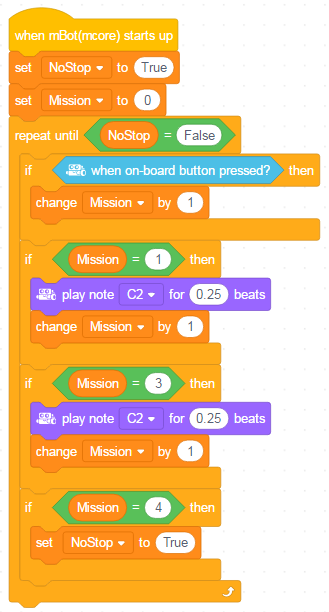
Realistically, this is sort of what you’d need to do from a structural perspective IMHO.

In essence, initialize the system which currently just sets the value of the initial state (see my comment above on states). You will want to add any other initialization code to the reset block to ensure that your hardware is starting in a known good state. As the state changes when the button is pressed, the block associated with that state (Mission1, Mission2, etc.) will be called. You can either put the shutdown code in each mission or create another custom block to stop the motors, turn off leds, etc. and call that block after the last if statement in the forever loop (not shown).
Crackel
#11
The define block will run after and not in parallel. It must send the message that is not in mBlock 5.
I did that but I did not test it
chuckmcknight
#12
Hmm, usually the custom blocks are instantiated before the main program runs. I haven’t looked at mBlock 5 yet so I’m not sure what it’s doing under the covers but I’d be surprised if it is not creating the custom blocks before running the main program. The custom blocks should run start-to-finish when they are invoked rather than in parallel.
@tech_support, can you weigh in on this?
Crackel
#13
Hmmmm, I think in Scratch the code is interpreted and it will be executed when called. But I’m not sure, I’ll have to wait for the next version of mBlock because the custom blocks are not yet implemented in this version.
chuckmcknight
#14
Well, I downloaded the latest beta and the code won’t compile for the mBot. Not sure what the scoop is though because the log only said that it failed.

Yes, Scratch is interpreted but then again, so is Python (although it has a JIT that can be engaged). However, the interpreters on either shouldn’t have an issue with invoking those additional methods.
I’d like to hope that the generated code looks something like this:
#include <MeMCore.h>

// declare current state
int currentState = 0;

// declare colors
const int BLACK_COLOR[] = {0, 0, 0};
const int GREEN_COLOR[] = {0,150, 0};
const int RED_COLOR[]   = {150,0,0};

// Set up LED constants
const int BOTH_LEDS = 0;
const int LED_PORT  = 7;
const int LED_SLOT  = 2;

// Onboard LEDs
MeRGBLed rgbLED(LED_PORT, LED_SLOT);

void Reset() {
  // turn off LEDs
  rgbLED.setColor(BOTH_LEDS, BLACK_COLOR[0], BLACK_COLOR[1], BLACK_COLOR[2]);
  rgbLED.show();

  // set current state
  currentState = 0;
}

void Mission1() {
  rgbLED.setColor(BOTH_LEDS, GREEN_COLOR[0], GREEN_COLOR[1], GREEN_COLOR[2]);
  rgbLED.show();
}

void Mission2() {
  rgbLED.setColor(BOTH_LEDS, RED_COLOR[0], RED_COLOR[1], RED_COLOR[2]);
  rgbLED.show();
}

void setup() {
  pinMode(A7, INPUT);
  Reset();
}

void loop() {
  if (analogRead(A7) == 0) {
    currentState++;

    if (currentState > 2) {
      Reset();
    }

    if (currentState == 1) {
      Mission1();
    }

    if (currentState == 2) {
      Mission2();
    }
  }

  delay(125);
}
but as you note, it’s a beta and not all of the pieces are there yet. 
system
#15
This topic was automatically closed 30 days after the last reply. New replies are no longer allowed.