Expert Coders...HELP! Custom Blocks for STEM Kids!


#1

Hey everyone, I have quite the task at hand, and I need a little assistance!
If you’re great with coding/adept with the extension builder, your help would be invaluable!! (a little lengthy but please hear me out!)

I am working with a very small non-profit that provides STEM education to low-income neighborhoods. One of our goals is to spread education and help cultivate the next generation of STEM scholars. The students have been learning block coding using Blocky and Dash robots. We wanted to shake things up a bit and host and in-house a tournament for the kids. They will be using a student activity derived from NASA. The goal of the activity is to choose the desired path your rover will take, code the rover to navigate the course on its own. The rover can not touch/ drive into craters, and the rover can not be touched one the coding has executed. Points are deducted if the rover drives off the course.

As stated, the kids learned block coding on Dash robots, but those cannot be used for the event as their wheels are not designed to drive on the rigid terrain (bots are driven on a rough 7’ x 8’ concrete moon-like terrain). We did a little research and purchased Yahboom tanks, utilizing Raspberry Pi 4, for the competition as they appeared to be just what we were looking for. Our director also wanted the kids to work with Raspberry Pis. To our dismay, we later discovered that Raspberry Pi and the Yahboom tanks aren’t compatible with Blocky which left us without a rover for the kids.

I jumped on amazon to find a bot structured as a tank, that utilized Blockly specifically or just block coding. The mbot Ranger was the winner. After playing with the mBlock app, I realized that the software wasn’t exactly Blocky and had some differences. I also noticed that the key differences would render the robot useless as the kids learned to code with specified distance and angles, but the program utilized power output and seconds.

Also, when trying to learn how to use the ultrasonic sensor, I discovered that it doesn’t seem to be working properly. The robot keeps moving past the specified distance and runs into the obstacle. I thought I could circumnavigate the distance/angle issue by teaching the kids how to create obstacle avoidance code, but without the senor working properly, there’s no point going that route. I also found that even IF I got the sensor to work, it may not be useful in the tournament as all the craters that need avoiding are well below the sensor and I don’t think they’ll be detected. What I really want to do is use the extension builder to create the blocks I need.

I am pressed with the following issue:

I’ve been busting my brain for weeks trying to find a solution, but I keep coming up empty handed. Our competition will be in less than 2 weeks (March 2, 2024) and I STILL can not figure out how to use the extension builder! I can’t tell you how many websites and videos I’ve scoured trying to find an answer, which includes trying to learn Python, which didn’t work out. I’m exhausted and don’t think I’m gonna make it in time.

Is there anyone out there who would be willing to help guide me in developing these blocks?

The blocks I’d like to create are as follows:

  • Move forward/backward () cm
  • Turn Left/Right () degrees

I just want to spread the world of STEM to a new generation, and with figuring this out I’m going to fail. The kids love the mBot Ranger and are excited to start coding it. I don’t want to let them down.

ANY help would be appreciated! Thanks!


#2

@VeggieMunsta

See my post recently repeated below …


#3

@VeggieMunsta That’s a huge project! If you have specific questions, feel free to ask me or refer to the docs:
https://education.makeblock.com/help/category/mblock-extension-builder/
As far as making a robot drive forward or turn, that varies a LOT depending on your robot and its configuration. If you can expound a little on that, it would be great.

Good luck!


#4

Thank you for your response! I will definitely take a look at your post. As this is the first forum I’ve ever posted on, I’m not sure where to find it. I assume I’ll be able to access it from your profile, so I’ll give that a shot! :smile:


#5

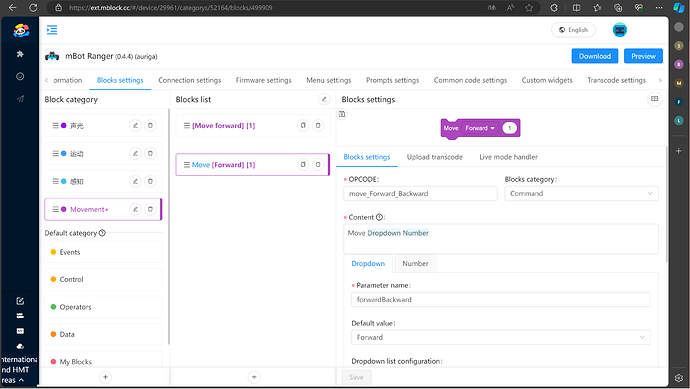
Thank you so much for responding! I’ve looked at lot of Makeblock education sites regarding the extension builder. I kinda understand what they instruct, but as I’m not a coder I can’t figure out what code I should write. I can get as far as creating by a blockl by entering “move forward Number centimeter(cm)” in the Content box, but without the proper code to upload, it’s not going to do anything. (Just so it’s out there, I made that content from an example where someone created a block to “move forward Number second(s)”). I get stuck on the transcode portion as well.

I’ve read through all of the categories on https://support.makeblock.com/hc/en-us/articles/21450876601879-Extension-Configuration-Guidelines but I get lost at the Transcode portion. This could be because their example is a different from what I’d like to use; I’m not sure. I understand everything previous, but when I get to the transcode section, I’m a deer in the headlights. As for your link, I’ll definitely take a deeper look! I clicked on it briefly and it’s not a webpage I’ve been on. Hopefully there’s something there that can help!

“As far as making a robot drive forward or turn, that varies a LOT depending on your robot and its configuration. If you can expound a little on that, it would be great.”

The robot we’re using is the mBot Ranger 3 and it is assembled in the Land Raider configuration. It’s tank-like design and rubber tracks are exactly what we’re looking for. If I didn’t answer you 100%, I apologize. Just let me know and I’ll try to clarify. In the meantime, I’m going to keep playing with the extension builder in hopes I have a “Eureka!” moment.


#6

Its the post immediately below this (your post) on the Makeblock Forum - ‘Trying to understand the Extension Builder’s coding concepts’ - (I renewed it on purpose so that you could find it easily).


#7

@VeggieMunsta Well, do you want to make an mBlock extension or an mBlock device, for a start?
Also, since I am a bit busy, feel free to ask my AI here about your codes (be very specific about what you need and be aware that it can lie):
https://mblock.zapier.app/

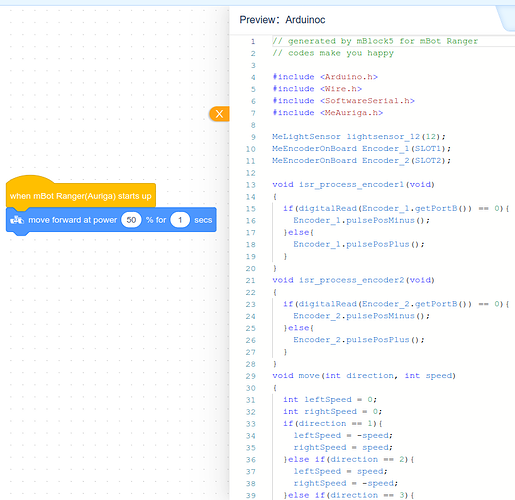
Also note that you can see some of the mBot Ranger source code in the code preview for the Ranger device on mBlock for any code you make:

And, if it would help, I can private message you the .mext file for the mBot Ranger device so you can look inside it at how it works (just don’t share it with anyone!).

Let me know if there are other ways I can help. Also mention me as @Best_codes, so I can respond to you faster.


Good luck!

And as a side note to @CommandeR, that new GIF profile picture looks spiffy. :smiley: Also, thanks for helping out.


#8

@Best_codes I’m looking to create an extension that I can add to the mBot Ranger to accomplish the maneuvers in the original post. A private message with the .mext file would be perfect! It would be very useful to see how it works so that I can use that information to derive the code I need.

I’ll also make sure to utilize the AI you’ve linked. Again, thank you so much for taking your tiime to assist with this issue; I’m 1000% grateful! If I’m successful, I’ll be sure to let you know! If I’m a failure, I’ll let you know that too. :joy:


#9

@VeggieMunsta Sorry about that! I hadn’t quite read all of your extensive post. :smile:
I’ll see when I can get that file to you.

Be careful with my AI! It is very nice, but often lies. Just be aware of that.
I don’t mind helping you at all!
Be sure to let me know if you need anything else. I’ll be listening up for further info about this!

Good luck, again!


#10

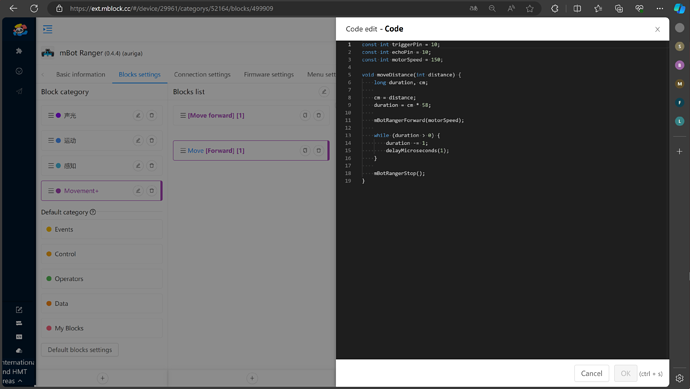
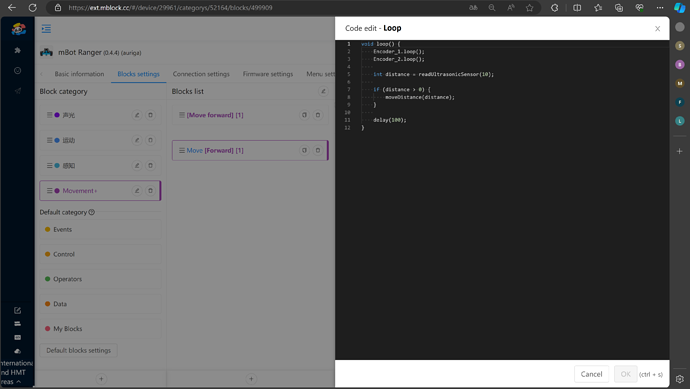
@Best_codes I stayed up quite late last night reviewing the code from the .mext once it was imported into the Device section of the Extension Builder. I used a combination of looking at the source codes and having extensive conversations with your AI to generate the codes I need; this includes asking the AI what coding language is used in each section.

All coding generated was placed back into the AI with an inquiry for the purpose of the coding. To me, everything seems to line up, but with zero experience, I’m unsure. I feel like I made some headway, but I was wondering of you could take a look at the codes created and determine whether or not they’re viable for the project. Am I missing any information? Are there codes that don’t make sense? Will these perform the way I need, and if not, what do I need to change about them? Hopefully they’re not too bad. It takes a smart person to create AI, so I fully trust it!

Purpose: To move the mbot Ranger forward or backward the distance specified by the user while using the ultrasonic sensor.
Block: Move forward/backward specified distance
Robot: mBot Ranger 3
Configuration: Land Raider

Block Settings


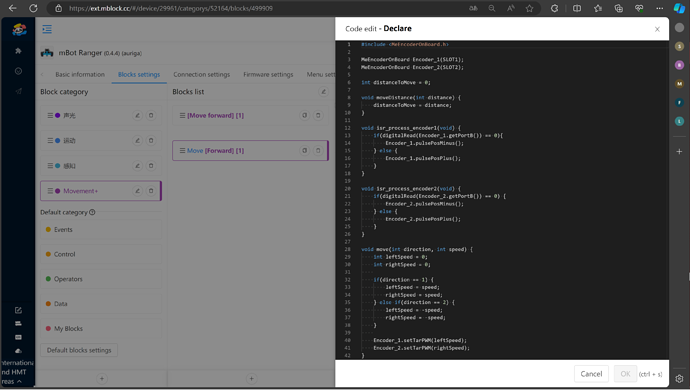
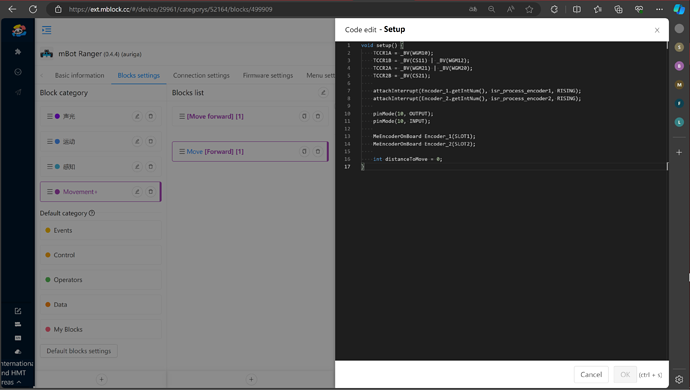
Below I have listed the codes generated and these sections they belong to:

Upload Transcode

lib:

[‘MeEncoderOnBoard Encoder_1(SLOT1);’,
‘MeEncoderOnBoard Encoder_2(SLOT2);’]

declare:

setup

code

loop

Common Code
(I wanted to upload a screenshot of this as well, but some of the lines are too long to be seen fully in the code editor)

// JavaScript code for the “Common Code” section in the “Common Code Settings” of the Extension Builder

import Sensorium from ‘exts/common/sensorium’;
const sensorium = new Sensorium();
if (!window.aurigaEngine) {
window.aurigaEngine = sensorium.createAuriga();
}
let engine = window.aurigaEngine;

const DIRECTION2SPEED = [
[-1, 1],
[1, -1],
[-1, -1],
[1, 1]
];

const FACE_DATA = ‘00000000000000000011110001111110011111100011110000000000000000000000000000000000001111000111111001111110001111000000000000000000’;
const EMPTY_FACE_DATA = ‘00000000000000000000000000000000000000000000000000000000000000000000000000000000000000000000000000000000000000000000000000000000’;
const LED_STRIP_DATA = ‘123450000000000’;
const BLACK_COLOR = ‘#000000’;

let lastTime = (new Date()).getTime();
let isBoardButtonPressed = false;

// Online configuration common functions
class OnlineUtil {
// Delay for n seconds
static async delay(n) {
return new Promise(res => setTimeout(() => res(), n * 1000));
}
}

const formatPowerData = (code) => {
if (!isString(code)) {
return code;
}
var reg = /[0-9]+%/g;
return code.replace(reg, (item) => {
item = item.replace(’%’, ‘’);
return Number(item) / 100 * 255;
});
};

const formatColorData = (code) => {
if (!isString(code)) {
return code;
}
var reg = /"?#[0-9A-f]+"?/g;
return code.replace(reg, (item) => {
item = item.replace(/"/g, ‘’);
item = item.replace(’#’, ‘0x’);
let r = Number(item) >> 16;
let g = Number(item) >> 8 & 0xff;
let b = Number(item) & 0xff;
return [r, g, b].join(’,’);
});
};

const isString = (value) => {
return typeof value === ‘string’ || value instanceof String;
};

const onlyOnlineBlocks = [];

const onlyOfflineBlocks = [];

// Online function calls
// Online protocol table
let aurigaProtocol = {
move: (index, leftSpeed, rightSpeed) => [[‘byte’, index], ‘0205’, [‘short’, leftSpeed], [‘short’, rightSpeed]],
// Add more protocol functions as needed
};

// Index number
let queue = Array(256).fill(false);
// Board button event - fixed index
queue[128] = true;

// Get index for assembling protocol
const getIndex = () => {
return new Promise((res) => {
let index = -1;
let id = setInterval(getIdx, 32);

    function getIdx() {
        if (index != -1 && !queue[index]) {
            queue[index] = true;
            clearInterval(id);
            res(index);
        } else {
            index = queue.indexOf(false);
        }
    }
});

};

// Reset index after online execution is completed
const resetIndex = (index) => {
queue[index] = false;
};

// Delay function for x seconds
const delay = (time) => {
return new Promise((res, rej) => {
setTimeout(() => {
res();
}, time);
});
};

// Convert hexadecimal color to RGB
const color2RGB = (color) => {
color = color.replace(’#’, ‘0x’);
let r = Number(color) >> 16;
let g = Number(color) >> 8 & 0xff;
let b = Number(color) & 0xff;
return [r, g, b];
};

// Convert face data to a 16-bit array
const faceData2Array16 = (faceData) => {
let array16 = [];
for (let i = 0; i < faceData.length; i += 8) {
let data = faceData.substring(i, i + 8);
data = parseInt(data, 2);
array16.push(data);
}
return array16;
};

// Convert the index to hexadecimal for sensor matching and obtaining return values
const byte2Hex = (num) => {
let byte = num.toString(16);
byte = ‘0’ + byte;
return byte.slice(-2);
};

const formatFaceData = (code) => {
if (!isString(code)) {
return code;
}
let result = [];
for (var i = 0; i + 8 <= code.length; i += 8) {
var tmpD = code.substring(i, i + 8);
tmpD = parseInt(tmpD, 2);
result.push(tmpD);
}
return result;
};

// Function to move the mBot Ranger based on ultrasonic sensor readings
const moveMbotRanger = async (distance) => {
const index = await getIndex(); // Get the index for protocol execution
const ultrasonicReading = /* Code to get ultrasonic sensor reading from port 10 */;

// Implement logic to move the mBot Ranger based on ultrasonic sensor readings
if (ultrasonicReading < distance) {
    const leftSpeed = 100; // Define the left motor speed
    const rightSpeed = 100; // Define the right motor speed

    // Send the move command using aurigaProtocol
    const moveCommand = aurigaProtocol.move(index, leftSpeed, rightSpeed);
    // Implement code to send the moveCommand to the mBot Ranger
}

resetIndex(index); // Reset the index after protocol execution

};

// Call the moveMbotRanger function with a specified distance
moveMbotRanger(0); // Move the mBot Ranger a distance of 0 units

So far, that’s what I’ve got. Call me hopeful, but if I’m on the right track I may be able to complete this project over the weekend! I’d also like to add that my director just confirmed that 3 big NASA execs agreed to judge the students. No pressure, RIGHT?! :sweat_smile:(I’m totally feeling the pressure :sob::joy:)


#11

@VeggieMunsta I will certainly review this later (I am a bit busy right now). By the way, you can put the code inside three backticks (like ```) to format it. Have you tested the code any?

Personally, I don’t think it can be finished on time… :frowning: It takes a lot of time and effort. (I’m sorry! :sob:). But, I’ll see what I can do when I have time.
Good luck!

@CommandeR anything to add?


#12

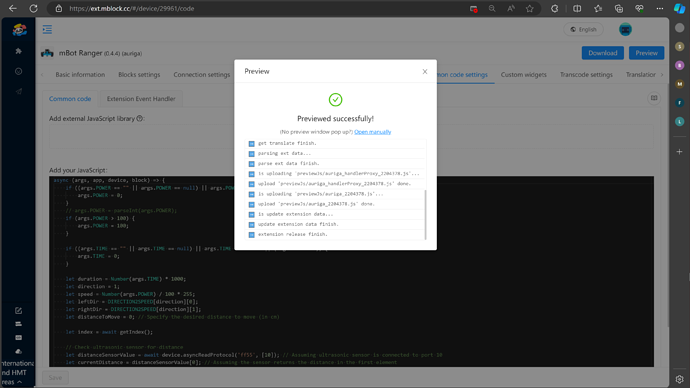
@Best_codes No problem at all! I had not tested the code as I didn’t know how. However, I noticed the Preview button in the top right corner of the Extension Builder and selected. It found an error, but once fixed it says it displayed a message saying it was successful.


Although I’m able to open the mblock preview, I can’t test the code as the robot is unresponsive. This could be because I never adjusted the code in the Transcode Settings section. I plan on working on that tomorrow. In the meantime, my director is heading out with one of the execs and she’s going to see if we can borrow one of the Sphero RVRs as Plan B if I can’t complete the code on time. If I don’t make it, I’ll just consider this my introduction to coding and delve deeper in to learning the language. :joy:


#13

Hello, this mBot Ranger is a good robot from a hardware point of view, but the motor control software libraries work disgustingly, and in some cases do not work at all. If you use your own libraries, everything will be fine.
In order to solve the described problem, three things are needed.

  1. Powered by three lithium or lithium-ferum polymer batteries, otherwise the robot will reboot when starting abruptly.
  2. Connection of Sharp infrared rangefinders for reliable identification of craters.
  3. Using your own motor control library.
    I don’t currently have a ready-made extension for the mBlock5 environment, only for the old version of mBlock3. But I can quickly develop this extension. I don’t really believe that a beginner will figure it out on his own in such a short time. It is necessary to use information from the motor encoders so that the robot travels the required distance and turns at a certain angle, regardless of the load and the degree of discharge of the batteries.
    I’ll try to find some time this weekend to write this extension for you, if you wish. What makes sense to start doing immediately is to resolve the issue with power supply and Sharp infrared rangefinders. To connect the latter you will need adapters or homemade wires.

#14

@a1egr0 Thank you for responding! I’m a bit confused at your statement. The battery pack on the mBot Ranger I have is for six batteries, not 3. Are you referring to a different model maybe? I also don’t have Sharp infrared rangefinders; I’m utilizing the ultrasonic sensor that came with the robot. It sounds like the fix to my issue requires additional parts. Unfortunately, we don’t any funding left from the grant to make a purchase for those adjustments.

If the extension you happen to have contains the blocks I would need to accomplish is task, that would be great! I’ll have to contact my director today and tell them we may have to focus on plan B.


#15

Hello,
when solving specific problems, it often happens that you have to purchase specific equipment. And of course, there are additional complications. For example, an analog rangefinder does not return readings in centimeters, and the conversion formula is relatively complex. However, I recommend checking how suitable this solution is for your tasks.


Good luck!


#16

Hello, below is the link where you can download the first version of the extension. It will take a long time for it to appear in the extension library. While only the “tank” configuration works, I haven’t gotten around to choosing the parameters for the “rover”.

https://drive.google.com/file/d/1UZmeIPNfqbRnb9H8qmK-BfgrDy9tC-dU/view?usp=sharing

Good luck!