Bit More (7a/7b).
OK here’s another ‘Getting Started’ type doc. My son and I have been playing with this all weekend. Loads of fun, but I think some more documentation is needed. So maybe this will help. Take it with a big grain of salt. Here is what we learned on the weekend. Once assembled, and before connecting it to any computer or phone, test it first to make sure it’s assembled correct. Testing steps below, along with other notes.
Note: The Red/Green/Blue power up thing is part of the Demo firmware, it does this has it turns on. When you update your own firmware it will not do this. Although not a bad idea to put something like it in your code to know it loaded.
1) Power up test:
With the mBot sitting on a table top, power it on. You should see the
following:
. as it powers up the two front left & right lights (LED1/2) will flash Red/Green/Blue then off.
. a RED power light in the middle on circuit board (PWR)- stays on.
. another RED light (very small) on the back of the range sensor - stays on.
. and finally, two tiny blue lights on either side of the line tracking sensor - stays on (when on table).
Note: If one or more of these lights is not lit, check the connections on port 2 & 3 and Check the batteries.
2) Test the Remote is working:
Put a battery in the remote, and make sure it’s working. The LED on the front should light up when a button is pressed – only you can’t see an IR light with your eyes. So turn on a digital camera (like on your phone), point it at the remote and confirm you can see that it lights up when a button is pressed. No light – check the battery.
3) Test the mBot using the Remote:
Mode A - Manual control:
. Press ‘A’ - Hear a beep, front lights go purple.
. press 1 (switch to slowest speed, easier to test)
. press < (left): Beep, LED1 (left) turns green, mBot turns left (right wheel turns).
. press > (right): Beep, LED2 (right) turns green, mBot turns right (left wheel turns).
. press ^ (forward): Beep, LED1/LED2 (left/right) turns green, mBot moves forward (both wheels turns).
. press v (backward): Beep, LED1/LED2 (left/right) turns red, mBot moves backwards (both wheels turns).
If any of these don’t work, check the motor connections and make sure the batteries are good. Maybe try pressing 9 (full power) and try all again with higher power level. If left/right turns in the wrong directions, the motor wires may be reversed. If one or both wheels are not turning maybe some wires is not plugged in, or battery to low.
Which is the left Motor? The ‘Left’ motor is the one installed under connectors 1 & 2. Both motors are the same. Once installed they become left and right. The left motor should be connected to the white power plug beside connector #1.
Mode B - Range checker:
Hold the mBot in the air and press B. wheels will turn. As you move your hand in front of the range sensor the wheels will change direction for a moment and then return to normal. If this does not occur, the range sensor may not be connected. Check it’s red power light (on back) is lit. Check it’s connected to port #3, only port 3 will work for the demo program and make sure snapped in on the back of sensor as well (Mine fell out on the back - a 15 minute puzzle)…
Mode C - Line follower:
Open the folded sheet with the giant number 8 one it. place the mBot right on top of a black line. Turn it on, and press C. The mBot should immediately start following the black line, adjusting its wheels to follow the line as it moves. If this does not happen, confirm there are two blue power lights on the tracking sensors. Ensure the tracking sensor is plugged into port #2.
4) Using Bluetooth / connecting:
Turn on the mbot, after 10 seconds you should see a slow flashing blue light on the mBot Bluetooth card. Flashing means listening, but not connected. Solid means connected – to the app. In your phones bluetooth settings scan for ‘MakeBlock’ and connect (pair) to it. Once connected, the blue light on the mBot will continue flashing – don’t worry. Once the mBot app is up and running, and also connected to ‘MakeBlock’ – the blue light will go sold. You’re in, start playing. If no blue light, check it’s plugged into the main board correctly.
Note: My android toy sees both ‘MakeBlock’ and ‘MakeBlock_LE’ (the makeblock??). Only first ever works for me. The other has some password issue.
4a) Drivers - you do need them
Connecting mBot to either a PC or MAC requires ‘drivers’, without these installed the computer will have no idea what the connected device is. Installing drivers on a PC is relatively simple, you trust the driver software is not a virus and just install it. Seems the MAC trusts no one, including you and the driver software, so installing on a MAC is a bit more frustrating. The following link seems to offer a solution…not an easy one. Review comments from thirdlion.
5) Coding and Connect to your computer (windows):
First (before USB cable) download and install the custom MakeBlock version of sketch called mBlock (with mBot additions), and install the mBot USB drivers for windows. Then open mBlock on your computer, under the menu open “Connect—>SerialPorts” and Record the ports listed.
Now, turn on mBot and using the USB cable, connect the mBot to the computer. A blue light (near PWR) will flash several times as it connects. Then main lights will flash red/green/blue/off – ready. Now using mBlock, check the listed serial ports again. Select the newest one listed – again main lights will flash red/green/blue/off. mBlock connected. Lets play.
Note on mBot Power: Turned off and with just the USB cable connected it may look like mBot has power, but it dos not. That tiny green light only indicates the the USB connection. Until power is on (Red pwr light), the mBot will not send back a connection request. Turn it on, wait for the blue connection lights to start and finish flashing.
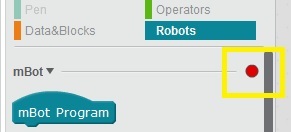
6) mBlock - ** Green Dot **:
Further notes: When using mBock, and ‘Robots’ is selected (under scripts) – look for a red or green dot in the robots menu. Green=mBot connected. Red=not connected – go back to ports to fix, turn on mBot power.
7) uploading your code to mBot:
Must be connected here, or nothing works. After you’ve written some code, you can ‘test’ it or ‘upload’ it to the mBot. To just test it, double click on the top most item of the program (mBot Program). It will highlight in yellow, and execute on the mBot. As you change the code you will see it affect the mBot. Once unplugged – all is normal – mBot will forget everything.
To actually install your new code ‘permanently’ into the mBot do the following. With green dot active (connected), right click over the top most item ‘mBot Program’. Select ‘Upload to arduino’ , the Arduino side bar will open (unless already open). On the Arduino side bar, again select ‘upload to arduino’. The mBlock code will be converted to ‘C’, compiled and transmitted to the mBot. Any ‘bad block’ error are usually because you have mBlock code segments that can’t be reached. Turn mBot off/on – code stays. The demo program is GONE!..oh noooo. Not to worry, ‘Connect—>RestoreDefaultProgram’ puts it back.


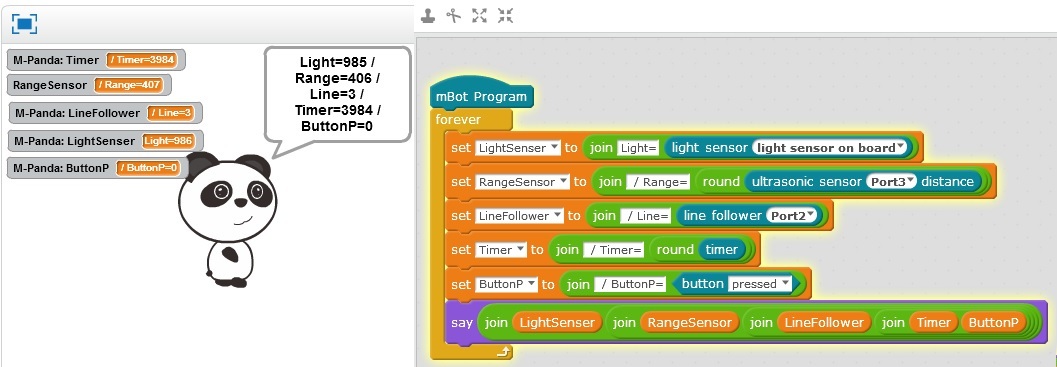
7a) Coding/Reading mBot Sensors:
Ok this may already be obviuse but here is a a bit of code reading the many mBot sensors and putting them on the screen. You can’t upload (via arduino) with a ‘Say’ block btw, as it only works on PC.
. Ultrasonic (range) sensor is in cm’s (so am I, Canadian). It has a range of 1-200 , a reading over 400 seems to mean too close to read.
. Line Follower has a range of 0-3, indicating which of the two little sensors can see reflected IR light. Where 0=neither, 1=Right, 2=Left and 3=both (binary).
. Timer (ok not a sensor) track elapse seconds from last reset.
. Light Sensor (I didn’t know it was ever there). Has a range of 0-999, with 0=dark. Another example below.
. Button Sensor (it’s the little green button on the front). You can read if it is ‘pressed’ or ‘released’.
Example. Does anyone know how to make a ‘newline’ in scratch. Playing with strings hard.
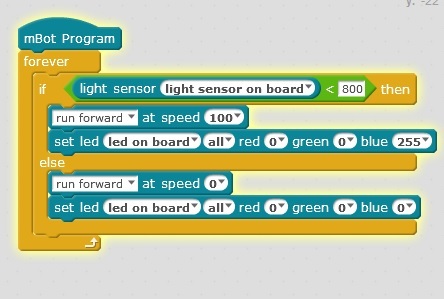
7b) The Light Sensor:
The mBot has a Light Sensor! I didn’t realize it was there. You can easily code some fun stuff to react the light level in the room. The sample code below make mBot turn on in the dark. In this case ‘dark’ is any value less than 50 (range between 0-999), it’s like freeze dance – when the light comes on he stops. Ok, I was using 800 here because I am scared of the dark. There is a great YouTube called ‘bedtime dancing mBot’ (something like that).
7c) The mBlock Rosetta Stone - the missing link 
Finally, here is the link to a high res copy of the ebook all about mBlock, as written by MakeBlock. There are many references to it all over this site, but they either get 404’s or hit a low res unreadable copy. Seems ‘Trapsis’ (below) found a link to the good copy. Download it and print it, so the kids can read and write on it as they try and code. Maybe it will also finally explain how send/receive an mBot message works. Link: http://learn.makeblock.cc/course-download/5
8) Maker Time - How to make a hard shell top
Using a cheap zip-lock container (super thin, sold in 5s) you can build a hard shell top to keep the kids from ripping the circuit board apart every time they pick the mBot up. It’s a small square 32oz container, bottom measuring 4x4 inches. Slice it, cut out room for the wheels, range finder, usb port and on/off switch. Ends up looking like mBot got a bad wig with long side burns, and a pony tail. Find a way to secure it. I just used three tiny self tapping metal screws.

9) Neat ideas for mBot storage - post assembly:
Pull out the foam, put the toy back in the box sideways, eyes facing long wall. Now you’ve got lots of room, a 60/40 split for the mBot and all the bits. Cut a little divider (like an wide letter H letter) glue to top and bottom sides and its perfect (6 5/8w x 3 3/4h). Bit of hot glue and you’re done.


