So I download the libraries I extract them and then I put them in the libraries folder, and all I have is a library called makeblockDrive is this the right one???
Arduino IDE libraries problem (mbot)
Not sure how you downloaded the Arduino libraries. I usually just clone the Git repo and use a symbolic link. but after I clone it (or download a zip) I follow these steps:
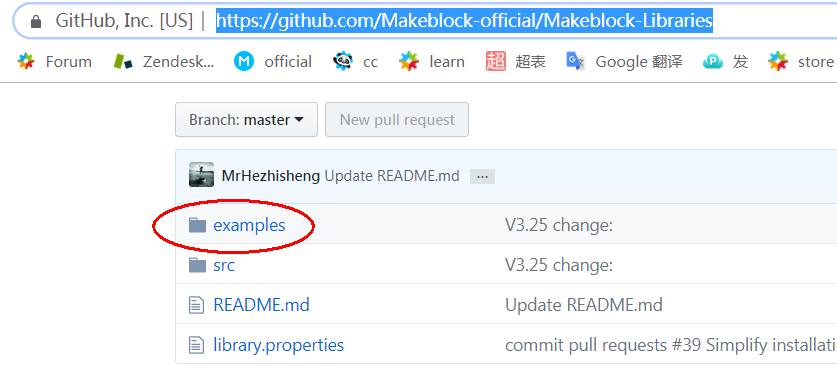
- Download the Makeblock-Libraries as a zip file.
- From the Arduino IDE, add the library (Sketch->Include Library->Add .ZIP Library
That should properly install everything (including the examples) into your sketchbook. Be aware that if you change the location of the sketchbook that you may need to re-add the library.
The .zip file can also be imported into the Arduino Create cloud-based environment as well.
BenasSuper
#3
Is this what it should have?
#include <Me4Button.h>
#include <Me7SegmentDisplay.h>
#include <MeAuriga.h>
#include <MeBaseBoard.h>
#include <MeBluetooth.h>
#include <MeBuzzer.h>
#include <MeColorSensor.h>
#include <MeCompass.h>
#include <MeConfig.h>
#include <MeDCMotor.h>
#include <MeEEPROM.h>
#include <MeEncoderMotor.h>
#include <MeEncoderNew.h>
#include <MeEncoderOnBoard.h>
#include <MeFlameSensor.h>
#include <MeGasSensor.h>
#include <MeGyro.h>
#include <MeHostParser.h>
#include <MeHumitureSensor.h>
#include <MeInfraredReceiver.h>
#include <MeIR.h>
#include <MeJoystick.h>
#include <MeLEDMatrix.h>
#include <MeLEDMatrixData.h>
#include <MeLightSensor.h>
#include <MeLimitSwitch.h>
#include <MeLineFollower.h>
#include <MeMbotDCMotor.h>
#include <MeMCore.h>
#include <MeMegaPi.h>
#include <MeMegaPiDCMotor.h>
#include <MeMegaPiPro.h>
#include <MeMegaPiPro4DcMotor.h>
#include <MeMegaPiProESCMotor.h>
#include <MeOnBoardTemp.h>
#include <MeOneWire.h>
#include <MeOrion.h>
#include <MePIRMotionSensor.h>
#include <MePm25Sensor.h>
#include <MePort.h>
#include <MePotentiometer.h>
#include <MePressureSensor.h>
#include <MePS2.h>
#include <MeRGBLed.h>
#include <MeSerial.h>
#include <MeShield.h>
#include <MeShutter.h>
#include <MeSmartServo.h>
#include <MeSoundSensor.h>
#include <MeStepper.h>
#include <MeStepperOnBoard.h>
#include <MeSuperVariable.h>
#include <MeTemperature.h>
#include <MeTouchSensor.h>
#include <MeUltrasonicSensor.h>
#include <MeUSBHost.h>
#include <MeVoice.h>
#include <MeWifi.h>
Here is a sample program to turn on all of the onboard LEDs on an mBot:
/***********************************************************************
 * Program:     Turn_On_All_Onboard_LEDs
 *
 * Author:      Charles McKnight
 *
 * Description:
 *  This program sets the color of the onboard LEDs to a shade of red,
 *  waits 2 seconds and then turns the onboard LEDs to black (off).
 ************************************************************************/

#include <MeMCore.h>

/******************* Global Declarations *******************************/

// Onboard LED port/slot definitions
const int PORT = 7;
const int SLOT = 2;

// LED Control settings
const int BOTH_LEDS = 0;
const int RIGHT_LED = 1;
const int LEFT_LED  = 2;

// Declare the MeRGLed object
MeRGBLed onboardLEDs(PORT, SLOT);

/**************** End of Global Declarations ***************************/

/***********************************************************************
 * Method:  updateLED(int led, int red, int green, int blue)
 *
 * Arguments:
 *           Variable        Values
 *          --------------------------
 *          led             0 - 2  (0 - Both LEDs; 1 - Right LED; 2 - Left LED)
 *          red             0 - 255
 *          green           0 - 255
 *          Blue            0 - 255
 *
 * Returns: N/A
 *
 * Description:
 *  The updateLED method manages the current color of the onboard
 *  LEDs.
 ************************************************************************/
void updateLED(int led, int red, int green, int blue) {
  onboardLEDs.setColor(led, red, green, blue);
  onboardLEDs.show();
}

/***********************************************************************
 * Method:       setup
 *
 * Arguments:    None
 *
 * Returns:      N/A
 *
 * Description:
 *    This method handles all of the initialization for the program.
 ************************************************************************/
void setup() {
  // set the led color components to generate a shade of red
  int red = 150;
  int green = 0;
  int blue = 0;
  int wait_duration = 2000;  // duration in milliseconds

  // set the color of the leds to a shade of red
  updateLED(BOTH_LEDS, red, green, blue);

  // wait for wait duration
  delay(wait_duration);

  // set the led color components to generate black (off)
  red = green = blue = 0;

  // set the color of the leds to black (off)
  updateLED(BOTH_LEDS, red, green, blue);
}

/***********************************************************************
 * Method:      loop
 *
 * Arguments:   None
 *
 * Returns:     N/A
 *
 * Description:
 *    This method executes continuously after the setup method
 *    completes its tasks.
 ***********************************************************************/
void loop() {
}
Note that I only needed to include the MeMCore.h header file because it contains all of the other includes.
BenasSuper
#5
When I tried this code I got an error Arduino: 1.8.8 (Windows 10), Board: “Arduino/Genuino Uno”
C:\Users\Benas\Documents\Arduino\sketch_jan22a\sketch_jan22a.ino: In function ‘void updateLED(int, int, int, int)’:
sketch_jan22a:12:3: error: ‘onboardLEDs’ was not declared in this scope
onboardLEDs.setColor(led, red, green, blue);
^
sketch_jan22a:40:1: error: expected declaration before ‘}’ token
}
^
exit status 1
‘onboardLEDs’ was not declared in this scope
tech_support
#6
If you installed mBlock 3, you can open arduino 1.6.5 through Arduino IDE:

This is what we downloaded:
Also this page says how to use the examples.
Hmm, I just recompiled the code under Arduino 1.8.8 with no issues. I’m on macOS, so I’ll need to give it a try with Windows 10. I’ll report back later today on what I find.
OK, just did some fiddling around on Windows 10 and needed to amend my post on installing the Makeblock libraries. Apparently there was an underlying reorg and since I work from the git repo using a symbolic, I hadn’t noticed the change. So…
- Remove the existing MakeblockDrive folder directly in the Sketches/libraries folder.
- If you don’t have the .zip file from Github, re-download it.
- Add the zipped library via the Sketch/Include Libraries/Add ZIP Library menu item.
I did those, and everything compiled correctly under Windows 10. I don’t have an mBot handy to test the upload, but I’ll get to that later today.
Cheers!
BenasSuper
#12
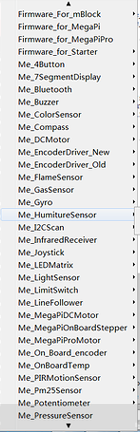
nope still doesn’t work, when I click on the MakeblockDrive library (I did it with add zip) this is what I get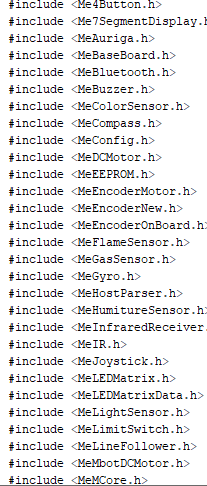
chuckmcknight
#14
OK, I got that earlier, but what I had to do was:
- Delete the folder in Sketches/libraries folder that held the Makeblock code.
- Re-download the zip file from Github (do not unzip it, just use it as is).
- Add that zip file via the Add ZIP library option.
That seemed to set things right because now I could see the examples.
When I originally downloaded the source a couple of years ago, all of the source, examples, etc., were in the src directory of the Github repo. I had mentioned that to someone in tech support and opined that removing that extra level of directory structure would make it easier for folks to add the library to their Arduino setup rather than having to go in and make a new zip file. Apparently, someone thought it was a good idea because that seems to be what happened. :-?
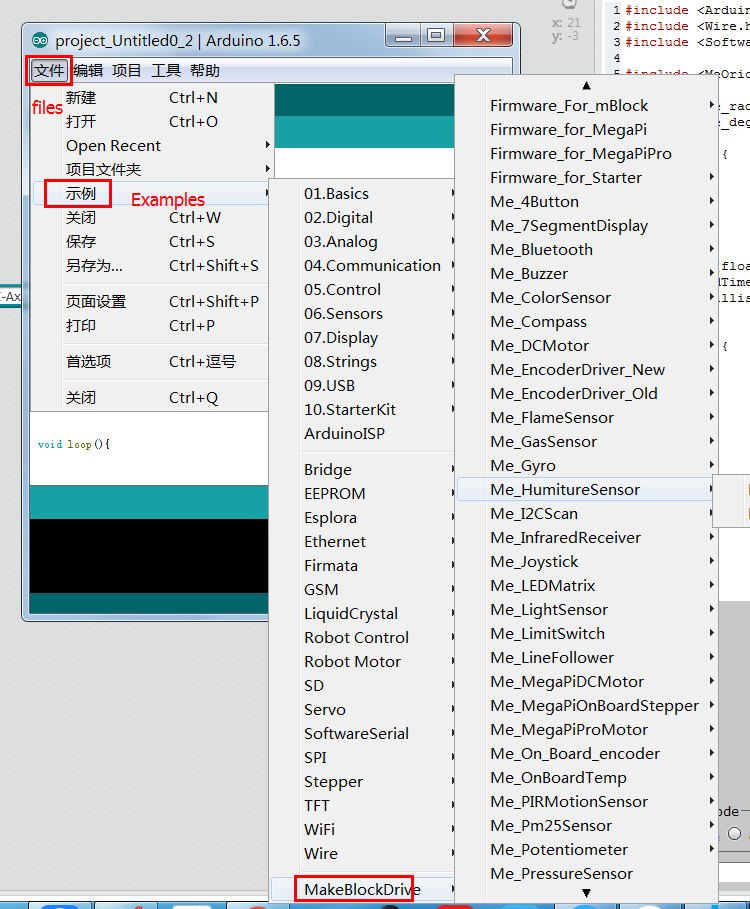
The examples would appear under the File->Examples->MakeblockDrive menu item if you are looking for them, not under the Sketch->Include Libraries menu item. 
system
#15
This topic was automatically closed 30 days after the last reply. New replies are no longer allowed.