Makeblock You are about to lose a customer


#1

Dear Makeblock,

I was prepared to love your product but the misery I have experienced over the last few days has left me extremely frustrated and upset. I bought the Starter IR kit for my 10 year old daughter for her birthday. She is on a lego robotics team and she is interested in programming. Your company made it seem like it was as easy as buying the kit, building it with simple instructions, plugging it in to a computer and programming it. So far, after four days, I HAVEN’T EVEN MADE IT TO THE PROGRAMMING PHASE. My daughter has not been able to play with it at all. Now, let me recap so we are all clear.

  1. Your instruction manual needs to be improved, bottom line. However, I did manage to build the robot TWICE. I had to take it apart to check all connections and make sure it was wired properly.

  2. I managed to plug the computer into my mac and update the firmware with mblock. I should mention that it also crashed my mac since I am running Sierra and I had to yet again find a solution via your forum. If these are known issues, they should all be included in the instruction manual in the kit.

  3. Now we run in to the real problem. I have yet to get a single program to work properly. If you see my other post you will notice that A) my default program works properly. If I push forward on the remote, it goes forward, backward, it goes backward, etc… HOWEVER when I tried this very simple program:

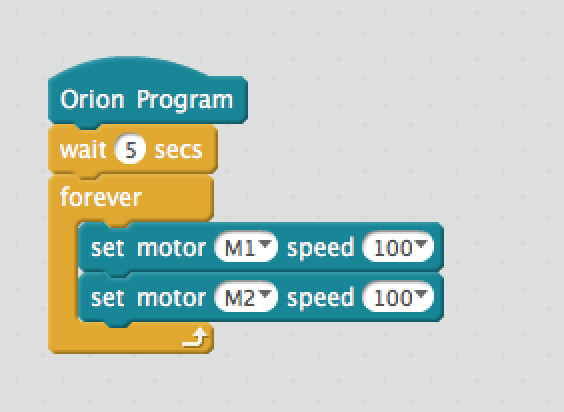
One track, the track with Motor 2 runs forward as it should. The other track, the one with Motor 1 runs backward.

Before you tell me about wiring let me point something out. Yes, I know if I switch the wires on the motor it works fine BUT THEN WHEN I LOAD THE DEFAULT PROGRAM the controls are messed up. I also know that I could just put -100 on the track but why should I have to do this? This is a program a 10 year old should be able to run right? I paid over 100 dollars. I want it all to work properly.

So please, please, pretty please, help me solve this problem and I might just change my mind and think this robot is great if my daughter can actually program it and make it work right. Heck, I might even buy more sensors and tell people your product is great. However, if I do not find a simple solution to this problem this robot is going in the garbage.

P.S. - You really should include about 10 examples of basic programs for the individual products in the manual with a step by step process.


#2

@Arram, you will need to copy @tec_support, the official customer support rep for Makeblock.

Also, be aware that Chinese New Year has started (I think) and during that time everything is essentially shut down.

I don’t work for Makeblock, but I’ve got the mBot Ranger kit and I’ll put it together this weekend to see if I have the same issues.


#3

Hi Arram,

Sorry for the late reply since it was very busy these weeks.
First, thanks for sharing your opinions on the User Manual, we will keep improving.
For the crash issue on the Mac OS Sierra, please refer to this document:http://www.mblock.cc/posts/run-makeblock-ch340-ch341-on-mac-os-sierra
For the last issue, may I know which version mBlock software do you use?
Could you please reset default program for starter again with latest version mBlock 3.4.5.
Here is the instruction to guide reset default program.2. How to reset default program for starter with mBlock.docx.zip (1.2 MB)
Test with IR controller, when it works properly with IR controller, please upload this example program in this document have a check.How can I upload my mBlock program to the Orion Board.zip (214.5 KB)

If it is possible, please kindly take a video to show the problem once still the same problem.


#4

Have I have done everything you mentioned several times. But I did it again.

  1. Deleted mblock program from computer.
  2. Reinstalled mblock 3.4.5
  3. Connected to starter robot and reinstalled default program.
  4. Default program works fine.
  5. Installed basic program on robot to make it move forward, yet again 1 track goes forward and the other track goes backwards, thus the robot goes in circles.

#5

Hi Arram,

Fellow user here.

I am using the Arduino IDE and found that it is true that you have to put a negative in for one motor. You then flip the signs to go in reverse.

Because the motors are mounted in mirror image, they would have had to make two version with opposite wiring. Or make a weird tweak to the board.

Part of robotics is using software to make the simple hardware work.


#6

Thank you for your reply but can you be a little more specific please. Do you mean I have to flip the signs when I am programming in mblock or arduino IDE? Which means simply putting a - in front of one of the motor speeds? For example:

set M1 motor speed -100
set M2 motor speed 100

Or am I missing something? I ask this because I have looked at sample programs and not a single one of them says this simple fact. In all of those programs they set 100 for forward and -100 for backwards.


#7

Hi Arram,

since the motors are mirror-mounted, one of the two motors must be controlled with a negated signal if they are to rotate in the same direction from the robot’s viewpoint. I think, When I work with robotics, I have to cope with it. It is also the intention to understand these relationships. That a 10-year-old can not alone, I understand.

Lego Mindstorms experience is probably not helpful at first. The Mindstorms software is a sequential function chart, mBlock has a procedural programming.

By the way, the mbot Ranger gives a “comfort function” forward / backward / right / left, which takes the position of the motors into account:

In my opinion, it is not necessarily better if things happen in the background, which can not be reconstructed as a beginner.


#8

That’s how I see it.

Maybe it was an example code for another board. MBot Ranger has forward / backward / left / right.
When programming line follower conventionally, it looks like this:


#9

https://youtu.be/4PGoQcdiaQw

I see what you are saying but in all tutorials I have seen that is not the case. If you have time please see the video in this link. This person is using an orion board just like me, and when they set both motors to 100 it is for forward. If they set it to 100 and -100 it is to turn the bot. There are several other videos that do the same thing and many posts on this forum with orion board examples.


#10

It’s very possible that they swapped the wiring…a lot of people seem to want to take that path. Or, the motors were wired in reverse from the factory at that time. There have been some motor issues and recalls, so things may have changed over time.

It is so often to find example code or comments in code which are outdated or leave out an important detail…such as “hey, we swapped the wiring”.

At first I thought mine was wrong until I realized that the sample code did work and when I examined the code I understood.


#11

I did watch 5 minutes of the tutorial, but he only uses the MOVE commands which take care of the sign for you automatically. Do they use the SET MOTOR command somewhere in the video so I can see what they do?


#12

We hear him speak, we see him programming, but unfortunately we do not know what the robot is really doing - on the other hand, I do not find any examples with rotated signals …


#13

I am sorry the video is long but you need to go to around 14:00 minutes in the video. He starts doing an Orion program. He basically says ‘let’s make the robot go forward’ and he sets M1 to 100 and M2 to 100. He then says ‘lets make the robot turn’ and he sets M1 to 100 and M2 -100.

On my robot, to make it go forward I have to set it opposite and if I change the wiring, as I stated before, it messes up the default program.

Here is a link to a topic in this forum. The person coded a program in mblock for the starter kit to use the remote. Yet again, in this program, M1 100, M2 100 is forward. They did not have to reverse the signs in the program to make it work, which leads me to believe something is messed up on my robot but I can’t figure out what.

[Trouble programming IR buttons in 3.2]


#14

Look at Matticus’ reply #16 in [Trouble programming IR buttons in 3.2] (the link you provided).

For key pressed #64, he set one motor positive and one negative. In post #10, someone uploaded a table showing the codes: 64 = ‘^’

So for the ‘^’ button, (presumably forward), he sets one motor positive and one negative.

For code #25 “down arrow”, he reverses the signs.

For 9 (right turn) he sets both negative, and for 7 (left turn both positive).

This is exactly what I do for the mCore as well.

As for Amethyst’s example, her code would still work…sort of…but the buttons would be switched around. She may not have mentioned that she was working that bug out, or she threw together an example without fully testing it…I have done that myself (oh, the shame).


#15

If you’re wondering why they don’t simply switch the wiring for one of the motors, here’s an explanation from a designer’s point of view:

The Orion board can be used to control many things…a robot’s wheels, a powered pulley, or an articulated arm.

In some cases, the motors are mounted such that they must be turned opposite to get the desired effect (robot wheels). In other cases, this might not be true (an elbow motor and a wrist motor of an articulated arm).

If you wire it for one design, it will be backwards for the other.

That is the beauty of software. One board, one motor, one wiring. The programming is used to adjust the system to the task at hand. Otherwise, it would require multiple boards, multiple motor styles, etc.

One of the major advances provided by computers is flexibility.


#16

I watched the tutorial at the 14 minute mark.

The tutor is just throwing together code on the screen…if he downloaded it to the robot he would probably be a bit surprised.

Nobody’s perfect.

By the way…if you want to see my C++ source code for a robot which uses the IR sensor to avoid running off the edge of table (most of the time), I included it below. Only use it on a low table with carpet underneath, because eventually the robot takes a dive.

http://somedisassemblyrequired.com/index.php/2017/01/01/mbot-example-program


#17

Yes I see your point. And I finally verified this by downloading part of a manual for programming the ranger. I found a section of the book that says exactly the same thing you said.

However, not to be a stickler, I have a few issues with the company and the instruction manual included in the kit. Makeblock needs to understand that people buying these kits are probably ordinary middle class people who have a kid that wants to do simple programs. Most of these people will expect to open the box, build the robot, plug it in, download 1 piece of software, and begin.

That has not been my experience so far, and judging by the masses of posts on this forum, and the comments on other forums, many people are frustrated and upset.

Makeblock has issues that range from poor motors (thankfully I escaped that fate so far), to poor instructions, to poor examples.

Dear Makeblock, you need to include the firmware issues AND programming examples for the specific board people have on their bot IN the instruction manual. The manual itself should have at least 5 - 10 basic examples of how to make the bot move. People do not want to sift through forums for days on end looking for things that should be with the product. I do thank all of the people who took time to help me. I will try to forget this horrific experience and hopefully get some joy from programming the robot with my daughter.


#18

You are correct.


#19

@Arram,

I’ve been working with Makeblock products, notably the mBot for a couple of years now, even authored an ebook on it (link) in an effort to start addressing the documentation issues. One of the things I will note, having working with robotics kits from many different manufacturers, is that the manufacturer’s documentation always leaves a bit to be desired. With much of the manufacturing being done in China, there is also a language issue and often the translations from the technical dialect of Mandarin is a daunting task because Mandarin does not translate directly English and vice versa. That being said, the community does a good job of filling in the gaps as best it can.

While I truly understand your frustration (having gone through it myself a few times), I would encourage you and your child to keep at it. It’s relatively easy to write helper functions in Scratch that provide the easy to use functionality that you are asking for and that may be the shortest path to helping your child master programming for the mBot Starter Kit.

I would also observe that one might be cautious about taking a lot of the “tutorials” on YouTube as being canonical. If you are using the same code as the speaker and your robot is not doing what you expect I’ve frequently found it is due to the speaker posting code that they didn’t really test. You are absolutely right to question things, and I would encourage you to continue doing so. We will all profit from that. :slight_smile:


#20

Your link seems to be broken.