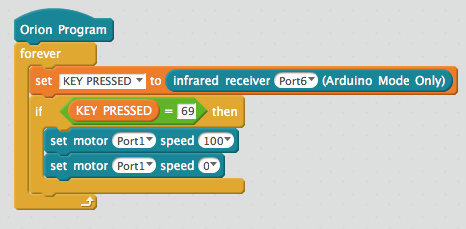
@chuckmcknight Thanks for taking the time to help. I’m not seeing that block. The closest I can find is the one I showed in my screenshot that has key1-key4. Am I missing it somewhere? Is it in with the robot category or somewhere else?
Trouble programming IR buttons in 3.2
@chuckmcknight
The <ir remote [A v] pressed> block only seems to appear in the Robots blocks when “Boards” is set to “mBot”.
I would guess that the IR sensor on the Me Orion would be able to decode the IR codes also, but it doesn’t look like the block to do this is built in.
@amethyst
I don’t have an Me Orion so I don’t know if this code will work, but this is the underlying Arduino code that is created by mBlock for the mBot using the ir sensor blocks. You could change the “MeMCore.h” to “MeOrion.h” (or some such) and try it? I’m sure the ports for the LEDs are wrong too. This code is looking for the “A” button to be pressed.
#include
#include
#include
#include

#include

double angle_rad = PI/180.0;
double angle_deg = 180.0/PI;
MeIR ir;
MeRGBLed rgbled_7(7, 7==7?2:4);


void setup(){
    ir.begin();

}

void loop(){

    if(ir.keyPressed(69)){
        rgbled_7.setColor(0,150,0,0);
        rgbled_7.show();
    }
    ir.loop();


}
Programming Starter Robot Kit with Robotic Arm
Thanks, @mddickey. I appreciate you taking the time. I have that part changed. I’ll keep working on it, and browse through the forum a bit more to see if anyone else has figured it out in the mean time, too.
@amethyst: I took a quick look at the Orion default firmware and it looks like @mddickey is on the right track. Perhaps the standalone IR receiver boards have the IR decoder built in and return a code as mddickey suggested.
The mBot has the IR receiver built into the mainboard so it may behave differently.
Restored Starter tank (mblock 3.4.1.1) to factory and now it drives automatically
I figured it out!!
There’s a thread in the Starter Kit forum that pointed to this. I had to read it a few times before I put it all together. So, just in case anyone else needs it…
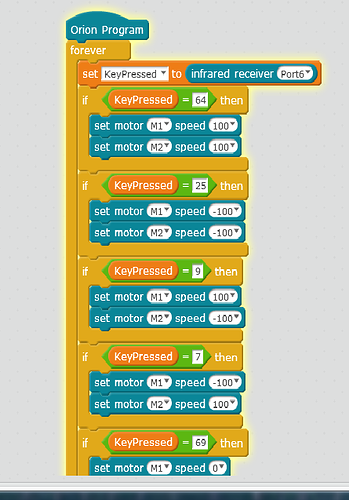
For the 3.2 version, you need to use hex code decimals to program the buttons. Everything is listed under NEC Code Table here: https://github.com/Makeblock-official/Makeblock-Libraries/blob/master/makeblock/src/MeInfraredReceiver.h
Once you have the code for the key you want (up = 0x40, for example), swing over to Google and type in the equation followed by “in decimal”, so in this case, "0x40 in decimal). Google pulls up a calculator and gives you 64. That’s the number you’re going to use to ‘say’ up in mBlock.
I ended up with something like this. Right now, I’m using the A button (60) to stop both motors.
I’ll add in the ultrasonic sensor in the next few days, and maybe a couple other small changes, and post back if anyone is interested. I’m sure there are other beginners out there who are just as confused as me. 
Thank you again for all of your help!
IR-Control for mbot ranger (Auriga Board)
Can't reprogram remote control
FAQ for Starter: How to program the IR remote in order to control the add-on Robotic Arm for starter
Having multiple programs
Excellent work, here are the other codes that I found that are returned when the different buttons are pressed on the remote control.

Mike
Motors stopping when turining
Super Job! I was infuriated with this device until I realized that this device was based on an Orion.
Out of the box every indication was that it would work with Mbot specs. This company needs
some English speaking help in the worst way.
I’m a complete beginner at this, I had a problem with the IR remote (now resolved) but have been following your progress.
I’m now trying to programme the Ultrasonic sensor and have spent ages been trying to find examples to give me an idea, so will be interested to see how you progress.
Good luck 
I have exactly the same issue. I want to copy the code you posted but I can’t find the SET command. Any chance you could send me a screenshot of it?
Thanks
The set command is found in the Data&Blocks area. Select “Make a Variable” and enter a variable name ‘KeyPressed’ and click OK. Some blocks will appear that are related to the variable.
Worked absolutely brilliantly!
Thanks very much for your help, I cannot tell you how relieved I am that I haven’t permanently bricked my sons new favorite toy!
I have the same thing copied down on my mblock, and it works, but only when it is connected the computer. Any Ideas?
Thank you Amethyst, and all who replied. I’m gonna piggy back:
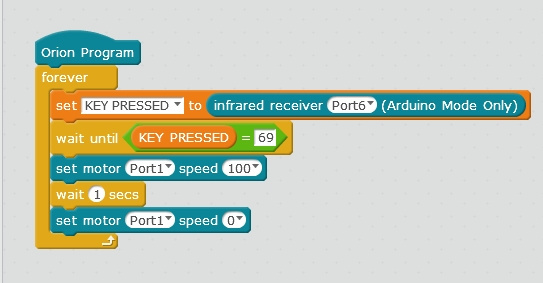
The wait time is 1/10 of a second. That way it will stop when you lift your finger off the button. =)
I have been trying to write a code to use the ir controller to control the starter kit robotic arm. This is what I have started with based on what everyone has said above.
When I click on “Edit with Arduino” and then “Open, Libraries, Makeblock, Firmware for Starter, IR_Ultrasonic”, I am able to compile a sketch and complete the upload, but it doesn’t work.
I have also read that I should be choosing “Firmware_for_mBlock, orion_firmware”, but that tells me that my sketch is too big when I verify it. Does anyone have any advice?
Hi I’m trying to test this program for robot arm and to find the block for"set keypressed to" and “key pressed” but I could not find them in mBlock v.3.4.6. Could you let me know how to find them?
What is the best way to control robot arm in the starter kit IR version?
KEYPRESSED is a variable that is created in the Data & Blocks Palette.
The set [variable] to block will appear in that palette after you create the KEYPRESSED variable.
Note that you have to use the variable block from the Data & Blocks palette if you want to read the value. If you just type in KEYPRESSED instead it will treat KEYPRESSED as a literal string.
What is the best way to control robot arm in the starter kit IR version?
I cannot find the “infrared receiver (Port 6) (Arduino Mode Only)” block. Can you please help me?
Thanks,


