Line Follower in Scratch


#1

Does anyone have documentation on how to use the Line Finder sensor in Scratch? I’ve found examples for arduino IDE, but would like to have samples in scratch. I am not sure how to read the states from the sensor and map it to a variable “S1 in” vs “S1 out”

thanks


#2

Hi @Crey,

@indream just wrote a line-find program some days before, you could refer that.

Line Finder.zip (44.4 KB)


#3

@Johnny,
I think there is a mistake. the program that you linked to doesn’t have any line finding in there, or at least i didn’t find any referencing in the code. . It is a program called xunxian that looks suspect to me.

Here is the program I wrote. I can’t seem to read from the line follower. The variable is either “0” or “null”

It is a version 2.2 LIne Follower.

Unfortunately, this website won’t allow me to upload my program.


#4


My line follower is on Port 3.
I don’t know what the output of Line Follower looks like, so generically, i’ve written “Right” and “Left”.

Looking at makeblock.h it should be something like 0x00, 0x01, 0x02, or 0x04
But in scratch when i look at the Sensor State variable, it just says 0 or null


#5

Hi @Crey,

I’m sorry for the misunderstanding. “Xunxian” is the Chinese pronunciation of line finder. I have tried that before, it could work. You could use the “Arduino Program” instead of the “mBot Program”.


#6

My preference is that it be done in scratch because my kid is familiar already with scratch. He has a competition and I’d rather that he wrote the program himself rather than me having to help him in Arduino.

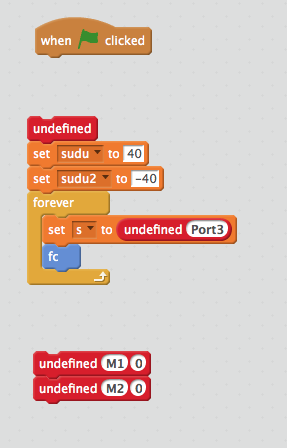
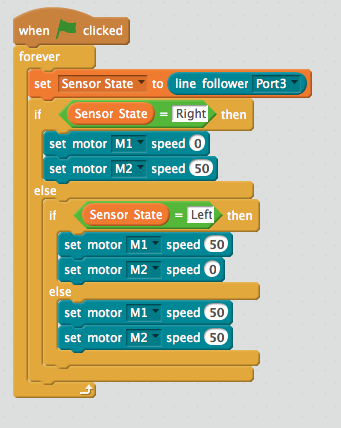
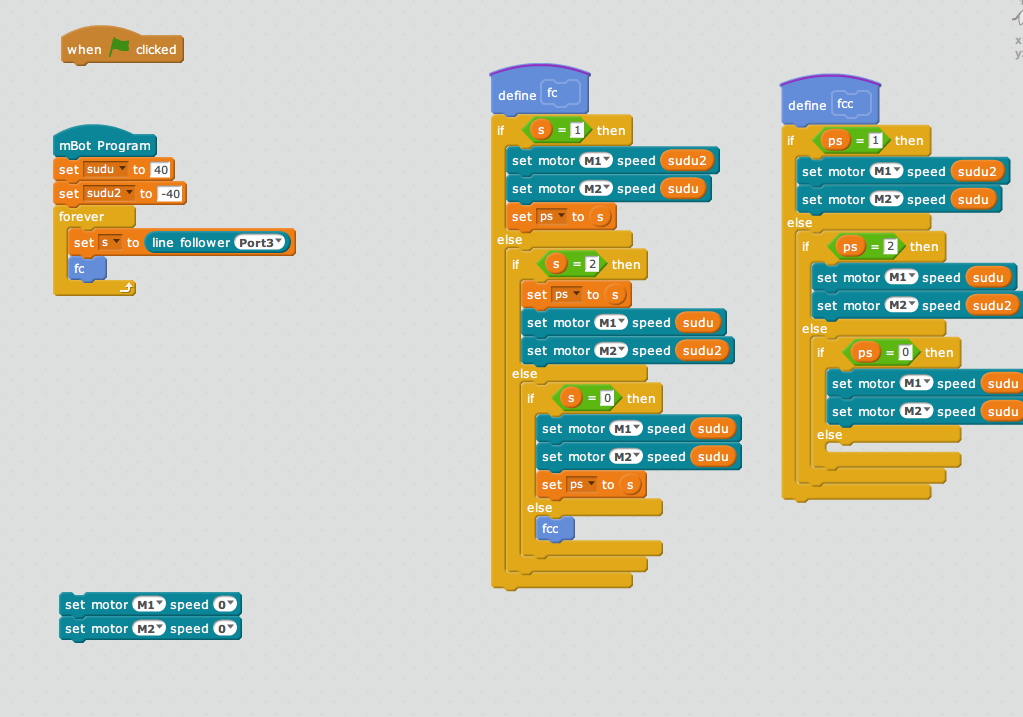
@indream , I loaded up the xunxian project and tried it. It looks like the “s” is the various states of the line follower and can be either 0,1,2,3 .

Is there a way to see what the undefined functions are as well as what’s in the FC function block?
I’m attaching a screenshot of the program.

I’ve also run into problems where sometimes the s values are being returned in the scratch environment and sometimes not.


#7

Hi @Crey,

The fc function block is at the right side, just move a little bit.


#8

Through this exercise, I learned quite a bit about working with the ME-Orion in the scratch environment with scratchbot 2.0.26 on Mac

  1. if you want to see the output of the program, ensure that:
    a) you have a USB connection to the board.
    b) you have selected the correct serial interface
    c) that you have the function selected.
  • I noticed that sometimes it says a specific serial port may be connected in the status bar, but it may not be “checcked” if you click on it. Ensure your port is checked.
  • If the function isn’t glowing gold/yellow, then that function may not be updating the display in the stage.

If you are using any motors or motor drivers:
a) ensure your battery pack is plugged in
b) ensure that your switch is turned on
c) ensure that the values used for speeds are high enough.

  • even though the LED’s on the boards are lit, and the sensors are responsive, there isn’t enough power to run even the lowest of DC motors. (or perhaps, they are run off different power inputs)
  • For a while, I thought my circuits or motors were broken when using a speed of “50”. I then used a value of “100” and then i could see movement

For the program I wrote, I tried jumping to 2.1.4.0210 but it didn’t seem to work for me. so instead of trying to figure out what was wrong, i reverted back to 2.0.26 and that seemed to be fine.


#9

I am using version 2.0.26 as well and can’t connect scratchbot to the robot. I see it in the terminal drop down and it says connected. DO you also have to connect a usb cable? Seems weird?

I can connect from phone but not from computer?


#10