I’ve connected the mbot to my computer via Bluetooth and tried to run the program, yet nothing happens. I’ve checked that it is actually connected. Is there anything I am missing? Some important step or required program?
Mbot won't run programs
Gort
#2
Bluetooth is not required for programming and control, and is suitable for smartphone usage.
If using computer, have you started by installing mBlock and connecting via the usb cable to load or test programs?
Gort
#4
In your other thread there were some instructions for doing different methods like bluetooth from user Nemesis:
They might make more sense after practicing the basics with USB cable. mBot power must be on for computer to recognize it. Connect usb cable from mBot board to the computer
In mBlock software, choose Connect->Serial Port->COM4 or COM5 or whatever appears
The title bar in program will show ‘Serial Port connected’
Choose Boards menu and select ‘mBot’
The software is now set for programming the mBot controller board. You should use the Connect menu option to ‘Upgrade Firmware’ and also use the ‘Reset Default Program’ after changing the mBot program to return to basic functions like IR remote control (RC Car style)
If you have already made some program scripts, they can be run while tethered by placing at the top the Green Flag block in ‘Events’. Click on that block to Start and Stop the program.
This does not require upload of the program, but will not run when disconnected.
Use either ‘Green Flag’ activation script to test program, or replace it with the ‘mBot Program’ script (in ROBOTS) to start the script for upload to the mBot.
Right click on the ‘mBot Program’ block and select ‘Upload to Arduino’. A new window appears with text program code and a button for ‘Upload to Arduino’. Once that button is clicked, the program will compile, then an Upload window will appear. When it finishes, (Program may start automatically! Be ready) turn off the mBot power switch and disconnect the USB cable.
Turn on mBot power and your program should run.
Again, be sure it is in a safe place, and good luck!
Ruin
#5
Thank you for the help, I’ve finally figured out how to upload a program. Now all that I must do is to figure out what does what and the basics of controlling it.
You wouldn’t know if it is possible to control the mbot with a computer keyboard, would you?
Gort
#6
I believe the ‘EVENTS’ script section has a “begin program” block labelelled ‘When key pressed’. If you select a key and place it at the top of the program, it should run like the ‘Green Flag’ button, but only when connected via USB or Bluetooth.
As for program ideas there are many on this forum and the Makeblock website. You can play with the TONE commands to make your bot come to life with sound. There is a line follower module and program examples for that are around I think.
You might begin working with the ‘Set motor speed’ commands to work out movement.
The mBot comes with an Ultrasonic sensor which can tell if it is close to something (the 2-eyeball kinda thing).
A typical program to avoid things would begin:
Moving forward (set both motor speed forward)
(IF) Checking if the sensor output was less than say, 20.
(THEN) When the distance is less than 20, stop, and turn right or left, and begin travelling forward again.
Repeat the loop forever.
If you are new to programming, you will need to work with the ‘script’ blocks, especially the ‘ROBOT’ blocks to understand how to use them for program flow. The above program will require the blue ‘Ultrasonic sensor’ block as the value of the distance to the object, which will be used in the green operator block (within the IF-then block) and checked as less than 20.
If you are not familiar with Scratch Blocks, the wiki can explain the non-robot ones:
Scratch Wiki - Blocks
Ruin
#7
Thanks, I’ll experiment more with the commands. I’ve already tried getting the mBot to run in a square, but I can never get it to turn at the right angle needed.
Gort
#8
If you slow down the motor speed, you can more easily adjust the time turning(thus the angle), but it is not precise.
Have you checked out the line follower module? My unit came with a white poster with black circular line to follow, but I haven’t put in the unit.
Ruin
#9
No, I haven’t looked into that yet. I’m just trying to get the 2.4g wireless serial right now.
Ruin
#10
You said the block required to program the distance between the mbot and an object was in the operator section? I haven’t been able to find anything like what you said.
Could just be my lack of knowledge though, I might be looking right over it.
Gort
#11
The block for that is in the robot section. It is an oval labelled Ultrasonic Sensor ‘port x’ distance’.
It can be placed in an operator.
Mom
#12
To help with the programming - a few tutorials/games on the Tynker.com website made a HUGE difference to our programming abilities at home… They use a similar language & DD & I both made the transfer to the mBOT rather quickly, for most blocks of code…
Ruin
#13
Hello again, it’s been awhile since I last contacted you. I have been busy for the past while so I am just now getting the time to try the Ultrasonic Sensor. I’ve found the block, but what do I put it into to function?
Gort
#14
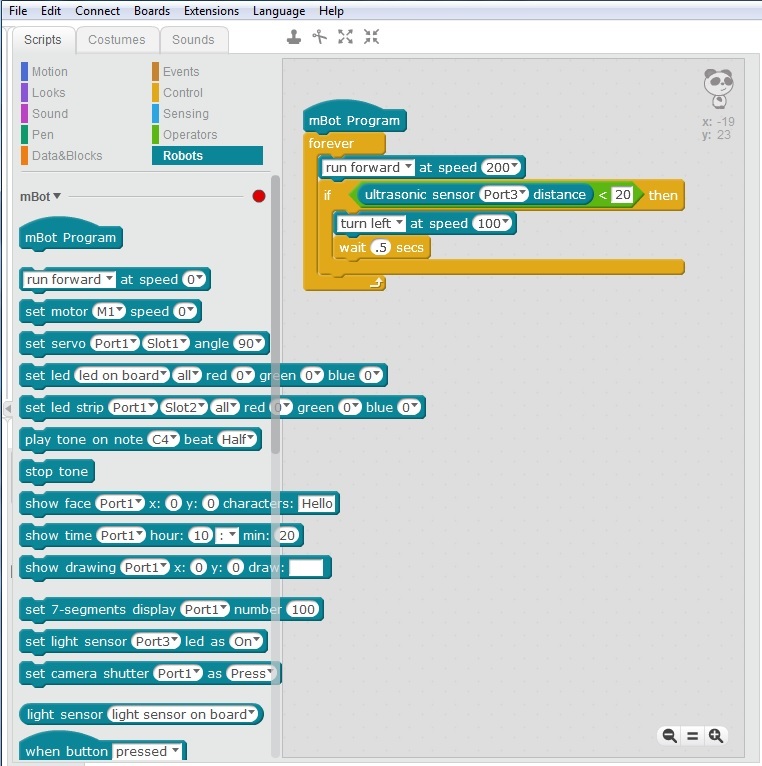
Here is a basic avoidance program which uses the ultrasonic sensor. It’s output seems to be in centimeters, so here we drive the robot forward until the sensor detects an object within 20cm, then do a left turn for half a second and drive forward again:
If you had a 7-segment LED module plugged in, you could view the ultrasonic sensor output like these 2 examples:
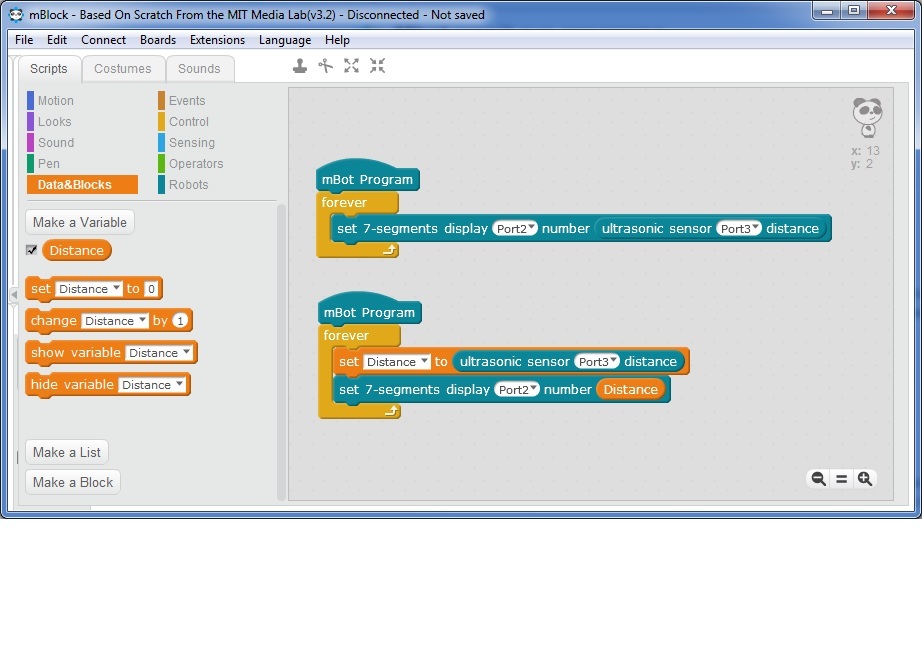
They do the same thing, but in the lower case we create a variable called ‘Distance’ to store the sensor output, and use the variable in the control block.
Ruin
#15
Thank you, you’ve been very helpful with all this stuff. How can you get Data&Blocks to save? I’ve created a few, but they are never there when I open up mBlock again.
darastrixsthyr
#16
If you want to get really precise about turning to exact angles, the best way I’ve found is to install a Me Compass shield, and use your heading to determine how far to make each turn. Sigtrygg has a great example, here.
Gort
#17
From the File menu choose ‘Save Project As’. When you name the project, be sure to add the .sb2 at the end. Otherwise it won’t recognize the file when you go to load project. It’s a glitch they haven’t fixed.
The ‘Save As Type’ selection is always ‘All Files’ so it has no file extension to tie it to a program to open it (mBlock/Scratch) , when it should default to add the .sb2 file extension
Ruin
#18
The mBot will only turn in circles, I have everything setup exactly like you showed me. What could the problem be?
darastrixsthyr
#19
Oh, the mBot will only turn in circles? If you’re running the program that @Gort wrote, it’s possible that it’s a hardware issue, not software. Your robot may be trying to “run forward” but its motors could be wired so that this causes it to just turn in circles forever. You might want to try switching the black and white wires that plug into one of the motors, and see if that makes the motors run in the same direction (really, the opposite direction, since they’re oriented on opposite sides of the robot!) when you try to “run forward”
Gort
#20
While the tank often gets wired wrong, the mBot connectors are pre-wired, so they should not wind up going in circles.
If the robot is always turning to the left, the ultrasonic sensor may be reading low all the time (we have seen this). Make sure you have upgraded the firmware on the mBot board from the mBlock program.
Often I have to reset the mBot before the ultrasonic starts registering.
Then change the program by removing the ‘IF’ - THEN block with the left turn, so it just runs forward to test the motors. If it goes forward, then re-try the ultrasonic part.