mBot onboard button default behaviour


#1

Hi everyone, I hope you are all enjoying your mBots! I feel that mBot and mBlock have come a long way recently, and thanks to firmware updates most of the little bugs have now been resolved.

However, there is still one issue which is causing my students some frustration. I have a question about the mBot onboard button and the way it is handled in the most recent mBot firmware. The firmware I am referring to is this one:

  • File Name: mbot_factory_firmware.ino
  • Version: V06.01.007
  • Date: 07/06/2016

This firmware is located here:

The issue with this firmware is that the button is programmed to cycle between the three “demo” modes:

A - driving in response to IR remote
B - obstacle avoidance
C - line follower

This behaviour of the onboard button can clearly be seen in lines 957 to 1024 of the source code.

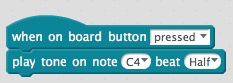
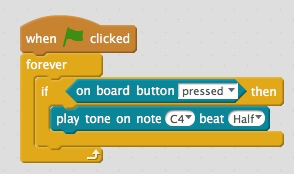
The problem is, having the firmware this way means that the onboard button cannot be used in mBlock to create programs such as “Wait Until On Board Button Pressed”. The onboard button does not respond to mBlock at all - when you press the button, the mBot ignores any program you have in mBlock and instead cycles to the next mode.

This was previously discussed (but not resolved) on this thread back in August:

I suspect this change was made because MakeBlock stopped shipping the IR remote and needed a new way to cycle between the different “demo” modes. However, this renders the onboard button basically unusuable over USB, WiFi or Bluetooth, which is pretty frustrating - especially for anyone who has an IR remote which duplicates the demo mode functionality anyway.

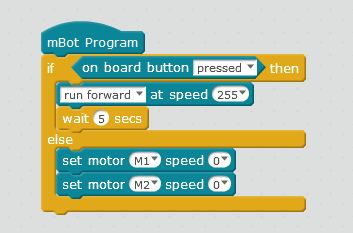
If someone wants to create a program in mBlock which uses the onboard button, the only way seems to be to upload the program using the Arduino IDE. However this is not ideal and is a bit complicated for younger students - ideally I would like a way to use the button over USB, WiFi or Bluetooth.

Is there any chance of this being fixed in the next version of the firmware?

Thanks in advance and thankyou for what is otherwise an incredibly powerful little robot!

Tim


#2

Bear in mind that the mbot_factory_firmware.ino “firmware” is just an Arduino program. If you create a different one, it will determine the behavior of the onboard button. For example, if you create this program in mBlock:

it will override the firmware and play a tone when you press the onboard button. If you go to Arduino mode to compile and upload the program, it will faithfully play the tone every time you press the button.

Hope this helps. :slight_smile:

Regards,

Chuck


#3

Thanks Chuck, that makes a lot of sense. I can confirm the button behaves as expected when using Arduino mode to overwrite the default program.

The main issue I have is that I’d like my students to be able to use the button without using Ardunio, such as when programming the mBot over WiFi. This means having the mBot running the default program (“firmware”) so that it can receive commands from mBlock.

The good news is, I have now solved this issue! After playing around a bit, I have amended the default firmware and removed the lines which relate to the button. The result is a custom firmware which solves my problem with the button:

mbot_tim_firmware.ino.zip (4.9 KB)

The only differences with my firmware are as follows:

  • The onboard button no longer cycles through the demo modes, meaning it can be used in mBlock programming over WiFi, Bluetooth and USB. This enables programming blocks such as “Wait until on board button pressed” to be used. If you wish to access the A,B and C demo modes this can still be done using the IR remote.

  • Instead of playing three notes at startup, the mBot now boots up with a different musical theme to let you know that it is running a custom firmware.

For anyone who’s reading this and wants to know how to install custom firmware on their mBot, here are the steps to reproduce what I did:

  • Download and unzip the custom firmware file
  • Open mBlock on your computer
  • Ensure that mBlock is not connected to your mBot
  • In the top menu, select Edit -> Arduino Mode
  • In the Arduino panel, click on Edit with Arduino IDE
  • Once the Arduino IDE window opens, navigate to File -> Open
  • Locate the custom firmware you downloaded earlier
  • Turn on your mBot and plug into your computer via USB
  • In the top menu of the Arduino IDE, select Tools -> Port and make sure the mBot is connected
  • Click on the “Upload” icon or select Sketch -> Upload
  • Wait approximately 30 seconds, if successful the mBot will play the new startup theme

It seems that this is effectively the same process as using mBlock to reset the default firmware, except with custom firmware. Apologies if this all seems a bit obvious; I am very new to Arduino! I’m hoping that by sharing this I will be able to help other people who’ve been having the same problem as me :o)

Cheers and happy MakeBlocking!

Tim


#4

Hi Tim

Thanks for this we will use it in the Library Classes for the community

As an aside I am testing a Codey Bot for consideration in our programmes - I am not sure what I think about it its early days and the public like it

regards

John


#5

Hi @timschmitz,

I guess I’m not understanding what you are trying to do. Even running the programs over wifi/bluetooth from within mBlock, you should not need to change the firmware.

The program below runs from within mBlock with the stock firmware:

You can drop the forever loop block and the if and just use the wait until block with the on board button [pressed] event block. This is a fairly common idiom, and I use it in several examples in the mBot eBook I published in May (link). The eBook is all in Scratch and has a collection of projects that start with blinking the onboard LEDs all the way through a simple maze solving robot.

Not that there is any issue with changing the firmware, but it seems like a lot of extra work that you would have to do every time a new version of mBlock is released.

Regards,

Chuck


#6

Hello Mbotters

Mr. McKnight, I’ve been reading your book.

I’ve been working with both bits of code above. When I upload in Arduino mode, the button pressed does play the tone.

In mBlock, when I click the green flag and then the onboard button, the pre-installed programs run.

Confusing.

I have also been working with the app and there is a block of code that is

button “port3” “key 1” is pressed

I’m wondering how this works.
Thanks!


#7

Hi,

I just rechecked and the program works if you upload it to the mBot if:

  1. You replace the when [green flag] clicked block with the mBot Program block.
  2. Upload to the mBot.

If you have the when [green flag] clicked block, mBlock will attempt to execute the program via the default firmware. I suspect that may be where the issue exists.

The important part to realize is that when you use the mBot Program block, you will trigger the code generator to generate Arduino code and compile/upload the binary to the mBot. If you use the when [green flag] clicked block, nothing is generated except an empty program that does nothing. You can confirm this behavior by putting mBlock into the Arduino mode and looking for the setup()/loop() methods with the when [green flag] clicked block is in place, then swap it out for the mBot Program block.

mBlock sends commands either via the USB cable or via WiFi or Bluetooth using the over-the-air firmata messages. The behavior you describe seems to indicate that you have restored the default program, but you haven’t successfully uploaded a program (likely due to the use of the when [green flag] clicked] block instead of the mBot Program block).

The button [port 3] [key 1] pressed uses the 4-button add-on module connected to the port labeled 3 (the mBot has ports 1-4 labeled).

Hope this helps!

Chuck

P.S. My book focuses on uploaded all of the programs using the mBot Program block to generate the Arduino code. :slight_smile:


#8

Hi Chuck,
Yes, I tried the code and uploaded it with the mBot program block.

It is successful. My question still remains- can the on board button pressed blockbe used in mBlock w/o uploading using mBot program block?

Each time I press the button after writing code in mBlock, the pre-installed programs run.

One of my goals is to have students use mBlock first and disconnect the robot from USB and run a program. Introducing mBot and uploading code is advanced and not 100% successful.

The Bluetooth connection in mBlock is another issue I need to resolve, but is a different topic than the on board button pressed.

Thanks very much for your quick replies!
Cilla Dahl


#9

Hi Cilla,

Yes, you can use the when [green flag] clicked header block (just tested it). You will need to upgrade the firmware to restore the firmata first though. :slight_smile:

I also tested the program over Bluetooth (on a Mac) and it worked that way as well. One thing I will caution about Bluetooth is that it is somewhat challenging to use in a classroom. Bluetooth will pair with the first device it sees and that may cause the situation of the computers not pairing with the same robot each time. When I’ve taught the classes, I use the WiFi module and dongle because those guarantee a consistent connection. It’s not that Bluetooth won’t work, but it is a bit more work. :slight_smile:

Best regards,

Chuck


#10

Hi Chuck,

It seems you know a bit about the mBot. It seems a very problematic little robot. I can’t even get it to work by using the code below. Can you help?


#11

Your program currently will exit without appearing to do anything. The reason is that the code as written will run once and it is unlikely that you will be able to press the onboard button fast enough. If you bring up the code in Arduino mode, you will see that the code will only execute in the setup() method. I would suggest that you wrap the if statement in a forever loop which will continuously read the status of the onboard button. In Arduino mode, you will see that this puts the code in the loop() method that runs continuously.

Hope this helps. :slight_smile:

Chuck


#12