The XY – Stage was built with 50cm*50cm length sliding rail, the timing belt, step motors, motor drivers, and a micro-controller. It works very good. And even you can build a XYZ – Stage with Makeblock by yourself.
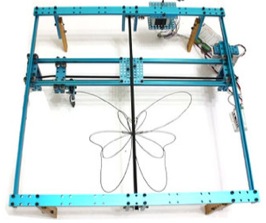
XY–Stage built with Makeblock
andrejust
#1
tomtastic
#3
Hi, cool xy-stage!!!
Can you post the eyact part list??
Do you plan do publich the software for the drawing as a tutorial. I would love that…
Greetings from Germany,
Tom
Eric
#4
Hi Tom,
So glad that you like this robot. We will upload a step by step guide about how to build and use this robot soon.
stelar
#5
Hi Eric,
This is really cool… I’d really like to get my hands on the step-by-step guide.
How do you translate from an image to the movement of the XY plotter? It’s not a line-by-line printing (like inkjet printing), so I’m curious as to how…
Zephod
#6
The “usual” way is to convert some vector-art (like an adobe-illustrator drawing or CAD-shape) to a robotpath using some CAM package, and send this to some microcontroller in the form of G-code.
If you are familiar with C#.NET I can share a small program that loads autocad .DXF files (a common interchange format) and send them to an arduino for synchronized moves. It might not suit your purpose (I was controlling a rather weird robot with it) - but maybe you can use some parts of it.
stelar
#7
Thanks, zephod! G-code is the keyword that’s been eluding me 
Could you share your program? I’m not very familiar with C#, but it’d be very useful to understand how translate from autocad to arduino.
Thanks again!
Zephod
#8
I have uploaded a zip with source + bin! (the binary might need the latest .net framework to run)
It also contains an “arduinoloop.cpp” file that shows a barebones example on how to receive these commands on arduino/meduino.
Please note that this does NOT contain anything to deal with G-code - since it did not really made any sense for me to have that as an intermediate language between dxf and motor-control. The whole setup is pretty much a 1-night experiment, so my excuses if parts are not completely refactored etc 
Let me know if this was useful at all!
Eric
#10
We also have made this in two kit, one is only the mechanical parts and the other include the electronic modules.
XY-Plotter Kit
XY-Plotter-E Kit
mmeixner
#11
and ordered immediately!
one of Makeblocks strenghts - besides the mechanical - is their responsiveness to user wishes! the new rotating base is just one of those ideas - keep the awesomeness, Makeblock
Zephod
#12
The new linear bearings + sliders are great!
I have been playing with them and they are quite solid for most use-cases
I would like to request a set of shorter 8mm rails though - the long ones can bend a little if you are making a machine that applies some force (think CNC mill )
Something like halve the length would be ideal!
I will post some pictures of my latest thing soon - A thread-driven XY-stage with 2 separate tools to first mill PCB traces, then drill the holes in the right places. Mini circuit board factory
arrow64
#13
Looks good!
I’m looking into purchasing the XY Plotter kit from you guys. I’m wondering, since it’s currently sold out, what the timeline is for these items to become available again.
I’m trying to decide whether it’s worth waiting, or whether I should start the design work to make something similar from scratch (buying all the necessary parts without the kit would be too expensive).
rambutan2000
#14
Could you still please post the full parts list for the above plotter rig?
I actually found the kit first and wanted to make it stronger and make it larger and this is exactly what I need. Or even if you could tell me which extra parts I’d need to buy to convert the current xy plotter kit into something like this one.
TNKS!
Geordie