Upgraded XY plotter - 6W laser


#21

The directions from the DTR site are accurate, 'cause that’s what I did. I put a diode in between the Orion motor output and the laser driver to make sure it didn’t get a reverse signal (unlikely, but just in case). I also added a 10K resistor. Just put both parts in series on the way to the “enable” pad on the driver. Power the Orion and the laser driver from the same power supply. You’ll need about 8A.

Here’s a pic of the ramp-up capacitor that needs to be removed:

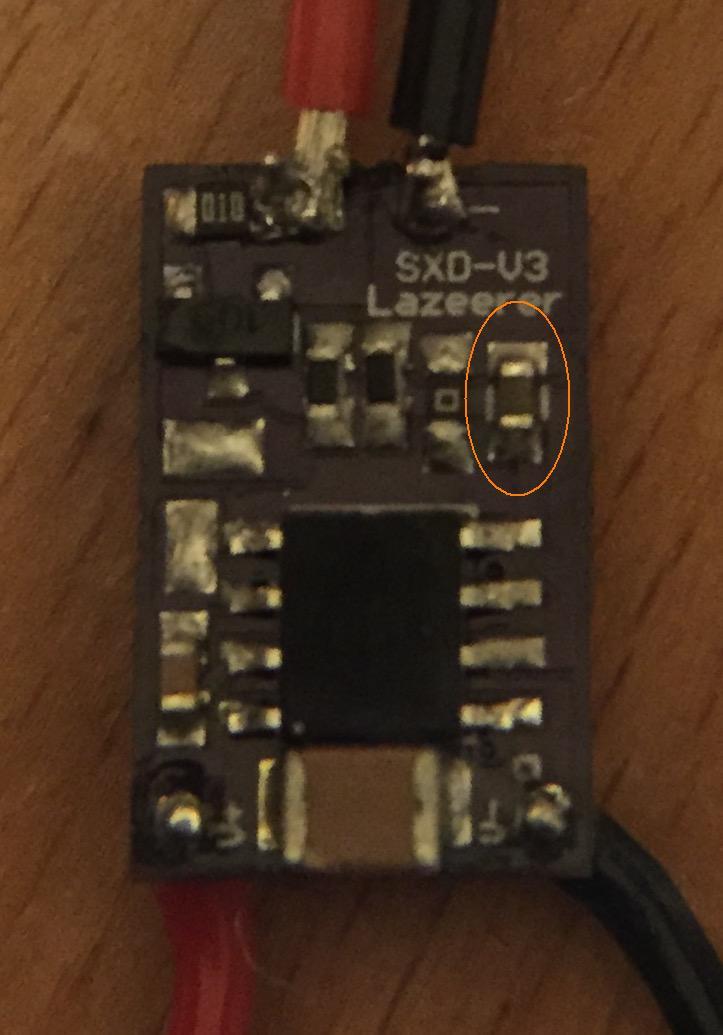
Removing that capacitor means the driver is now instant-on instead of having a one second power-up ramp.

Here’s the resistor to remove to expose the enable pin:

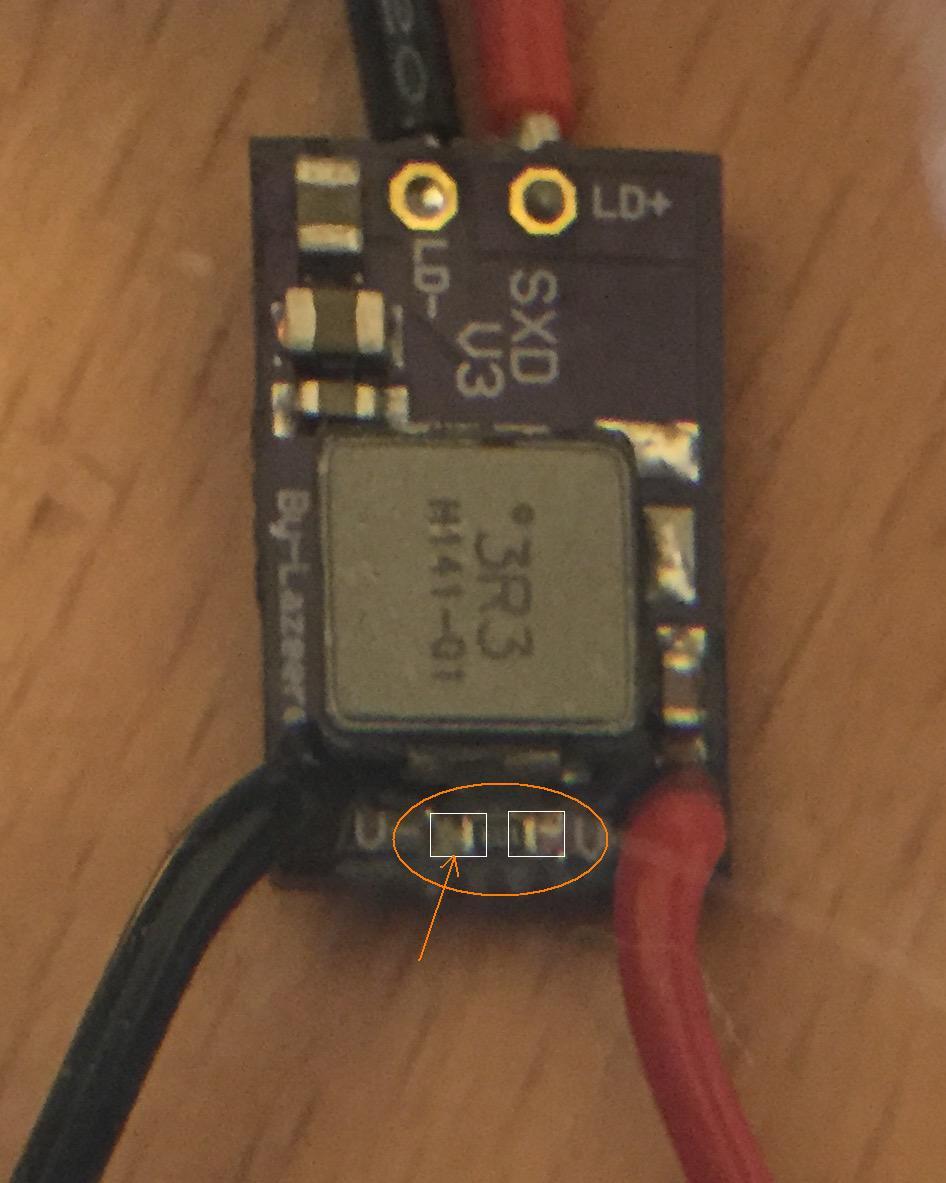
When you desolder the resistor, there are two metal pads exposed (shown here as white rectangles). The resistor is drawing power from the red wire on the right and applying it to the enable pad on the left, meaning the driver is always on. By removing the resistor, you disable the driver until you apply power to the enable pad again. Take the POSITIVE wire from the M1 output of the Orion board, run it through a diode for safety, then through a 10K resistor to limit the power, and attach to the exposed enable pad on the left. Now, when the Orion sends a pulse that would normally drive a motor, it’s turning on the enable pad of the laser driver instead.

You don’t need a super fine tipped soldering iron, just be careful. Heat up both sides of the resistor or capacitor at the same time and use an exacto knife to push it off the pads when it gets hot. Be careful not to get solder on the other parts. It’s a small board, so it’s a little fussy, but it’s doable. The driver itself is relatively cheap, and Jordan from DTR will do this for a small fee, so if you’re not comfortable doing it yourself (or you screw it up) you can always buy one ready to go.


#22

If it makes you feel any better, I blew a $200 diode getting impatient. That stung a little.


#23

Yes impatience can screw things up. Im on a break playing music on the island but had to check. So reading this on my phone, The driver I got is slightly different, from what I can see. But Im sure Ill be up late trying. As usual, your a great help. I guess I should post proto1 and 2 made entirely from scrap old printers and wood. They worked but were slow and not so accurate. One other question… If temporarily I need to revert back to my 1watt diode, I will need to slow the move rate down considerably. Im having forgetful issues concerning the gcodes for feed rates, suggestions appreciated. Also, I fell in love with the apps that will take bmp, svg, etc… and print directly. I have used Inkscape with some laser extensions but apparently turning laser on and off is not generated properly. What are you using for intermediate software?
Thanks again I hope others are learning from my mistakes… I put another nickle in for your help.
Wayne Keller


#24

I use Vectric VCarve because I have a CNC as well, so I started with Cut2D and upgraded a year or so in. I’ve seen people use InkScape to trace images, export to DXF, and then use DXF to GCode. That works but it’s a few more steps.

The companion firmware code for MDraw or BenBox would probably benefit similarly from the changes I made to GCodeParser, I just don’t use those much because I have the tools to make GCode, and you get better control that way. I can set feed rate and laser power for each path independently, then feed them all to the machine at once.

G0 is a rapid move
G1 is a feedrate move, usually followed by F500.0 where 500.0 is mm/min

F, X, Y, and Z are optional params. If left out, the machine just uses the last value for that axis.

G0 X0 Y0 / rapid home
G0 X60.0 / rapid move to current Y, X 60mm
G1 Y50.0 F600 / feed move to current X, Y 50 at 600 mm/min, or 10mm/sec


#25

Great work! Why you don’t try to port grbl to the Orion? That will be very very cool!


#26

Largely because I didn’t know it existed before now. :slight_smile: That said, the Atmel chips are pretty underpowered for this, so I was planning on building a completely different board using a Propeller chip. That way, one core could do the motion plan while another core executes it. It would be inherently simpler to write it on a multi-core chip than trying to pretend you’re multi-core with creative use of interrupts and task switching.

I’m curious about grbl now though - I’ll have a look at it. I’m mostly wondering what kinds of stepping rates they’re able to get in their inner loop while continuing to do motion planning, or if they’re actually even doing that.


#27

So I actually looked into this, but sadly it’s not as easy as just configuring it. The Orion board has some of its step/direction pins on different ports, and the grbl code only supports them being on the same port. It could be possible to change it, but the added overhead of passing along the port values per pin would cost memory and cycles.


#28

Could you provide few photos here how to redesign carriages for the work area maximization ?


#29

I shall post a link to the upgrade parts/kit here within a couple days. I am working on the cable chain (2 total sets of cable chain) setup and an Orion board enclosure plus making a few minor changes to my designs before I publish my Makeblock XY Plotter upgrade parts/kit. The upgrade parts will need to be 3D printed which means you will have quite a bit of spare parts left over after making the upgrade.


#30

This is AWESOME. Kudos to you for both the laser upgrade and the improvements to the code.
I am interested in buying the bigger laser, but I don’t have the skills, interest, tools nor inclination to do the soldering and all that other stuff for the upgrade. I’m interested in buying a more “turn key” kit that I can mount on the device, plug-in and go… Any chance a ready-out-of-the-box version might be made available?
Thanks!


#31

If you want ready-made, your best bet would be to pick up something like this: http://www.ebay.com/itm/High-Precise-40W-CO2-Laser-Engraving-Cutting-Machine-Engraver-Cutter-USB-Port/260825065645


#32

I already have the XY Plotter with the laser add-on. I just meant the 6W upgrade you created.


#33

That upgrade is a new laser and laser driver that, kitted, would cost you more than the one I linked you to. I’m happy to provide help to others trying to DIY it, but no, I’m not going to build it for you.


#34

I’m planning to get the 6W laser too, but i want to replace the Orion with a Arduino UNO + CNC Schield in order to install a more stable firmware.
It can cut the plywood? What speed you get in the raster engraving?


#35

6W isn’t strong enough to cut plywood. You might be able to cut a single sheet of very thin veneer, but it’s really not strong enough for much more than paper or card.

I haven’t tried raster engraving, but I suspect at full power you could go pretty fast. I’ve cut cleanly through darker paper at 50mm/sec or faster. It will score paper at 70mm/sec or faster, and that wasn’t full power.


#36

Are you sure that the 6W can’t cut plywood, even 3/4 mm or with multiple passes?
This is very strange because the 4W Laser Module for the Emblaser laser engraver cuts 3mm plywood in 3 passes, but it depends also of what type of plywood is used.


#37

It’s possible - 6W will make a definite mark in plywood, but I haven’t cut through yet.

I did some searching online, and using the same diode I have, here are suggested parameters for cutting different materials:

Note, that this speeds and parameters are effects of tests and can be different for some materials, cooling systems as well setting of the focus distance.

Vinyl 2mm: 100mm/min; 5W; 1 pass (requires smoke removal)
Wood 3mm: 200mm/min; 5W; 3 passes (1 pass for each mm)
Plywood 10mm: 300mm/min; 5W; 10 passes (1 pass for each mm)
InchJet Photographic paper: 400mm/min; 5W, 1 pass
Paper: 600mm/min 2W, 1 pass

When I was trying to cut plywood I wasn’t at full power yet, probably didn’t do enough passes, and my laser was probably a little too high above the material, which affects the focus size. I’ll have to try it again.


#38

wow impressive, I bought a more powerful laser, expected to just plug in and it would work “wrong”

I am using Benbox to run the laser at the moment do I carry on with that and add that code youve done ?


#39

I don’t use BenBox. I have a CNC machine and software for making cut paths for that, so I’m used to working with GCode. The GCode parser for the XY plotter is what I modified to run the laser, but as long as it’s patched through the M1 power connector then BexBox or MDraw should also work. Note that it won’t be as simple as just plugging it in - I had to do a bit of soldering to make mine work from the M1 motor output - the laser I use has its own power supply and driver board. I had to patch the M1 output into that to make the Orion control it.


#40

Is the zip in the first post still the latest version of your optimized GCodeParser?

I’m having quite some trouble making it work. Sometimes the steppers move, most of the time they don’t.
Did you by any chance change anything to the configuration of your plotter, besides the laser upgrade? Steppers? Limit switches?

(I’m working on a version of the GCodeParser which a bit more of Grbl-like responses and error codes (so it can easily be used with some of the popular free GUI’s available). I thought it’d be nice to use your improved code as a starting point instead of Makeblock’s original GCodeParser.)