ULTIMATE 2.0 mBlock Programing: How to remote control the robot?


#1

Hello,

I built the Camera motion control version of the Ultimate 2.0 kit and want to make my own program for it using mBlock … But I don’t see any IR_remote available in the Mega PI section. The only controller i see is an XY axes joystick.

Since the mobile app doesn’t work for custom programs with the mBot, i sort of assume that it’s the same with this kit, am i wrong?

How can we remote control a Ultimate2 (megaPI) showcased robot with a custom mBlock program?
How can we even program it to be remote controlled, beside from the XY only joystick?)
For example i’d like to have buttons to set the speed per motor (minus, reset, plus), another one to cycle thru options for what an added 7-segmentsdisplay would show …

Thanks in advance, any help would be much appreciated.

@tec_support?

Stefan


#2

Hi xenjee,

Please see this program block for IR remote:

You may refer to this post to program.

What do you mean about “mobile app doesn’t work for custom programs with the mBot”?
You can use the Makeblock APP on mobile devices to control and program for mBot or Ultimate 2.0


#3

Thank you very much @tec_support, the link to the other post is the perfect answer.
Solved!

For the “mobile app doesn’t work for custom programs with the mBot” i meant that - with the mBot at least - if we upload a custom program made in (and uploaded from) mBlock (desktop application) then we can’t remote the bot from the mobile app anymore (firmware mismatch message). Am i wrong?

Thanks,
Stefan


#4

Hi Xenjess,

This is normal. You must use the default program for mBot if you want to control it with mobile APP.


#5

Yup, that’s what i meant.
Thank you.


#7

Hi again @tec_support,

Could you please share/upload examples (.sb2 file > Scratch mBlock) for the Ultimate 2.0 Kit?

Specifically different ways to drive the 3 Optical Encoder Motors, using the IR remote (the one that comes with the mBot kit)
And even more specifically for the Camera Dolly ?

PLEASE, pretty please, DO share/provide mBlock examples!!!

Best regards,
Stefan


#9

Hi Xenjee,

I don’t have these kind examples. About graphical program, we encourage the users try to figure out by themselves.
Though there is no special program online course for Ultimate 2.0, while I think you may refer to the program online course for mBot since the program priciple is same.
Here is a link for the info of encoder motor to you for reference.


#10

Hi @tec_support,

Thank you for your answers. The links are helpful.

I couldn’t find the definition of the “set power” Encoder_3.setTarPWM(0) though. (In the Link to the Encoder Motor)

If we use the “set encoder motor speed RPM” block, should we expect the 2 different motors (from Ultimate 2.0 kit) ) to run at the same speed anyway? I did a test and they didn’t seem to run at the same speed.

Thank you.
Stefan


#11

Hi again @tec_support,
Hi everyone ,

If i may, i have a few more questions before i can make good use of all this (camera dolly or other precise motion control programs)

There are some specs on the encoder motors:

Could someone explain what they mean?

How do we correctly set the speed of a motor (RPM), is there an equation to add to the “Speed-rpm” factor in the set speed block in mBlock ?

Then how do we take in consideration the specs (size) of the other gears (and wheel size) involved ?

Is there another way to accurately set the speed of a Motor/Gear/Wheel system?

Thanks in advance, any help appreciated!

Stefan


#12

Hi Xenjee,

The first program block can control the speed of the motor by providing the proportion of the power inside the battery.
When you set 255, then the main board will provide 100% power from the battery for the motor. Normally, the speed of the motor change according to the power provided.

The second program just change its speed directly by setting the RPM value (revolutions per minute). As for the distance value the robot move when the motor rotate 360 degree, you may need to measure in your application.


#13

Hi @tec_support,

Thank you for your support.

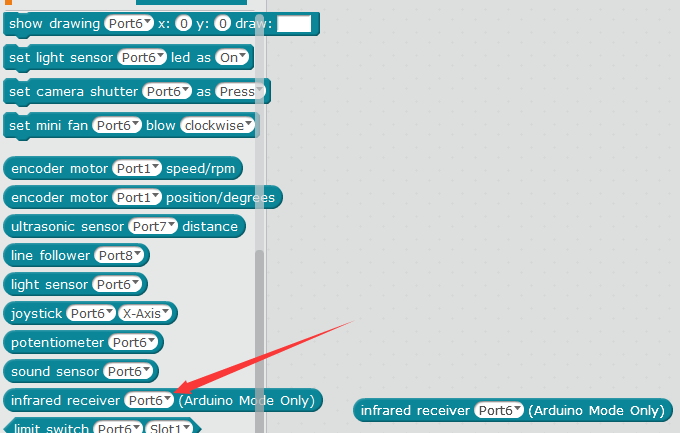
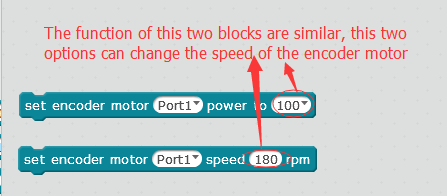
If i may, i’d still like to know what’s the difference between the two options: Speed / Power
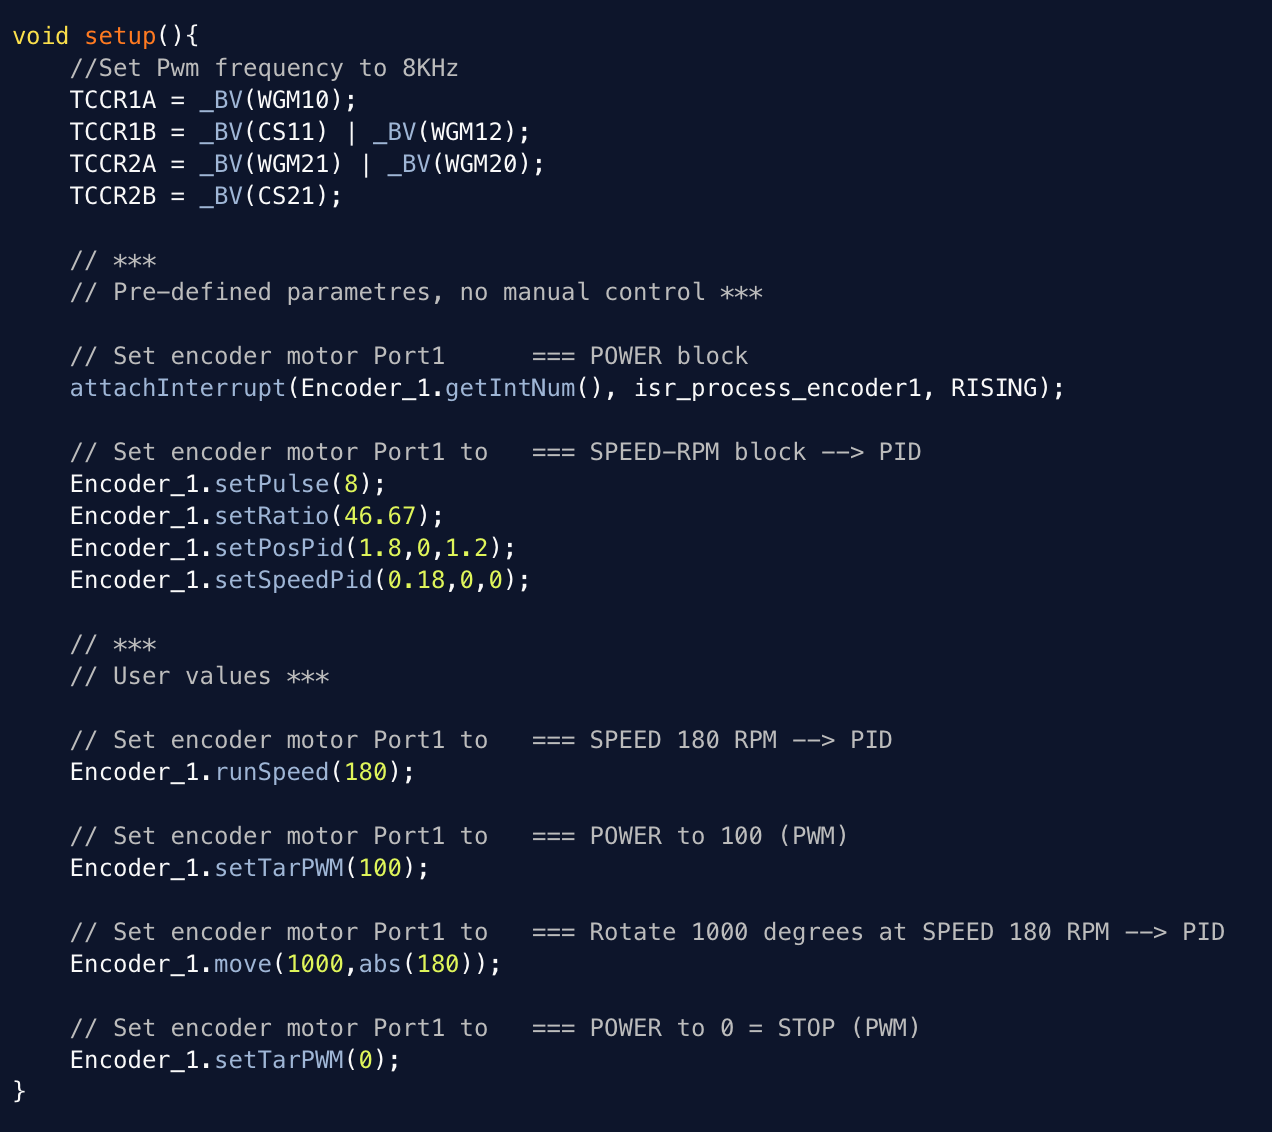
The Arduino code for the Speed-rpm block adds PID related parametres.

Encoder_1.setPulse(8);
Encoder_1.setRatio(46.67);
Encoder_1.setPosPid(1.8,0,1.2);
Encoder_1.setSpeedPid(0.18,0,0);

Can i assume that:

  • Power = simple pwd/duty cycle (would this be like a simple DC motor (no Optical Encoder)?
  • Speed = PID (~feedback…) for pwd
    ???

Is the PID thing the whole reason why the motors are Optical Encoder motors? So that they can allow accurate repeatable motion control?

Sorry if it sounds like i have no idea of what i’m talking about … it’s close enough :wink:

void setup(){
//Set Pwm frequency to 8KHz
TCCR1A = _BV(WGM10);
TCCR1B = _BV(CS11) | _BV(WGM12);
TCCR2A = _BV(WGM21) | _BV(WGM20);
TCCR2B = _BV(CS21);

// ***	
// Pre-defined parametres, no manual control ***

// Set encoder motor Port1 		=== POWER block
attachInterrupt(Encoder_1.getIntNum(), isr_process_encoder1, RISING);

// Set encoder motor Port1 to 	=== SPEED-RPM block --> PID
Encoder_1.setPulse(8);
Encoder_1.setRatio(46.67);
Encoder_1.setPosPid(1.8,0,1.2);
Encoder_1.setSpeedPid(0.18,0,0);

// *** 
// User values ***

// Set encoder motor Port1 to 	=== SPEED 180 RPM --> PID
Encoder_1.runSpeed(180);

// Set encoder motor Port1 to	=== POWER to 100 (PWM)
Encoder_1.setTarPWM(100);

// Set encoder motor Port1 to	=== Rotate 1000 degrees at SPEED 180 RPM --> PID
Encoder_1.move(1000,abs(180));

// Set encoder motor Port1 to	=== POWER to 0 = STOP (PWM)
Encoder_1.setTarPWM(0);

}

Thank you.

Stefan


#14