Trouble programming IR buttons in 3.2


#9

I figured it out!!

There’s a thread in the Starter Kit forum that pointed to this. I had to read it a few times before I put it all together. So, just in case anyone else needs it…

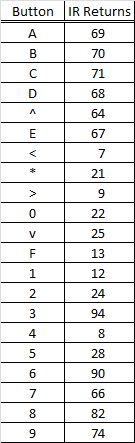
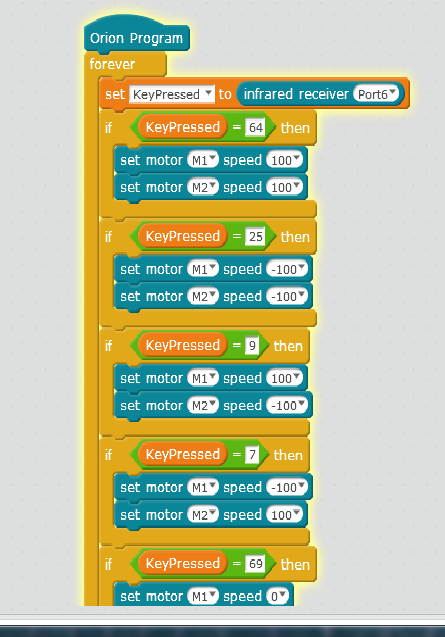
For the 3.2 version, you need to use hex code decimals to program the buttons. Everything is listed under NEC Code Table here: https://github.com/Makeblock-official/Makeblock-Libraries/blob/master/makeblock/src/MeInfraredReceiver.h

Once you have the code for the key you want (up = 0x40, for example), swing over to Google and type in the equation followed by “in decimal”, so in this case, "0x40 in decimal). Google pulls up a calculator and gives you 64. That’s the number you’re going to use to ‘say’ up in mBlock.

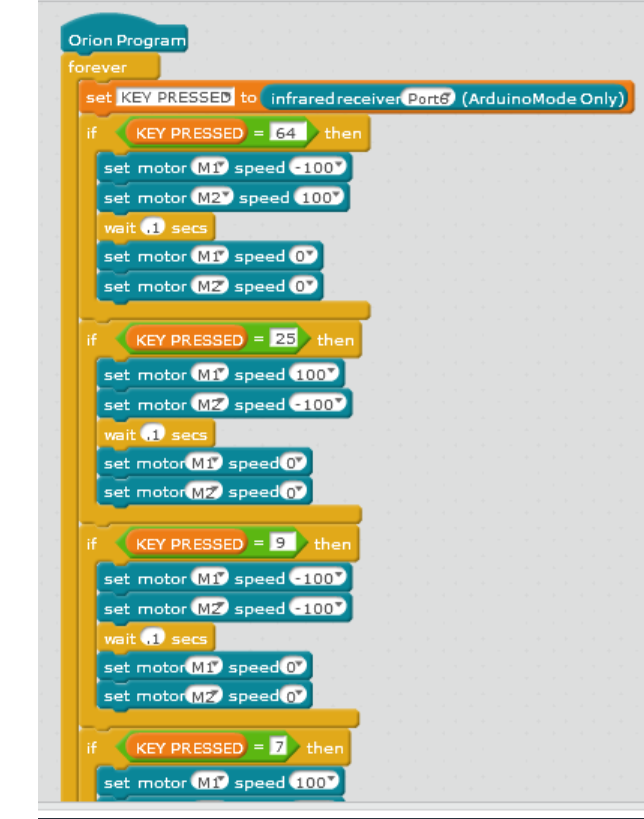
I ended up with something like this. Right now, I’m using the A button (60) to stop both motors.

I’ll add in the ultrasonic sensor in the next few days, and maybe a couple other small changes, and post back if anyone is interested. I’m sure there are other beginners out there who are just as confused as me. :grin:

Thank you again for all of your help!


IR-Control for mbot ranger (Auriga Board)
Can't reprogram remote control
FAQ for Starter: How to program the IR remote in order to control the add-on Robotic Arm for starter
Having multiple programs
#10

@amethyst,

Excellent work, here are the other codes that I found that are returned when the different buttons are pressed on the remote control.

Mike


Motors stopping when turining
#11

Super Job! I was infuriated with this device until I realized that this device was based on an Orion.
Out of the box every indication was that it would work with Mbot specs. This company needs
some English speaking help in the worst way.


#12

I’m a complete beginner at this, I had a problem with the IR remote (now resolved) but have been following your progress.
I’m now trying to programme the Ultrasonic sensor and have spent ages been trying to find examples to give me an idea, so will be interested to see how you progress.
Good luck :slightly_smiling:


#13

I have exactly the same issue. I want to copy the code you posted but I can’t find the SET command. Any chance you could send me a screenshot of it?
Thanks


#14

The set command is found in the Data&Blocks area. Select “Make a Variable” and enter a variable name ‘KeyPressed’ and click OK. Some blocks will appear that are related to the variable.


#15

Worked absolutely brilliantly!
Thanks very much for your help, I cannot tell you how relieved I am that I haven’t permanently bricked my sons new favorite toy!


#16

I have the same thing copied down on my mblock, and it works, but only when it is connected the computer. Any Ideas?


#17

Thank you Amethyst, and all who replied. I’m gonna piggy back:

The wait time is 1/10 of a second. That way it will stop when you lift your finger off the button. =)


#18

I have been trying to write a code to use the ir controller to control the starter kit robotic arm. This is what I have started with based on what everyone has said above.

When I click on “Edit with Arduino” and then “Open, Libraries, Makeblock, Firmware for Starter, IR_Ultrasonic”, I am able to compile a sketch and complete the upload, but it doesn’t work.

I have also read that I should be choosing “Firmware_for_mBlock, orion_firmware”, but that tells me that my sketch is too big when I verify it. Does anyone have any advice?


#19

Hi
You may try the program below?


Programming Starter Robot Kit with Robotic Arm
#20

Yay!
Thank you @amethyst and everybody for chiming in! Very helpful.


#21

Hi I’m trying to test this program for robot arm and to find the block for"set keypressed to" and “key pressed” but I could not find them in mBlock v.3.4.6. Could you let me know how to find them?


What is the best way to control robot arm in the starter kit IR version?
#22

KEYPRESSED is a variable that is created in the Data & Blocks Palette.

The set [variable] to block will appear in that palette after you create the KEYPRESSED variable.

Note that you have to use the variable block from the Data & Blocks palette if you want to read the value. If you just type in KEYPRESSED instead it will treat KEYPRESSED as a literal string.


What is the best way to control robot arm in the starter kit IR version?
#23

I cannot find the “infrared receiver (Port 6) (Arduino Mode Only)” block. Can you please help me?
Thanks,


#24

Hi adriacliment,

Which mainboard do you have?
If it is the me Orion board, you need choose the board option as Starter/Ultimate (Orion) on mBlock software, then you can find the the “infrared receiver (Port 6) (Arduino Mode Only)” block under Robot.


#25

Yes, this is really great you can add this code, I think you will be solve the issue and also add the missing part what you are actually missed out, if you have any othe issue you can also visit https://hpsupports.co/hp-support-assistant/ to know more information related to your quaries.


#26

Thank you very much!!

I purchased the exact model battery pack, and I agree, now I can turn and run on carpet, I do not run it at full speed because the acceleration on the motors.

Thank you for the suggestion, I would recommend this pack to anyone who uses the tank.


#27

I cannot tell you how relieved I am that I haven’t permanently bricked my sons new favorite toy!


#28

I am writing down all the things related to IR Buttons. Depending on which you can program IR buttons 3.2 -
The Dish Network 3.2 IR remote control accompanies several different satellite receiver boxes to control viewing options, settings and channel changing. Basically, I have also wanted to integrate these buttons on mobile erp and related things. This remote control can be programmed to control all of the audio and visual devices connected to the receiver. DVD players, VCRs, televisions and surround sounds are just a few of the types of devices programmable with the 3.2 IR remote control. This easy-to-use remote control eliminates the need for a different remote control for each different device.
Step 1
Locate the “Mode” buttons at the top of the remote control. The buttons are labelled SAT, TV, VCR and AUX. The SAT key is already programmed to control your satellite console receiver. The AUX button can be programmed to control DVD players, surround sounds and other audio and visual auxiliary components.
Step 2
Point the remote at the device you are programming. Hold down the “Mode” button for that device. For example, if you are programming a VCR, hold down the “VCR” button. When all four of the “Mode” buttons have lighted up, release the button. The “Mode” button you are programming is now flashing on and off.

Step 3
Press the large red “Power” button. This signals the remote to access the internal programming codes.

Step 4
Move the blue up and down arrows to access the different programming codes that relate to your device. You may have to move through the codes several times to access the correct one. Once the correct program code is recognized, the device will power off.
Step 5
Press the “Pound” or “#” key to save the device’s program code. Hit the red “Power” button to power the device back on. This process will have to be done with each of the different devices you wish to program into the remote control.

Hope this article will help everyone properly.