Currently I am trying to write a basic code that moves the robot about an object just using the action blocks. (I plan on later down the road on using the Ultrasonic senor to automate parts of it). However, when I am running the code, the robot will run perfectly in a straight line and other curve off therefore causing the coding to be thrown off and not run properly. Is there any way to fix this either with coding or the robot? Thanks in advance!
Poor Alignment when Driving mBot Ranger
Best_codes
#2
Are you saying that you have alignment issues with your mBot X? (Is this a Ranger, mBot, or what?). If it is mBot Ranger, are you using treads (this has an unfixable bad alignment, really)? Please give me a bit more details about the issue, @techy_apple.
What I have done in the past to help with this would be to use the gyro sensor of mBot Ranger to correct its alignment. Not sure if I can remember how to this anymore…
techy_apple
#3
@Best_codes Im using a mBot Ranger with tracks. I remember from looking back at one of my other posts that you helped my with, that nothing can be done physically but i wondered if anything can be done using software to help correct the problem? Thanks!
Best_codes
#4
Yes, the tracks cause alignment issues @techy_apple. What I would try is using the gyro sensors to correct its direction as it drives. I can’t give a sample code right now because I’m having issues with mBlock. I’ll get one to you whenever I can.
techy_apple
#5
@Best_codes Its okay, just create the sample code whenever you get a chance! Im also going to try to make a sample code once I figure out how to use the gyro.
techy_apple
#7
@Best_codes Is there a place where I can figure out what the numbers and angle of the gyro sensor mean? Thanks!!
Best_codes
#8
@techy_apple I believe that:
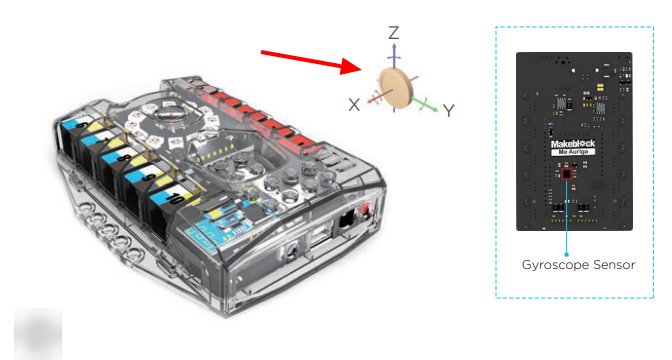
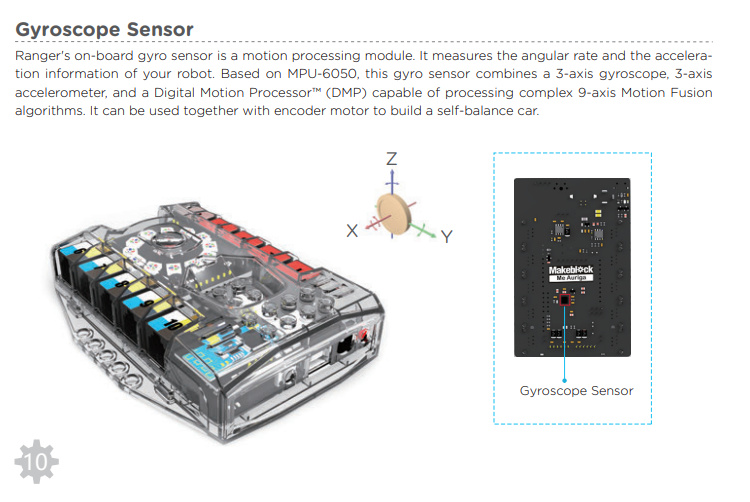
X: How far the robot board is leaning backwards or forwards (on its ‘face’ or ‘tail’).
Y: For the default Ranger setup, how far the robot is tilted side to side (leaning ‘right’ or ‘left’)
Z: How far the robot has spun in a circle (turned right or left)
So Z would likely be the one you’re looking for.
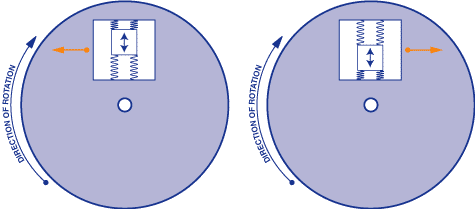
How a Gyro Works
When things rotate around an axis, they have what’s called angular velocity. A spinning wheel can be measured in revolutions per second (RPS) or degrees per second (°/s).
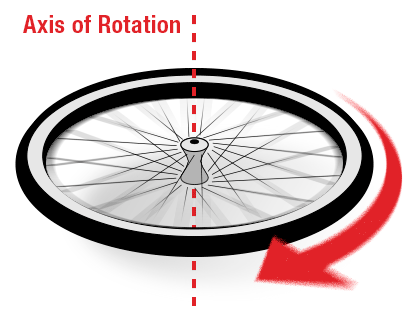
Note that the z axis of the gyro below aligns with the axis of rotation of the wheel.
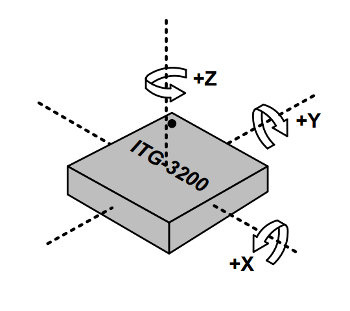
 This image is not representative of mBot Ranger’s setup, but of gyros in general!
If you attach the sensor to the wheel shown above, you can measure the angular velocity of the z axis of the gyro. The other two axes would not measure any rotation.
Imagine if the wheel spins once per second. It would have an angular velocity of 360 degrees per second. The spinning direction of the wheel is also important. Is it clockwise around the axis, or is it counter-clockwise?
A triple axis MEMS gyroscope, similar to the one pictured above (ITG-3200), can measure rotation around three axes: x, y, and z. Some gyros come in single and dual axis varieties, but the triple axis gyro in a single chip is becoming smaller, less expensive, and more popular.
Gyros are often used on objects that are not spinning very fast at all. Aircraft (hopefully) do not spin. Instead, they rotate a few degrees on each axis. By detecting these small changes, gyros help stabilize the flight of the aircraft. Also, note that the acceleration or linear velocity of the aircraft does not affect the measurement of the gyro. Gyros only measure angular velocity.
How does the MEMS gyro detect angular velocity?
The gyroscope sensor within the MEMS is tiny (between 1 and 100 micrometers, the size of a human hair). When the gyro is rotated, a small resonating mass is shifted as the angular velocity changes. This movement is converted into very low-current electrical signals that can be amplified and read by a host microcontroller.
Credit to https://learn.sparkfun.com/tutorials/gyroscope/all for some content and images.
I hope this is helpful! 
Best_codes
Best_codes
#10
@techy_apple No problem! I’m glad it was useful. I almost have mBlock working, but now I can’t remember where I put my ranger.  I won’t rush it. Good luck on your code, too!
Best_codes
#12
Sorry, not yet. I think I might have broken my ranger by accident, so I’ll have to buy a new one, maybe. I’ll try to make a sample later this week anyway. Thanks for your patience! @techy_apple
techy_apple
#13
@Best_codes Attached bellow is my sample code. The correct X-Axis angle for the robot to go perfectly straight is somewhere between 5.91-5.96. When the robot turns toward the right, the number go higher (ex. 6.03) and when it turns to the left the numbers get lower (ex. 5.84). Even though you currently dont have a
m-Bot Ranger could you try to help fill in the “if then, else” part of the code. The one part I am unsure of is that the number are not consistent. For example, if the robot was saying 6.03, then I stop the code, turn the robot to a different angle, and restart the code it says it is at the same angle. Thanks!
P.S. I’m not sure if the 6.60 in the code is accurate.

Best_codes
#14
@techy_apple This is my guess at what the code would look like:

Since I just threw that together on the spot, I can’t be sure.
When I get my Ranger working, I’ll let you know. Good luck!
Best_codes
#16
Of course, no problem! I’ll test it when I can (it may be amazingly useless right now, LOL). @techy_apple

Best_codes
#18


Best_codes
#20
Don’t get your hope too high that it will completely work.  It likely has some bugs, since I can’t test it yet. Good luck! @techy_apple