MultiTasking - Do something while waiting for something to happen


#1

One of the things that is necessary when programming an autonomous robot for competitions is that it can Multitask.
That is, do something eg Line Follow, while waiting for something to happen eg a Touch Sensor to detect an obstacle.
When the obstacle is detected, the program needs to stop line following and change programs to navigate around the obstacle. Once it has done this, the program needs to be able to change to something else, eg back to line following.
I have been programming robots in Lego EV3-G as well as RobotC etc for some time but have only recently looked at Arduino, which in reality is what the mBot and Orion boards are based upon.
I have found that it is possible to MultiTask within the mBlock/Arduino environment using a couple of techniques adapted from other languages.
The base requirement is an understanding of Variables, Case Where (Switch) control structures and Functions.
The mBlock environment can handle Variables and Funtions well, however Case is not a Control option, so we will have to use IF decision controls.


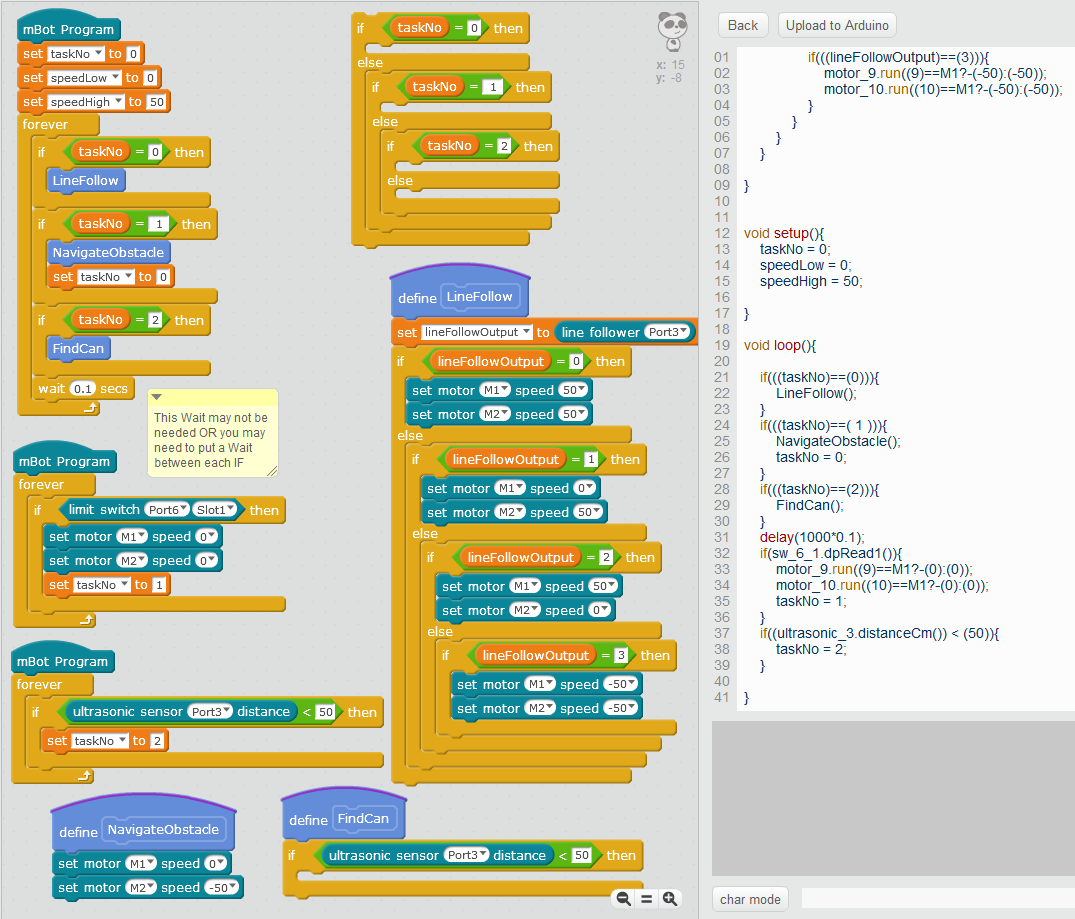
The image above shows the basics of the unfinished program.
What is interesting is that I can put multiple ‘mBot Program’ blocks and in the Arduino code they become Tasks which is what we want.
Now to be able to have one task run and have the others also running and checking if that event has taken place requires the Main mBot Program to be constantly looping through each task checking if it is running OR if an event has triggered a change in the TaskNo (task number) which is controlled by the Variable taskNo.
Now in this case the main program is running, taskNo is set to zero (0) and the Line Follower function is running (see light blue function). The main program sweeps though the IF’s checking to see if taskNo has changed. If so, then through the next sweep it will execute the code in that IF and not the others.
The other mBot Porgram blocks are constantly running in Forever loops, always checking to see if the event takes place. When one does, eg touches an obstacle the variable taskNo is changed to 1. Note: a wait may need to be placed here so that the main program has time to reach the loop iterating through the IF’s.
Now taskNo 1 will execute and the robot will navigate around the obstacle.
Note: that once it has navigated around the obstacle the last thing that happens is taskNo variable is set back to zero (0) so that the robot will go back to Line Following.

The light blue Function can be made under the Data&Blocks pallet. You simply need to define an meaningful name to the Function/sub-program/sub-routine and then you can call it from within another program in this instance the main program.

Note: None of the code is finished in this example, it is only an example.
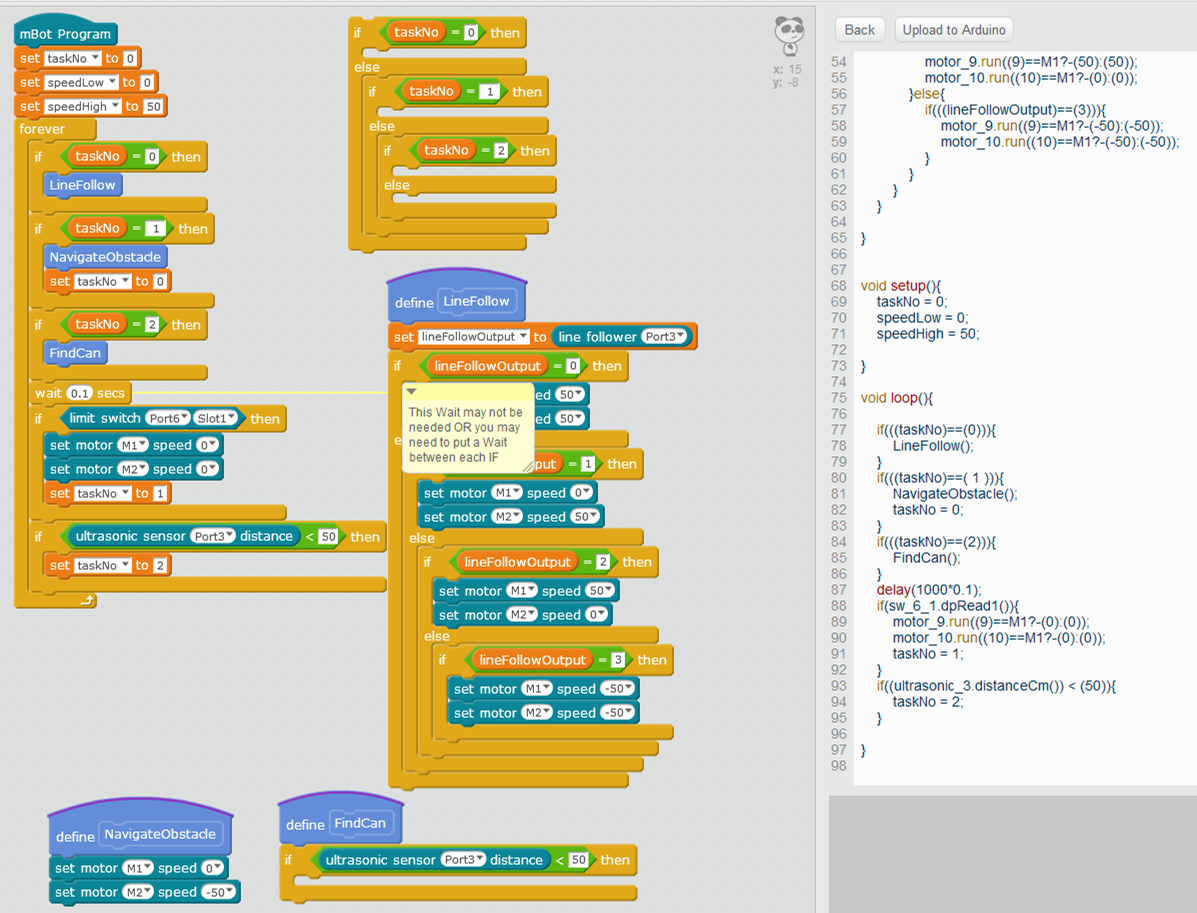
The Main Program uses IF’s rather than IF ELSE (however, I have included an example that could be substituted. Why, because in this instance I do not want each task to be mutually exclusive. I want the program to run through each running process checking if it has been met.
Using the IF ELSE is a classic substitute for the CaseWhere control, and is in fact the way it is handled by the CPU.
If you need mutually exclusive CaseWhere then use the IF ELSE instead.
MultiTasking Example.sb2 (75.1 KB)
I’ve also included the sb2 code so if your keen you can adapt it to your project.
NOTE: This type of program is what teams use when program autonomous robots in RoboCup Junior Rescue events. RoboCup Junior Rescue

Hope this helps everyone who is trying to make autonomous robots do more than one thing at once, sort of!


#2

I hate to burst your bubble, but this is not multitasking. From your example, I noticed something interesting, the arduino code. Arduino sketches have only one setup() function and one loop() function, and that is what your code shows. mBlocks lets you do many things, but when the blocks are translated into code, the results show what is really going on. Below, I have modified the blocks and generated the same code.


As you can see, the translation process put everything together into the loop() function.

Please don’t be discouraged though. Arduino does have a Scheduler Library (experimental) that you can look into at your leisure. Interrupts are also available. A good example for the use of interrupts can be found here.

mBlocks is a useful tool for teaching, but there are many things that have not (yet) been implemented. For example, you mentioned Case Where (Switch), which is a very useful programming tool, and faster than multiple IF statements, but I have yet to see any blocks for it.

I would encourage anyone who is interested, to take a look at Arduino - Reference and also take a look at the Makeblock example (Start Here) to see how the code behind the blocks works.

Mike


#3

@mddickey

Mike,

the scheduler library does not work for Arduino Uno. It is designed for Arduino Due. However, it is still possible to add multitasking-alike features to makeblock projects running Arduino Uno boards (like the MeOrion).

The “Multitasking the Arduino” Tutorial on the The Adafruit “Learn Arduino” Site describes how to do it.

I linked part 1 here, which explains how to modify sketches so they do not need to use the “delay” command (which blocks the whole system) and set up a “state-machine” instead. Part 2 deals with interrupts and part 3 with some more complicated matters.

When looking at this thread, I can only recommend to use the real Arduino IDE to actually learn programming a microcontroller. mBlock/Scratch may be nice to educate kids with simple things, nothing wrong with that. But if one wants to really understand what is going on it is important to deal with the code and the IDE itself!

Cheers, Stefan


#4

Thanks for that, very useful. Could you explain how you define the subroutine? Is it the create block?


#5

Did you look into the tutorial I linked in? I work exclusively with the Arduino IDE, not with mBlock or Scratch! If you want to do advanced programming on Arduino, you have to deal with the real IDE, so better start sooner rather than later :slightly_smiling:!

Looks to me like mBlock and Scratch use “define” blocks for the subroutines. May be somebody else knows how to create a class in mBlock/Scratch? However, to understand the idea behind it, creation of a user class is not mandatory.

Stefan


How do I make my mBot follow a line and avoid an obstacle?
#6

Stefan

I would like to see the tutorial you linked but I can not see any link to anything. I do want to use the Arduino IDE to control this. I am more familiar with Arduino than with Raspberry Pi. Also, I am trying to just control one servo right now with the MegaPi by using the example in the Arduino example. I keep getting an error that the MegaPi library is invalid. I am not sure what to do. Do you have any ideas? I tried getting the firmware from the example and when it compiles, it gives me an error about the mega2560


#7

Hi Marcus, the link to the tutorial is in my first post in this thread, above. Undortunately I do not yet have any experience with the MegaPi yet (it is on mylist…), so can’help you there.

Have fun with the tutorial, it is great to learn this technique.

Cheers, Stefan