I programed the robot using the examples provided. But when I press the “D” button, the motors go in opposite direction. I have never used the Arduino program so I do not know how to fix it.
Getting the Starter Robot Kit IR version to work by itself
mddickey
#2
Try switching the motor (wire) connections where they plug into the board (M1 -> M2 & M2 -> M1). If that does not fix it, it would be helpful to see the code.
chainrot
#3
I tried switching them, it just made the controls worse but here is the code.
/*************************************************************************
- File Name : orion_firmware.ino
- Author : Ander
- Updated : Ander
- Version : V1.10101
- Date : 03/06/2014
- Description : Firmware for Makeblock Electronic modules with Scratch.
- License : CC-BY-SA 3.0
- Copyright © 2013 - 2014 Maker Works Technology Co., Ltd. All right reserved.
-
http://www.makeblock.cc/
**************************************************************************/
#include <Servo.h>
#include <Wire.h>
#include <SoftwareSerial.h>
#include <Arduino.h>
#include <MeOrion.h>
Servo servos[8];
MeDCMotor dc;
MeTemperature ts;
MeRGBLed led;
MeUltrasonicSensor us(PORT_3);
Me7SegmentDisplay seg;
MePort generalDevice;
MeInfraredReceiver infraredReceiverDecode(PORT_6);
MeJoystick joystick;
MeStepper steppers[2];
MeBuzzer buzzer;
MeHumiture humiture;
MeFlameSensor FlameSensor;
MeGasSensor GasSensor;
typedef struct MeModule
{
int device;
int port;
int slot;
int pin;
int index;
float values[3];
} MeModule;
union{
byte byteVal[4];
float floatVal;
long longVal;
}val;
union{
byte byteVal[8];
double doubleVal;
}valDouble;
union{
byte byteVal[2];
short shortVal;
}valShort;
MeModule modules[12];
#if defined(AVR_ATmega32U4)
int analogs[12]={A0,A1,A2,A3,A4,A5,A6,A7,A8,A9,A10,A11};
#endif
#if defined(AVR_ATmega328P) or defined(AVR_ATmega168)
int analogs[8]={A0,A1,A2,A3,A4,A5,A6,A7};
#endif
#if defined(AVR_ATmega1280)|| defined(AVR_ATmega2560)
int analogs[16]={A0,A1,A2,A3,A4,A5,A6,A7,A8,A9,A10,A11,A12,A13,A14,A15};
#endif
String mVersion = “10.01.001”;
boolean isAvailable = false;
boolean isBluetooth = false;
int len = 52;
char buffer[52];
char bufferBt[52];
byte index = 0;
byte dataLen;
byte modulesLen=0;
boolean isStart = false;
unsigned char irRead = 0;
char serialRead;
#define VERSION 0
#define ULTRASONIC_SENSOR 1
#define TEMPERATURE_SENSOR 2
#define LIGHT_SENSOR 3
#define POTENTIONMETER 4
#define JOYSTICK 5
#define GYRO 6
#define SOUND_SENSOR 7
#define RGBLED 8
#define SEVSEG 9
#define MOTOR 10
#define SERVO 11
#define ENCODER 12
#define IR 13
#define PIRMOTION 15
#define INFRARED 16
#define LINEFOLLOWER 17
#define SHUTTER 20
#define LIMITSWITCH 21
#define BUTTON 22
#define HUMITURE 23
#define FLAMESENSOR 24
#define GASSENSOR 25
#define COMPASS 26
#define DIGITAL 30
#define ANALOG 31
#define PWM 32
#define SERVO_PIN 33
#define TONE 34
#define PULSEIN 35
#define ULTRASONIC_ARDUINO 36
#define STEPPER 40
#define LEDMATRIX 41
#define TIMER 50
#define COMMONCMD 60
//Secondary command
#define SET_STARTER_MODE 0x10
#define GET 1
#define RUN 2
#define RESET 4
#define START 5
float angleServo = 90.0;
int servo_pins[8]={0,0,0,0,0,0,0,0};
unsigned char prevc=0;
double lastTime = 0.0;
double currentTime = 0.0;
//Just for Start
int moveSpeed = 190;
int turnSpeed = 200;
int minSpeed = 45;
int factor = 23;
int distance=0;
int randnum = 0;
boolean leftflag;
boolean rightflag;
int starter_mode = 0;
void Forward()
{
dc.reset(M1);
dc.run(moveSpeed);
dc.reset(M2);
dc.run(moveSpeed);
}
void Backward()
{
dc.reset(M1);
dc.run(-moveSpeed);
dc.reset(M2);
dc.run(-moveSpeed);
}
void BackwardAndTurnLeft()
{
dc.reset(M1);
dc.run(-moveSpeed/2);
dc.reset(M2);
dc.run(-moveSpeed);
}
void BackwardAndTurnRight()
{
dc.reset(M1);
dc.run(-moveSpeed);
dc.reset(M2);
dc.run(-moveSpeed/2);
}
void TurnLeft()
{
dc.reset(M1);
dc.run(-moveSpeed);
dc.reset(M2);
dc.run(moveSpeed);
}
void TurnRight()
{
dc.reset(M1);
dc.run(moveSpeed);
dc.reset(M2);
dc.run(-moveSpeed);
}
void Stop()
{
dc.reset(M1);
dc.run(0);
dc.reset(M2);
dc.run(0);
}
void ChangeSpeed(int spd)
{
moveSpeed = spd;
}
void ultrCarProcess()
{
distance = us.distanceCm();
Serial.println(distance);
randomSeed(analogRead(A4));
if((distance > 10) && (distance < 40))
{
randnum=random(300);
if((randnum > 190) && (!rightflag))
{
leftflag=true;
TurnLeft();
}
else
{
rightflag=true;
TurnRight();
}
}
else if(distance < 10)
{
randnum=random(300);
if(randnum > 190)
{
BackwardAndTurnLeft();
}
else
{
BackwardAndTurnRight();
}
}
else
{
leftflag=false;
rightflag=false;
Forward();
}
}
void IrProcess()
{
infraredReceiverDecode.loop();
irRead = infraredReceiverDecode.getCode();
if((irRead != IR_BUTTON_TEST) && (starter_mode != 0))
{
return;
}
switch(irRead)
{
case IR_BUTTON_PLUS:
Forward();
break;
case IR_BUTTON_MINUS:
Backward();
break;
case IR_BUTTON_NEXT:
TurnRight();
break;
case IR_BUTTON_PREVIOUS:
TurnLeft();
break;
case IR_BUTTON_9:
ChangeSpeed(factor9+minSpeed);
break;
case IR_BUTTON_8:
ChangeSpeed(factor8+minSpeed);
break;
case IR_BUTTON_7:
ChangeSpeed(factor7+minSpeed);
break;
case IR_BUTTON_6:
ChangeSpeed(factor6+minSpeed);
break;
case IR_BUTTON_5:
ChangeSpeed(factor5+minSpeed);
break;
case IR_BUTTON_4:
ChangeSpeed(factor4+minSpeed);
break;
case IR_BUTTON_3:
ChangeSpeed(factor3+minSpeed);
break;
case IR_BUTTON_2:
ChangeSpeed(factor2+minSpeed);
break;
case IR_BUTTON_1:
ChangeSpeed(factor*1+minSpeed);
break;
case IR_BUTTON_TEST:
Stop();
while(infraredReceiverDecode.buttonState() != 0)
{
infraredReceiverDecode.loop();
}
starter_mode = starter_mode + 1;
if(starter_mode == 2)
{
starter_mode = 0;
}
break;
default:
Stop();
break;
}
}
void setup(){
pinMode(13,OUTPUT);
digitalWrite(13,HIGH);
delay(300);
digitalWrite(13,LOW);
Serial.begin(115200);
delay(500);
buzzerOn();
delay(100);
buzzerOff();
delay(500);
infraredReceiverDecode.begin();
leftflag=false;
rightflag=false;
randomSeed(analogRead(0));
}
void loop(){
IrProcess();
if(starter_mode == 1)
{
ultrCarProcess();
}
}
mddickey
#4
It looks like you have some old software. Goto Makeblock -official, this is where Makeblock keeps there latest software updates. Start with the Makeblock-libraries, follow the instructions in the README.md section.
Mike
chainrot
#5
@mddickey okay thank you so much
Now I did what you told me to except to follow the instructions in the READEME.md section because my computer will not allow me to open it, but I still have some statements/questions.
- when I pressed the D button, nothing happened and when I press all the other lettered keys, nothing happens with that. so I guess it still didn’t work and
- On some instructions I found on the makeblock website (http://learn.makeblock.cc/starter-robot-kit-ir/), it said that the up and down arrows are for the robot to move forward and backward and the left and right arrows are the direction in which the robot turns. But for me, the up and down arrows make the robot turn and the left and right arrows make the robot move forward and backwards. It’s not a big issue for me but is there anyway to fix that??
mddickey
#6
Unfortunately, without the software update, it will be difficult to figure out what the problem is. There have been a number of changes to the firmware that fixed problem.
I’m not sure what you mean by “my computer will not allow me to open it”.
Were you able to download the file in step 1?
Were you able to unzip/decompress the file to the directory in step 2?
As far as question 2 goes, you may still have to play with the wire some more.
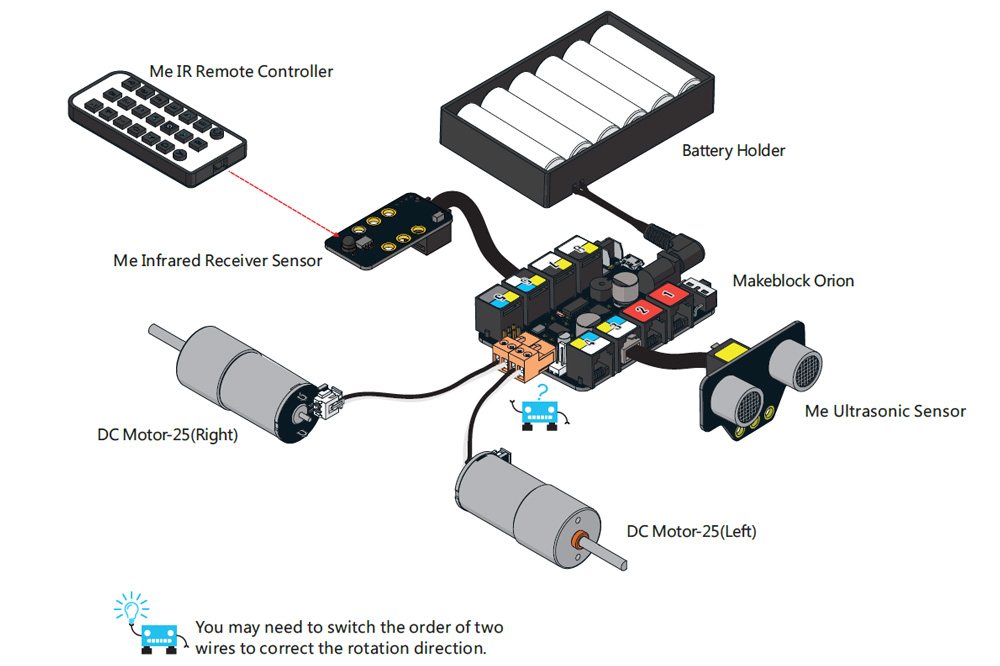
The wires from each motor may need to be switched.
Start by pressing the “forward” arrow and figure out which motor is going backwards. Switch that motors wires at the orange connector. Test it again, if it goes forward, try going backward.
Now let’s try the “left” arrow. If it goes to the right, switch the orange connectors (back to their original place before my previous response).
Let me know what your results are.
Mike
Gort
#7
It took me a while to work out correct wiring for the motors. Rather than trying a whole big program, running the motors separately while on USB and wheels up may help see if they turn the way you want.
You might just create a ‘Set motor speed block’ under a ‘When green flag clicked’ for M1. Set it to 255 and see if it goes forward. Then note if M1 is on the right or the left.
Repeat for M2.
Figuring out left-right means knowing which motor (M1 or M2) is left and right. If M1 is right, and you want to turn right, M1 speed is -255 and M2 speed is +255.
If M1 is one the left, then those same motor commands would turn the bot left.
chainrot
#8
Ok, so what I meant by my computer not opening up the file is that. ok so when I click on the readme.dm file, it asks me what to open it up as, I clicked word document and it wouldn’t open so I tried opening up in different apps like in paint and in the picture files and word pad and nothing worked. I redownloaded the file, decompressed/unzipped the file, and same thing happened.
Now with the robot, no matter how many times I switched the wires, the motors still go in the same direction as always. The only thing different is that instead of it going forward with the left arrow, it goes forward with the right arrow.
Ranger64
#10
I had the same problem and made some progress by reversing one set of motor wires. The remote now moves the robot up and down, but left and right are reversed.
mddickey
#11
Just switch the black and white wires for the right motor only. What are the results? Do not switch the orange plugs.
chainrot
#12
I won’t be able to do that until Sunday. But I did reverse the black and white wires but for both motors. nothing really happened. But I will switch it just for the one motor and I will let you know what happens then. 