Another Bluetooth issue - Starter robot - BT Version


#1

Purchased this couple years ago and after getting built and not working (bluetooth app and connections, and motors too weak to move the bot) my kids gave up on this, I am trying to figure out the various issues.

So I have reassembled the BT version. I was able to get the bluetooth to connect after 4 or 5 attemptts, but the MB APP reported unrecognized firmware. I have installed the MBOT SW on my computer, connected and reloaded the Firmware. Robot now starts up and spins. Treads moving in opposite directions is on a low friction surface, otherwise it sits still, wining as the motors are being powered, but they are “locked rotor” - so I do not like leaving it in this state for long. Motors are wired in opposite polarity, as they should be for the tank tread assembly since they are mounted in opposite orientation.

Ok - the MakeBlock android App “sees” the bot, reporting between 1.0 and 0.2 M away, but will not connect, and will not connect manually. BT module blue light is blinking. The phones bluetooth set up shows it as pared, but that is from before the FW update, it does not see the bot when scanning for available devices.

The APP reports “Please move the phone closer to your Makebot device” – I am like 6 inches away.

Phone is a Samsung Galaxy S5, Android 6.0.1.

Any guidance would be appreciated


#2

Also - is there a MBlock “scratch” file showing the default program? – So I could edit the default and make it not depend on the bluetooth?

Edit - other info.

Batteries and motors are warm, check the voltages, the batteries are down to 7.8V turned off, brand new yesterday with about 5 min total on time. When turned on they are at 7.2 and you can see them draining ( 7.240, 7.230, 7.220 - etc), in this locked rotor state. Motor voltage s 3.6V.


#3

Hi pfhandwaver,

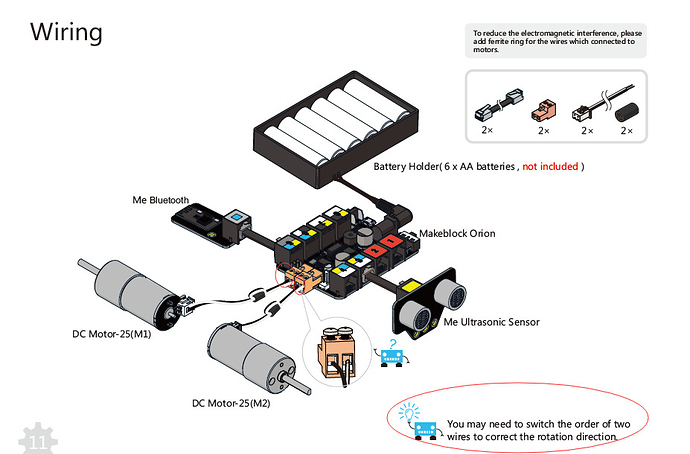
For the wiring connections for the motors, please kindly refer to the following diagram:

Besides, what’s kind of batteries do you use? We may suggest that you change the batteries have a try.
According to our test and research, it is suggested to use rechargeable Li-ion battery or rechargeable nickel-metal hydride, nickel-cadmium which can be bought from amazon or local shop. Or Alkaline battery with good quality like Energizer, DURACELL.


#4

I have an mBot Ranger and found that I needed to go to rechargeable LiPo batteries because standard Duracells just wouldn’t make the robot go (apparently not enough power). Also, if you are using the tank treads you may need to loosen the tension on the treads by moving the tension wheel to a different mounting hole.


#5

Just getting a chance to work on this now - again - thanks for the feedback. Between the bad Bluetooth, weak motors, poor support - etc. I am thinking of just re purposing the whole thing - just making it a regular arduino - “thing”. I was hoping this would spark a bug in one of my two kids, but it made them even less interested in anything like this.

I also have an IR version they never assembled -

This being suitable for 10 yearolds is bull.


#6

To be honest, a better starting kit for 10-year-olds would be the mBot STEM version. I’ve run classes where the kids were able to assemble the robots and be running in about 20-30 minutes. The mBot Ranger and/or Starter Robot seems to require more tweaking to get working. The motors are actually stronger, but in turn require better batteries from my experience. I wouldn’t give up, but the kits based on the Auriga (vs the mCore for the STEM mBot) seem to require more effort to get going with. I’ve got the Ultimate Robotic Kit 1.0 that I’ll be upgrading the processor board at some point, and it required some fiddling on my part to get going.


#7

My kids are older, but the marketing for this was 10 and up.(& Scratch is really an elementary level environment.) Took about an hour for my older son to build, he quickly got fed up when it did not work and could not get any info ( at the time 2 years ago the BT AP was third party and complete garbage). At this point hours for me to troubleshoot. I am just trying to get something back for the $100s.

All I have at this point is a “tank” that occasionally reacts to the ultrasonic sensor (BT is will not connect). I have built the same functionality with Arduino, where the hardware and software are open, and there is proper documentation, For about 30% of the cost.

Sorry - just frustrated having thrown away the money - was a longer venting message - I deleted, what is the point.


#8

I understand your frustrations. I’m currently writing a second book in my “A Gentle Introduction to Robotics” series that is based on the mBot (mCore) and the Arduino IDE to try to continue to address the lack of in depth documentation. While it’s aimed primarily at the mCore board, I’m considering potentially adding an additional part that discusses the Auriga or possibly just doing another volume that has that focus. The first part of the current book covers writing simple programs to utilize the sensors, control the motors, etc. and the second part gets into writing applications that are similar to the ones in the first book although I’ll be able to utilize more sophisticated techniques for programs like the maze solver or the sumo bot.


#9

Hello Chuck,

BTW - I would be happy to proof any of the work you do. I do not know the Aruga? – I am looking at a Particle Photon due to the low cost wireless support. I have a few PiZero but starting from scratch in Python I am not thrilled about. I am more on the electronics side, vs the software anyway…

Two things that I have come to recognize:

  1. The whole Arduino world seems to be controlled by “coders” - and not really what I would call programmers. Everything is written out in English - written word, and then snippets of code etc. Not a flowchart or SW diagram diagram in the mix, or even a summary sheet showing the functions ( in libraries for example). I learned long ago that I am a visual learner, I am not good at reading and remembering the various details, so I need quick references to get anywhere, even with functions I have used numerous times…

  2. So much of the info is Point A to Point B ( to make this do this) - which I OK for building but not so much for learning. I was trying to reverse engineer the SparkFun code for their RedBot, to try to understand how they were using PCIs to read the encoders. It was impossible, so to use the SF Encoders, that they sell separately, you would have to use the whole RedBot set up or start from scratch.

Don’t you find that the mBot core is too proprietary ( expensive and actually I do not think too durable) from a hardware standpoint?

my 2c


#10

I’ll keep that in mind when I’m closer to looking for technical reviewers and thanks for the offer.

The Auriga board is the replacement for the Orion board (as near as I can tell), but it’s used in the mBot Starter Kit and the mBot Ranger.

I wouldn’t really separate the Arduino world from the rest of the world in terms of who’s writing because that style has been the norm for the last 10-15 years. One of the points I try to keep in mind when I’m writing is that my readers have lots of different learning styles. I can’t address all of them, but I try to be orderly in presenting the material. To that end, I go through a short lifecycle that starts with requirements and goes through analysis, design, implementation, and testing with explanations for the rationale behind the choices made. It’s not perfect, but it seems to work for most people. While I understand the “hacker” ethos (not the “cracker” ethos which has co-opted the term “hacker”), it’s pretty subjective and the lack of documentation around why decisions were made often ends up being a problem. Reverse-engineering is always a challenge, mostly due to that lack of documentation.

I’m not sure that I’d consider the mBot mCore as particularly proprietary since the source code is on Github and the Makeblock folks try their best to answer any questions. The kit itself seems to be pretty durable because I’ve used it in teaching robotic programming for a couple of years now and plan to continue to do so. The mCore board packs a lot of functionality for the price, but a skilled individual may be able to DIY a board for less. My thought is that the price includes the R&D, board layout headaches, and honestly all of the work required to integrate so that end users, who are supposedly middle school children and older who may not have those skills, can get started making the robot work as quickly as possible. There are always trade-offs, but the mBot 1.0/1.1 provides a great value for the price in my experience and a good launching pad for moving into more advanced robotics.

But your mileage may vary. :slight_smile:

Best regards,

Chuck


#11