All About Motors, APP and Etc, from Makeblock Team


#1

Dear all,

Recently, we received some comments about Makeblock products on the forum. We are very sorry for all the trouble and confusion. All of which have been forwarded to our technical support team for verification already. Hope we could find out the root cause ASAP.

Meanwhile, in order to exclude those issues not really related to product, we need your kind support to check followings and try the solution we provided

After check above , if you still find

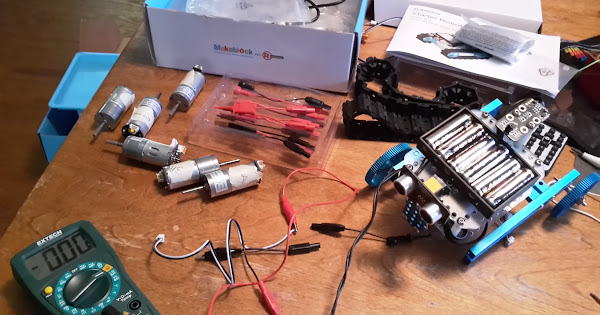
  1. The motors don’t work in normal. Please email to us via support@makeblock.cc, tell us the problem of your motors with photo or video, we will feed back in 24 hours.
  2. Bluetooth disconnection for the App. Please check whether you have update the latest firmware.
  3. Scratchbot/mBlock doesn’t work. Please re-install your Scratchbot / mBlock with our last version

Thanks and best regards.

Makeblock Team


About Motors Qustions
Thank you for choosing Makeblock product and I’m very sorry for the problem you met. Please kindly confirm below details with us to eliminate some FAQ and figure out what we can do for you, thanks.
1. Please confirm whether the motor is unable to turn right/left, or unable to run. Please also confirm if both motor is defective or just one.
2. Please rotate the wheels of your motor by hand, check whether it’s too tight or not.
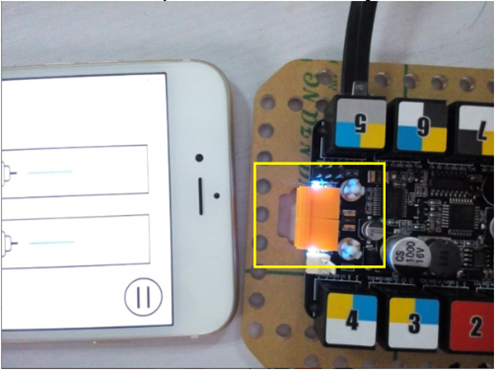
3. Please use IR remote controller or Bluetooth app to control the robot car, and observe the motor signal LED. If the LED light didn’t turn on, which indicates that there is no firmware. Please upload firmware with Arduino or mBlock. (Battery should be installed or the light won’t turned on) Please download firmware at https://github.com/Makeblock-official/Makeblock-Firmware/tree/master/mblock_firmware.

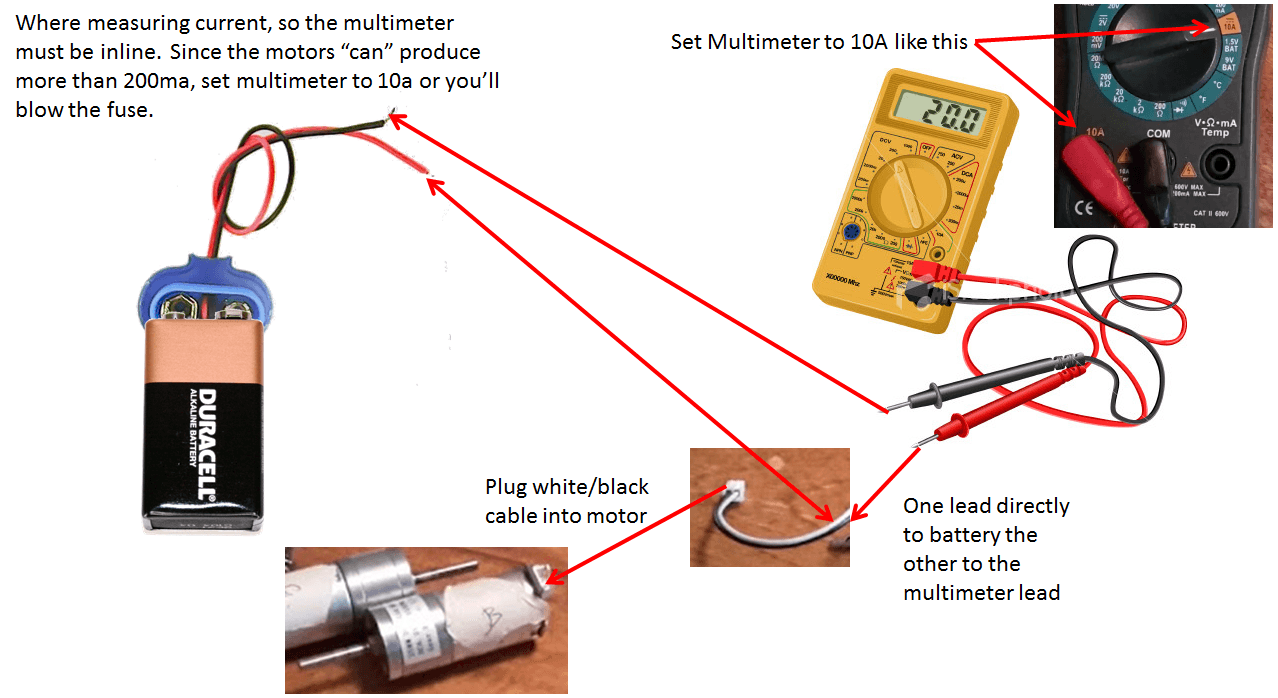
4.If the LED light is on when you control the robot car, please check the battery and wiring. Please try 6 brand new batteries or try an 11 volt lithium battery if you had one, sometimes the motor do not work is because the voltage is not enough to work.
5.Please check the wiring of motors. Unscrew the littler screws on orange motor plug, insert the motor wires (be sure to connect to the core instead of the plastic cover), and then screw tightly.


About Upgrade Firmware Qustions
Please refer to following steps to upload firmware.

  1. Turn on your robot car.
  2. Open the Bluetooth switch of your smart device (Android phone/iPhone or iPad)
  3. Open “Makeblock” APP, make sure you installed the latest version.
  4. Find your robot sample in app, click the “play” button, find the Bluetooth device named “Makeblock”, select to connect.
  5. The “Update firmware” window will pop out, click “Update”, and the window will remind you to press reset button on mainboard.
  6. After pressing reset button, the window will show a progress bar, and it will be disappeared once finished.
  7. Buzzer will beeping after finish uploading, please turn it off by hand. The switch is a tiny button next to the reset button
  8. Please turn off your robot, your Bluetooth, exit your app, and then re-connect robot to your smart device as step 4. You should be able to control the robot via Bluetooth now.

If you failed update firmware via phone, please update the firmware by your computer via USB cable.
Here you go the steps to update firmware in Arduino.

  1. Please un-plug the Bluetooth module.
  2. Please connect your mainboard to computer via USB cable.
  3. Install the driver of mainboard. Attached please find the driver for Windows, if you are using a Mac OS computer, please check the backside of your mainboard and download corresponding driver at http://app.makeblock.cc/program/.
  4. Please download the latest firmware at https://github.com/Makeblock-official/Makeblock-Firmware/tree/master/mblock_firmware, and extract it to your computer.
  5. Open Arduino.exe, click File->Open, and then select the firmware file mblock_firmware.ino. Select the correct board type (UNO for Me Orion, and Leonardo for Me Baseboard) and serial port in menu “Tool”.
  6. Click “upload” button, progress bar will appear at the bottom of Arduino.exe and the signal light will blink. Please kindly wait for a few second at this progress.
  7. Buzzer will beeping after finish uploading, please turn it off by hand. The switch is a tiny button next to the reset button.

After finished, please remove the connection, plug the Bluetooth module, and then connect to the robot via Bluetooth to check if your problem fixed, thanks.


About Bluetooth Qustions
Here you go the flow of Bluetooth connection.
1 Please check your wiring, be sure everything is correct.
2 Install 6 AA batteries for your robot, and turn it on. You should be able to find red light spot in both Bluetooth module and ultrasonic sensor module. (Be sure that your batteries are power enough, or the Bluetooth connection would be tough and unstable)
3 Turn on the Bluetooth in your smart device, open Makeblock app. (Download Makeblock Bluetooth control app at http://app.makeblock.cc/)
4 View the menu and select your robot sample picture.
5 Click “play” button or menu button (put your smart device close to the robot car), search for device.(The UI is a little bit different for Android, iPhone and iPad, please have a try, you can find “help” in the homepage menu)
6 You should be able to find “Makeblock” Bluetooth device, click to connect.
7 Touch the direction key to control your robot.
8 Explore the function of every key.

Please contact support@makeblock.cc for any question.


Bluetooth issue for mBot ranger
None of MeEncoderOnBoard samples are working
#2

Thanks for figuring out a standard way to take care of this. Other than the motors I’m loving the Makeblock kits, enough that I went and snagged the IR Starter Robot Kit tonight.


#3

I am also glad you have created a process. I will attempt to document my motor issues.

Question … is there a quick way to check the firmware version I have on my uno?


#4

HOW BOUT RECALLING YOUR 25mm MOTORS OR BEING PRO ACTIVE AND SENDING OUT GIFT CARDS OR COUPON CODES WITH PURCHASE OF ALL RADIO SHACK 25mm MOTORS.

GOOD LUCK


#5

Hi @Johnny,

honestly, I do not think this would help me much when I was struggling getting the robot work. First of all, this is just one more tutorial on your web page. One of the problems with you documentation is that you have too many less than perfect tutorials instead of a single one that “just works”. Also at the point when people are browsing your forums and find this post, they are already struggling. Why not post this to your “Getting started pages”.

As noted by other people, https://github.com/Makeblock-official/Makeblock-Firmware has four different firmware folders. The link is not much useful without good description which one should be used. And actually, I think that your FW doesn’t work with Scratch. The version of the FW you ship with Scratch uses different message format (your Scratch installer is way older than your mobile app). This is going to confuse a lot of people because they’ll need to re-upload FW every time they switch between Scratch and the cell mobile app.

You also need to specify what you mean by “motors don’t work in normal”. Somebody who tries the robot for the first time doesn’t know what is “normal”. Say something like “robot doesn’t turn on hardwood floor with new batteries”.

I seriously doubt the BT issues have anything to do with the version of the firmware. And again, a new user typically installed all the latest versions of everything they found on your web page (not to speak about your mobile app that packs FW with it and wouldn’t run without first installing it).

The same goes for your #3. New users typically installed fresh Scratchbot from your web page. As evidenced from these forums, some people are still struggling. Besides, you didn’t update Windows installer for 5 months: it is older than your ultimate robot kit how many people you think don’t have the most recent version already? This advice is hardly going to help anybody.

Michal


#6

Thanks for posting the new FAQs, it is a great idea. And they are well executed too. They should be linked somewhere from the main page.


#7

#8

This topic is now a banner. It will appear at the top of every page until it is dismissed by the user.


#9

This topic is no longer a banner. It will no longer appear at the top of every page.


#10

I got loads of the ultimate kits and the basic I/r and bluetooth kits for my school. so far it is a disaster. I have Scratchbot and Arduino IDE working ok, but of course the motors don’t work. It is not torque or voltage. PWM should allow motors to creep at a super slow
speed. Instead they just whistle until high enough power, then they start running but with no real power. Hardly enough to overcome friction of drive system. I think the inductance of the motor just doesn’t like the switching frequency. Can you try reducing the pwm switching frequency?

Makeblock, please don’t drag this out. it could make or break your product. Robots without working motors… useless.

All the basic info given here should not be needed because the product should just work!

Has anyone tried running the motors off a basic variable output power supply? With no load, at 6v dc I would expect the motors to run smooth and draw no more than 250ma. they should start turning on as little as 1volt would expect, but on straight dc their won’t be much torque.

Jon.


#11

I have an ultimate kit and the motors seem under powered, even with new batteries. After setting the motor power settings in Arduino to higher values (220) I can get the tank to run forwards and backwards but can turn only by running the two sides at different rates in the same direction (255/220). Attempts to run the two sides in opposite directions to turn on the spot (as per the starter kit examples) just stall the motors. Your notes above mention applying 11V power instead of the normal 9V, but my question is what voltage can I safely apply to the motors and Orion card? I have an old rechargeable racing pack (8xrecharagble Ni-MH AAs) which says its 9.6V but unloaded appears to produce 12V, and I have a battery holder for 8xAA which I can put Alkalines and would also expect to produce 12V. Is 12V safe to use, the description of the Orion card indicates 6V-12V input so I am assuming that is going to be OK? Does anyone have experience of doing so as I don’t want to fry the card or motors?


#12

they recalled them: http://forum.makeblock.cc/t/notification-replacement-of-25mm-defective-motor/917


#13

I ended up doing this (using an old RC pack), but i the end realized the motors were defective internally. I ended up getting a replacement and the robot works fanastic.

See: http://forum.makeblock.cc/t/notification-replacement-of-25mm-defective-motor/917


#14

Thanks I obtained an 8xAA and a 10xAA battery holder and have tried these with both Alkaline (1.5v) and rechargeable Hybrid NiMh (1.2v) batteries and got a really good result with either. My tank now charges around the room at a good speed (and can turn on the spot) so the extra couple of volts seems enough to do it.


#15

I have similar motor issues and even after contacting support, answering their questions and posting videos, no luck.

I even posted a YouTube video and hopefully that helps. But at this point I have a starter and ultimate kit that’s as good as a paperweight. https://youtu.be/jcyFzR7A6pQ


#16

Pioneer or anyone from support reading this thread?


#17

Directly connected to the battery pack that came with the kits here’s the results of the motors. Note the letter refers to the kit. The number to the 1st or 2nd motor in that kit.

1a:180ma
1b: 200ma
2a: 170ma
2b: 190ma
3a: 180ma
3b: 200ma

Note that 1b & 3b are the highest and at points for split seconds hit 210ma.

Voltage of the built in pack was around 8.7v. Using a fresh 9v battery with a metered voltage of 9.2v all the amps above increased by 10ma respectively. This agrees with the posts where people upgraded the battery pack to a 12v to get better results.


#18

@shaiss : just picked up another kit, for a nephew. Pulled out the motors and put them in my original (perfectly functional) kit’s tank to test em. They barely move it, so I guess this new kit has bum motors. What exactly were you doing to get those milliamp results, exactly? Motor to battery pack to …voltmeter?.. I am not much of an electrician and would appreciate a for dummies guide to what exactly is going wrong and how to test for it. When I have the time I am going to set up a torque comparison test between the new and old motors, was thinking about just lifting a series of dead weights on string until the motor gives up…


#19

Here’s some of the photos/videos when I was testing:
11 new photos by Shai Perednik

None show a good overview of the circuit, so I put this together to illustrate:

You should see your multimeter bounce a bit similar to the video. Note that you are testing at 9V which is misleading since the motors are rated for 6V and the orion board only puts out 6V. SO, if you’re getting 200ma at 9v you’re going to get less at 6V. I haven’t proven this out since I don’t have a working motor. 0 for 6 so far :frowning:


#20

Outstanding. I will post some comparison results when I have time to set this up, between my two good motors and my two apparently bad ones. Along with a torque test hopefully.